Extron DA HD 8K L Manual
Read below 📖 the manual in Italian for Extron DA HD 8K L (2 pages) in the Receiver category. This guide has been helpful for 19 people and has been rated 4.5 stars on average by 2 users
Page 1/2

1
DA4 HD 8K L and DA6 HD 4K L • Setup Guide
IMPORTANT NOTE:
Go to www.extron.com for the complete user guide, installation instructions, and specications before connecting
the product to the power source.
This guide provides basic instructions for an experienced technician to install the DA HD 8K L distribution ampliers.
Overview
The Extron DA4 HD 8K L and DA6 HD 8K L distribution ampliers distribute one HDMI input signal to four or six outputs
simultaneously at resolutions up to 8K @ 30 Hz 4:4:4 or 8K @ 60 Hz 4:2:0, and comply with HDMI 2.1 and HDCP 2.2. The DAs also
feature EDID Minder
®
Plus, remote control and monitoring via Ethernet, USB, or RS-232, and discrete display control via CEC.
For complete instructions, see the DA HD 8K L Series User Guide at www.extron.com.
Front Panel
DA4 HD 8K L
CONFIG
INPUT
1
SIGNAL
HDCP
e
2 3 4
OUTPUTS
DA6 HD 8K L
CONFIG
INPUT
1
SIGNAL
HDCP
e
2 3 4 5 6
OUTPUTS
A
A
A
A
A
A C
C
C
C
C
CB
B
B
B
B
B D
D
D
D
DD
A
— Lights when power is applied to the unit.Power status LED
B
USB-C Config port — Connect a PC to this port to configure and monitor the DA via Simple Instruction Set (SIS™ ™) or
Product Configuration Software (PCS).
C
— Input LEDs
• Signal LED — Lights when a TMDS signal is detected on the HDMI input. If the source requires HDCP encryption, this LED
may light only when HDCP is authenticated.
• HDCP LED — Lights when the source requires HDCP encryption and it has been authenticated with the HDMI input.
D
— Outputs LEDs
• HDCP LEDs — Light when HDCP is authenticated between a DA output and the corresponding sink device.
• Signal LEDs — Light when HPD is detected from the corresponding sink device and a TMDS signal is detected at the
input.
Rear Panel
POWER
12V
--A MAX
21 43
INPUT
REMOTE
OUTPUTS
LAN
RS - 232
Tx R x G
R
POWER
12V
--A MAX
21 63 4 5
INPUT
REMOTE
OUTPUTS
LAN
RS - 232
Tx R x G
R
D
D
D
D
DD
A
A
A
A
AA
B
B
B
B
BB
E
E
E
E
E
E F
F
F
F
FF
C
C
C
C
CC
A
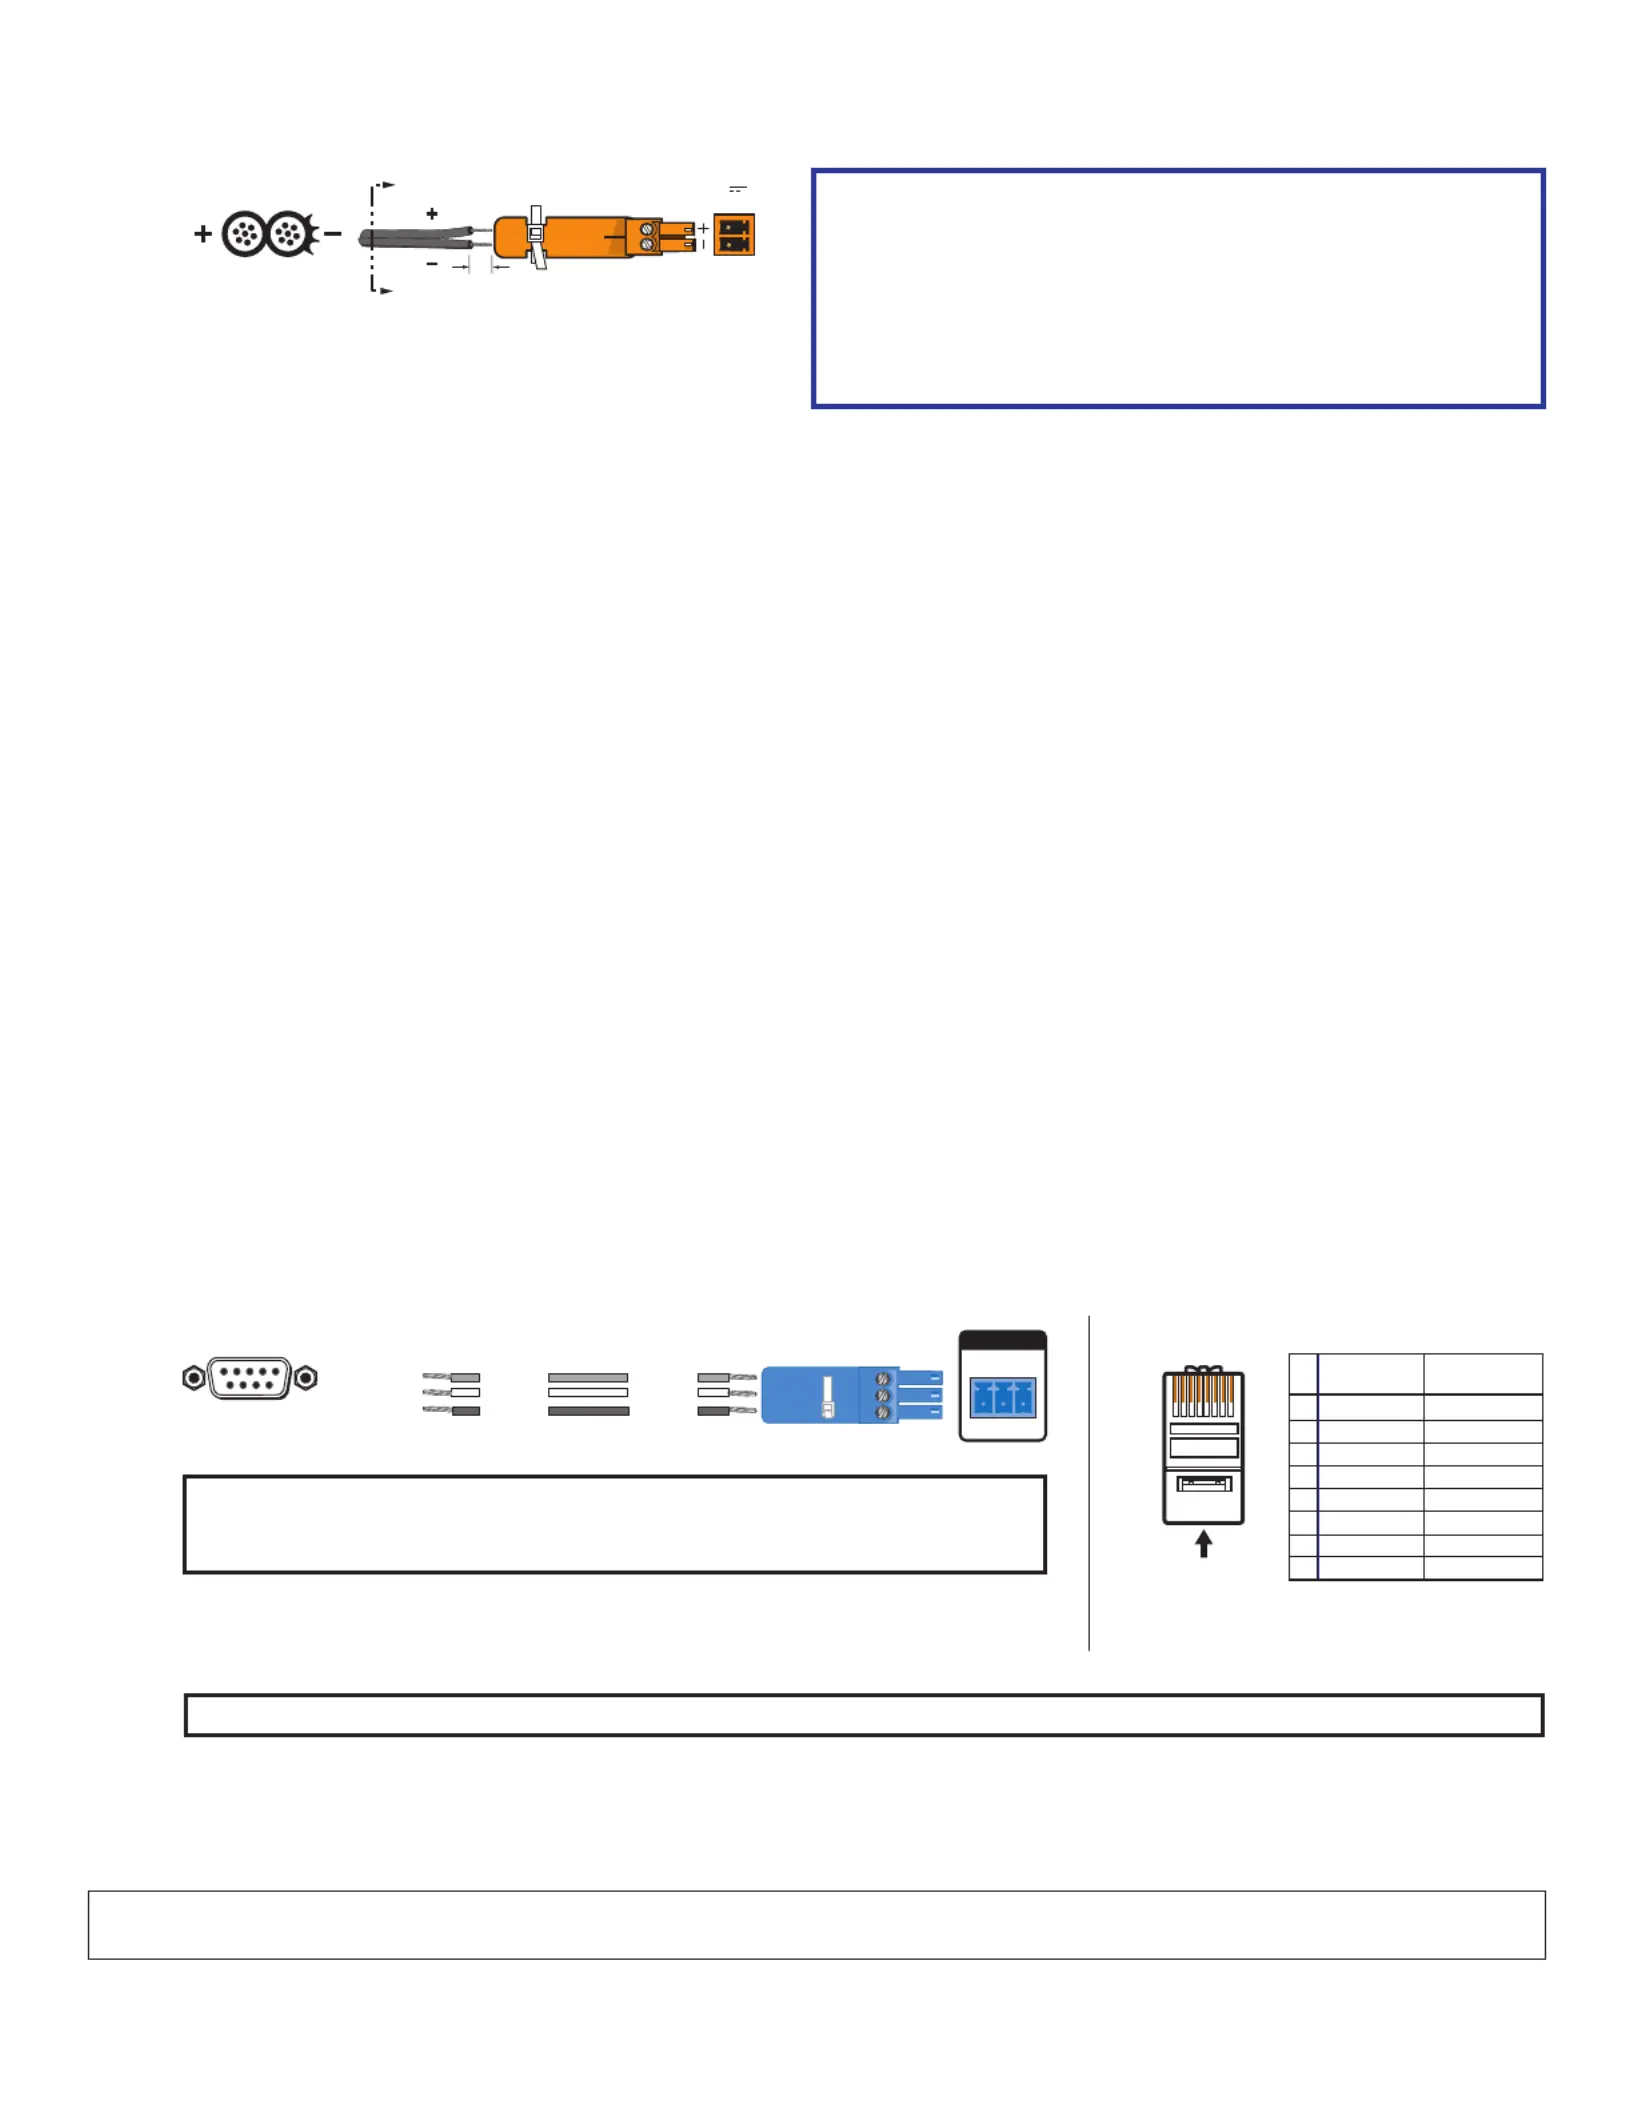
Power input — Connect the provided 12 VDC, 3.0 A power supply to this 2-pole 3.5 mm captive screw port (see the power
Attention and diagram to wire the connector on ).page 2
2
68-3435-50 Rev. A
08 24
SECTION A–A
Ridges
Smooth
A
A
3/16"
(5 mm) Max.
POWER
12V
--A MAX
ATTENTION:
• Do not connect the power supply before reading the
Attention in the Power Supply section of the DA HD 8K L
Series User Guide.
• Ne branchez pas la source d’alimentation externes
avant d’avoir lu les mises en garde dans la section
« Power Supply » du DA HD 8K L Series User Guide.
B
(see on page 1HDMI input Rear Panel ) — Connect a source device to this female HDMI type A input.
C
HDMI outputs — Connect up to four or six display devices to these female HDMI type A outputs.
D
Remote RS-232 port — Connect the provided 3-pole captive screw connector for SIS configuration, monitoring, and firmware
updates (Pin 1 = Tx, Pin 2 = Rx, Pin 3 = Ground). Protocol: 9600 baud, 8 data bits, 1 stop bit, no parity.
E
LAN port — Connect to an Ethernet LAN or WAN via this RJ-45 port to control the DA from a remote location. When connected
to an Ethernet LAN or WAN, the DA can be accessed and operated from a computer with a standard internet browser.
Ethernet connection indicators — The Link and Activity LEDs indicate the status of the Ethernet connection.
• Green Link LED — Indicates the distribution amplier is properly connected to an Ethernet LAN. This LED lights steadily.
• Amber Activity LED — Indicates transmission of data packets on the RJ-45 port. This LED ickers as the distribution
amplier communicates.
F
Reset button — Use an Extron Tweeker or small screwdriver to press and hold the button while the DA is running or while
powering up, for different reset levels.
• Press and hold the reset button while applying power to revert to factory default rmware for a single power cycle, but
maintain IP settings.
• Press and hold the reset button for 3 seconds and again for <1 second within 1 second to reset the unit to factory settings.
• Press and hold the reset button for 6 seconds and again for <1 second after the LED blinks twice to reset all IP settings
back to factory defaults.
• Press and hold reset button for 9 seconds and again for <1 second after the LED blinks 3 times to reset all settings to
default except the rmware.
Installation
1. Mount the DA in a suitable location with one of the recommended mounting kits (see www.extron.com for mounting options).
Follow the instructions provided with the mounting kit.
2. If required, connect a control PC to the USB-C Cong port (see Front Panel,
B
on page 1), Remote RS-232 port (see Rear
Panel,
D
, see the diagram below for wiring), or LAN port (
E
, see the diagram below, right for wiring).
RS-232
Tx Rx G
REMOTE
TransmitReceive
ReceiveTransmit
GroundGround
DB9 Pin Locations
Female
5 1
9 6
Pin 2 = Rx
Pin 3 = Tx
Pin 5 = G
Computer DA HD 8K
NOTE: Use PCS to congure EDID Minder, mute the video signal, mute the
audio signal, adjust the video color bit depth, or monitor the signal and
HDCP status (see the DA HD 8K L Series Help File).
3. Connect the display devices to the rear panel HDMI outputs (see Rear Panel,
C
)
and power them on.
12345678
RJ-45 Connector
Insert Twisted
Pair Wires
Pins:
Pin
1
2
3
4
5
6
7
8
Wire color
White-green
Green
White-orange
Blue
White-blue
Orange
White-brown
Brown
Wire color
T568A T568B
White-orange
Orange
White-green
Blue
White-blue
Green
White-brown
Brown
4. Connect the source device to the rear panel HDMI input (
B
).
NOTE: Use the LockIt
®
HDMI cable lacing brackets provided to secure the HDMI connectors.
5. Connect the provided 12 VDC, 3.0 A power supply to the 2-pole captive screw inlet (
A
, see the diagram at the top of the page
to wire the connector).
6. Power on the source device.
For information on safety guidelines, regulatory compliances, EMI/EMF compatibility, accessibility, and related topics, see the Extron
Safety and Regulatory Compliance Guide on the Extron website.
© 2024 Extron — All rights reserved. www.extron.com
All trademarks mentioned are the property of their respective owners.
Worldwide Headquarters: Extron USA West, 1025 E. Ball Road, Anaheim, CA 92805, 800.633.9876
Product Specifications
| Brand: | Extron |
| Category: | Receiver |
| Model: | DA HD 8K L |
Do you need help?
If you need help with Extron DA HD 8K L, ask a question below and other users will answer you
Receiver Extron User Manuals

13 October 2024
13 October 2024
13 October 2024
13 October 2024
13 October 2024
13 October 2024
13 October 2024
13 October 2024
13 October 2024
13 October 2024
Receiver User Manuals
- Receiver Sony
- Receiver Bosch
- Receiver Brondi
- Receiver Jensen
- Receiver Hartke
- Receiver Goobay
- Receiver Avantree
- Receiver Cayin
- Receiver Axton
- Receiver Kogan
- Receiver Yamaha
- Receiver Lindy
- Receiver Pioneer
- Receiver NuPrime
- Receiver Ecler
- Receiver AudioControl
- Receiver Rotel
- Receiver Toa
- Receiver Marantz
- Receiver Pyle
- Receiver Wet Sounds
- Receiver JVC
- Receiver VMV
- Receiver S.M.S.L
- Receiver Kicker
- Receiver Auna
- Receiver OSD Audio
- Receiver Power Dynamics
- Receiver DataVideo
- Receiver Audizio
- Receiver Vonyx
- Receiver Bluesound
- Receiver Blackstar
- Receiver Cambridge
- Receiver MB Quart
- Receiver Aplic
- Receiver CSL
- Receiver NUVO
- Receiver Block
- Receiver Smart-AVI
- Receiver Advance
- Receiver Artsound
- Receiver Denon
- Receiver Yorkville
- Receiver Valcom
- Receiver Mosconi
- Receiver JBL
- Receiver Helix
- Receiver Soundstream
- Receiver Bellari
- Receiver Rolls
- Receiver Ground Zero
- Receiver Karma
- Receiver Glemm
- Receiver EA
- Receiver Match
- Receiver Renkforce
- Receiver Scansonic
- Receiver SPL
- Receiver Audiotec Fischer
- Receiver Crunch
- Receiver A-NeuVideo
- Receiver Classé
- Receiver FoneStar
- Receiver Monitor Audio
- Receiver Peavey
- Receiver Crown
- Receiver Fosi Audio
- Receiver Graupner
- Receiver Antelope Audio
- Receiver Vaddio
- Receiver ESX
- Receiver Omnitronic
- Receiver Russound
- Receiver MEE Audio
- Receiver GigaBlue
- Receiver Mx Onda
- Receiver Black Hydra
- Receiver Electro-Voice
- Receiver Boss
- Receiver JL Audio
- Receiver Shanling
- Receiver Atlas Sound
- Receiver Ashly
- Receiver Audiolab
- Receiver Memphis Audio
- Receiver AVM
- Receiver Primare
- Receiver PureLink
- Receiver Kramer
- Receiver ATen
- Receiver Blustream
- Receiver Yaesu
- Receiver Musical Fidelity
- Receiver RDL
- Receiver Dynacord
- Receiver Ferguson
- Receiver DAP Audio
- Receiver REL Acoustics
- Receiver Inovonics
- Receiver BZBGear
- Receiver Ram Audio
- Receiver Strong
- Receiver Phoenix Gold
- Receiver HiFi ROSE
- Receiver Intelix
- Receiver Comprehensive
- Receiver Deaf Bonce
- Receiver Fiio
- Receiver Lab Gruppen
- Receiver GlobalSat
- Receiver AVMATRIX
- Receiver Koda
- Receiver Technical Pro
- Receiver Marshall Electronics
- Receiver Naim
- Receiver Anthem
- Receiver Audison
- Receiver Hifonics
- Receiver Geemarc
- Receiver Loxjie
- Receiver Clare Controls
- Receiver Edwards Signaling
- Receiver Hegel
- Receiver August
- Receiver PTN-electronics
Latest Receiver User Manuals
27 October 2024
27 October 2024
27 October 2024
27 October 2024
27 October 2024
27 October 2024
27 October 2024
27 October 2024
27 October 2024
27 October 2024