Impact VS-LCD400 Manual
Read below 📖 the manual in Italian for Impact VS-LCD400 (16 pages) in the Lamp category. This guide has been helpful for 21 people and has been rated 4.5 stars on average by 2 users
Page 1/16

VS-LCD Series Flash
INSTRUCTIONS
www.impactstudiolighting.com
impact
Page 16
(back cover)
Page 1
(front cover)
To see all of our lighting equipment,
please visit our Web site
10M 25M 50M 75M 100M 10Y 25M 50M 75M 100M

2
Thank you for purchasing the Impact VS-LCD Series Studio Strobe. This
light incorporates numerous advanced features, and was designed to
provide many years of trouble-free service. Please read these operating
instructions and safety precautions carefully before operating this
equipment.
Features
• A tactile, “grippy” feel that resists slipping and shock damage
• Cushioned “touch-pad” function control buttons
• Liquid Crystal Display
• Five Stop Range – full power to 1/16th power in .10 f/stop increments
• Red Eye Reduction function
• “Auto Dump” excess power release circuitry
• User-replaceable ash tube
• Commonly available 1/8” mini plug ash sync input
• Universal IEC C13 type computer power cord
• 7˝ grid reector
• Voltage: 100-120V 50-60Hz
• Built-in optical slave
Power Requirements
This light is designed for use with 110/120V AC power only, and is supplied with a
3-prong, grounded plug. Do not attempt to defeat this safety feature. If necessary, use
only grounded extension cords rated for 10 amps or greater.
Warning
There are no user-serviceable parts inside the unit. Only qualied service engineers
should access the inside of the case (Danger – high voltage parts inside). Avoid damage
to both the ash tube and modeling lamp. If the modeling lamp becomes cracked or
damaged in any way, it should be replaced immediately. Do not use your ash unit in an
environment where moisture or ammable vapor is likely to come in contact with the unit.
Turn the power off and unplug the power cord when the unit is not in use. Always remove
the modeling lamp and replace the protective cap when transporting the unit. Avoid
strong light falling onto the slave cell as it will prevent efcient operation. If the strobe
blows a fuse, a replacement fuse can be inserted in the pull-out compartment on the
back of the unit. To ensure long life of the ash capacitors, the ash unit should be
powered up and red several times at least every two months.
Page 2 Page 15
One-Year Limited Warranty
10M 25M 50M 75M 100M 10Y 25M 50M 75 M 100M
3
Contents of carton
Carefully remove the ash unit from the box. You should have the following:
• 110-120V ash unit with protective cap and ash tube installed
• 150W modeling lamp
• 7˝ grid reector • 11´ sync cable
• power cable • user manual
Mount on a stand
Select a stand or support system of suitable weight and dimensions to ensure stable
operation of the unit.
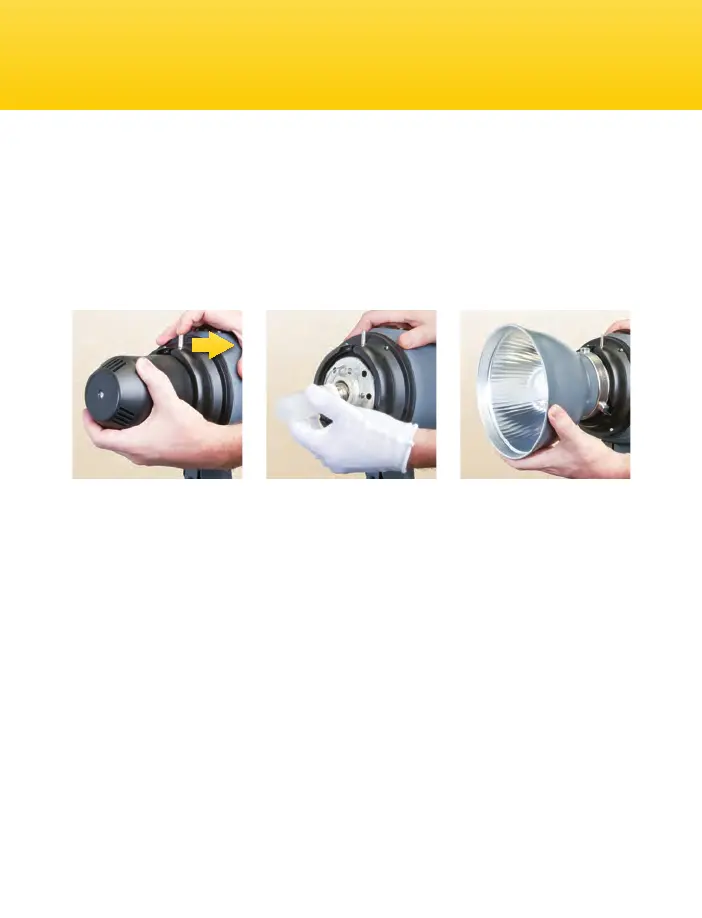
Install Reector & Modeling Lamp
Depress the latch above the protective cap. Rotate the cap counter-clockwise. Pull the
cap off and set aside. Install the modeling lamp by screwing it into the threaded socket.
CAUTION: Do not touch the lamp with your bare hands. Oil residue from your ngers can
cause the surface of the lamp to heat unevenly and explode. Use white cotton gloves or a
clean cloth. Install the reector where the protective cap was before. Align the three
pegs on the reector with the three slots, press the reector in and rotate clockwise
until it locks in place.
Note: Take care when tting or removing reectors or softboxes to not damage the ash
tube assembly. The ash tube is very delicate. Always switch off the unit and disconnect
the power before tting or changing lamps, ash tubes, reectors or softboxes.
Preparing Your Flash for Use
Safety Notes
• Do not use your ash in an environment where moisture
may come in contact with the unit.
• A re hazard exists if ammable materials are placed in close proximity
to the ash tube or the modeling lamp. Do not use your ash
in an environment where ammable vapors are present.
• Do not restrict the ventilation holes when the ash is in use.
• Always switch off the power and disconnect the power cord
before changing the fuse, modeling lamp, or ash tube.
• Avoid placing cables where they can be tripped over.
Replace damaged cords immediately.
• Never use a ash unit with damaged covers, moldings, ash tube,
or modeling lamp. If the unit is dropped or damaged,
have it checked by a professional repair service before using.
• Due to the high voltage circuitry inside this device,
do not attempt to disassemble or repair the unit yourself.
• Keep out of the reach of children
Maintenance Notes
• Turn the power off and unplug the power cord when the ash is not in use.
• We recommend charging the ash unit for one to two hours prior to its initial use
and after an extended period of inactivity (more than two weeks).
• If the unit is left unused for a few months, or the unit has been used predominantly
at low power settings, we recommend that the power be increased
to the maximum and the unit left switched on (with the modeling lamp OFF)
occasionally for at least 30 minutes to help preserve the life of the capacitors.
• Avoid rapid, high-power ashing, especially when using restrictive reectors
such as snoots or grids. Excessive heat will shorten the lifespan of your ash unit,
modeling lamp, and ash tube.
Safety and Maintenance Notes
Page 14 Page 3
10M 25M 50M 75M 100M 10Y 25M 50M 75M 100M
Product Specifications
| Brand: | Impact |
| Category: | Lamp |
| Model: | VS-LCD400 |
Do you need help?
If you need help with Impact VS-LCD400, ask a question below and other users will answer you
Lamp Impact User Manuals

17 October 2024
17 October 2024
17 October 2024
17 October 2024
17 October 2024
17 October 2024
17 October 2024
17 October 2024
17 October 2024
17 October 2024
Lamp User Manuals
- Lamp Sony
- Lamp Samsung
- Lamp Xiaomi
- Lamp IKEA
- Lamp Philips
- Lamp AFX
- Lamp Hama
- Lamp Neewer
- Lamp Hazet
- Lamp Topeak
- Lamp Schwaiger
- Lamp Godox
- Lamp Integral LED
- Lamp Golden Lighting
- Lamp ET2
- Lamp Quoizel
- Lamp Crystorama
- Lamp Brennenstuhl
- Lamp Aputure
- Lamp NEO Tools
- Lamp Westinghouse
- Lamp Dainolite
- Lamp EMOS
- Lamp Nanlite
- Lamp Cameo
- Lamp BeamZ
- Lamp Livoo
- Lamp Steinel
- Lamp Flex
- Lamp Maxim
- Lamp Brandson
- Lamp NUVO
- Lamp Sonneman
- Lamp Elgato
- Lamp Ansmann
- Lamp V-Tac
- Lamp Elation
- Lamp Fredrick Ramond
- Lamp Chauvet
- Lamp Karma
- Lamp Ridem
- Lamp Black Diamond
- Lamp Dedra
- Lamp Ozito
- Lamp Hansa
- Lamp Eurolite
- Lamp Casalux
- Lamp Profoto
- Lamp Petzl
- Lamp Gravity
- Lamp Olight
- Lamp Altman
- Lamp Setti+
- Lamp Kanlux
- Lamp Xline
- Lamp ARRI
- Lamp Ledlenser
- Lamp Perfect Christmans
- Lamp XCell
- Lamp Jinbei
- Lamp Apa
- Lamp Bolt
- Lamp Heitronic
- Lamp Theben
- Lamp Raya
- Lamp Lucide
- Lamp Hensel
- Lamp Waldmann
- Lamp Kind LED
- Lamp Zafferano
- Lamp Zadro
- Lamp August
Latest Lamp User Manuals
27 October 2024
27 October 2024
27 October 2024
27 October 2024
26 October 2024
26 October 2024
26 October 2024
26 October 2024
26 October 2024
26 October 2024