Kicker PXA500.1 Manual
Read below 📖 the manual in Italian for Kicker PXA500.1 (20 pages) in the Receiver category. This guide has been helpful for 26 people and has been rated 4.5 stars on average by 2 users
Page 1/20

PXA MONO AMPLIFIERS
PXA200.1 | PXA500.1
Owner’s Manual | English
Manual del Propietario | Español
AMPLIFICADOR DEL LA SERIE PXA.1
Benutzerhandbuch | Deutsch
MONOVERSTÄRKER DER PXA.1-SERIE
Manuel d’utilisation | Française
AMPLIFICATEUR DE SÉRIE PXA.1
PXA
Amplifiers
2015 PXA Mono Amplifiers Rev F.indd 12015 PXA Mono Amplifiers Rev F.indd 1 10/23/2015 2:31:41 PM10/23/2015 2:31:41 PM

2
PXA.1-SERIES AMPLIFIERS
OWNER’S MANUAL
INSTALLATION
Mounting: Choose a structurally sound location to mount your KICKER amplifi er. Make sure there are no items
behind the area where the screws will be driven. Choose a location that allows at least 4” (10cm) of open
ventilation for the amplifi er. Drill four holes using a 7/64” (3mm) bit and use the supplied #8 screws to mount the
amplifi er.
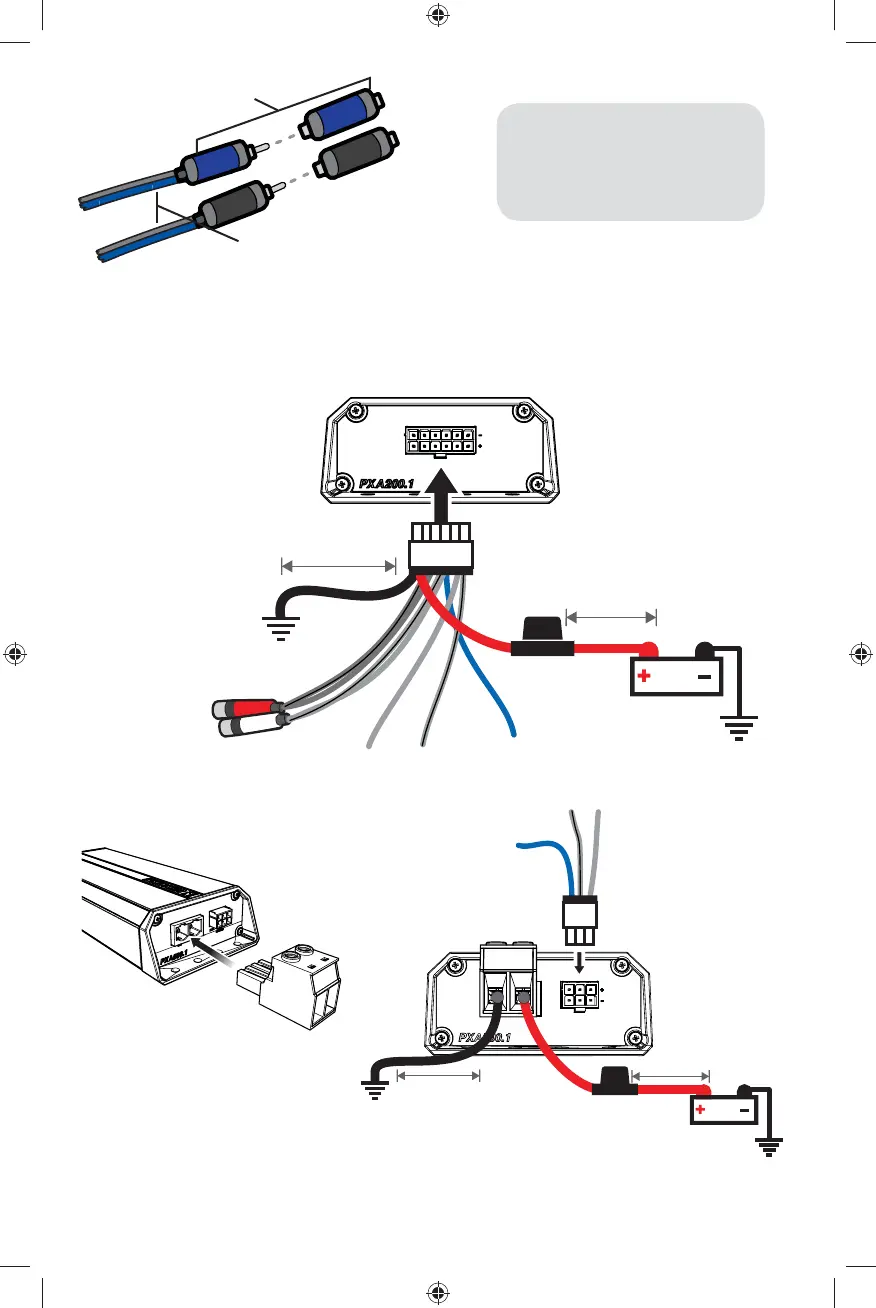
Wiring: Disconnect the vehicle’s battery to avoid an electrical short. Then, connect the PXA harness to the
amplifi er. A good ground connections is important. If this amplifi er is mounted in the front fairing of a motorcycle, it
will be best to extend the ground wire all the way to the battery.
The PXA amplifi ers have the capability to receive almost any level of input signal. If a Hi-Level signal is coming
from the speaker leads of the source unit, simply cut off the RCA jacks and connect it directly to the exposed
wires. Set the Input Level switch to Hi. Set the Auto Turn-On to DC. If speaker leads are not available from your
source unit, use an RCA stereo cable to connect directly to the RCA connectors of the PXA amplifi er. Set the
Input Level switch to Lo. Set the Auto Turn-On switch to +12V, and use the blue remote trigger wire to turn the
amplifi er on.
PERFORMANCE
Authorized KICKER Dealer:
Purchase Date:
Serial Number:
Model: PXA200.1 PXA500.1
RMS Power [Watts]
@ 14.4V, 4Ω mono, ≤ 1% THD+N
@ 14.4V, 2Ω mono, ≤ 1% THD+N
@ 14.4V, 1 mono, ≤ 1% THD+N
@ 14.4V, 0.5 mono, ≤ 1% THD+N
25 x 1
50 x 1
100 x 1
200 x 1
250 x 1
500 x 1
N/A
N/A
Length [in, cm] 4-3/4, 12 8-1/4, 21
Height [in, cm] 1-9/16, 4 1-9/16, 4
Width [in, cm] 3-7/16, 8.7 3-7/16, 8.7
Frequency Response [Hz] 25 - 120 25 - 120
Signal-to-Noise Ratio [dB] 95 95
Input Sensitivity Low Level: 125mV–5V
High Level: 250mV–10V
Low Level: 125mV–5V
High Level: 250mV–10V
Electronic Crossover Selectable 60Hz, 80Hz, 100Hz or
120Hz low pass; 24dB/octave slope
Selectable 60Hz, 80Hz, 100Hz or
120Hz low pass; 24dB/octave slope
KickEQ™ Bass Boost Selectable 0 or +6dB @ 40Hz Selectable 0 or +6dB @ 40Hz
Subsonic Filter 25Hz, 24dB/octave slope 25Hz, 24dB/octave slope
Remote Bass Yes Yes
Pro Tip: To get the best performance from your new KICKER Amplifi er and extend the warranty by 1 year, use
genuine KICKER accessories and wiring.
MODEL: PXA200.1 | PXA500.1
IMPORTANT SAFETY WARNING –
PROLONGED CONTINUOUS OPERATION OF
AN AMPLIFIER IN A DISTORTED OR CLIPPED
MANNER CAN CAUSE YOUR AUDIO SYSTEM
TO OVERHEAT, POSSIBLY CATCHING FIRE
AND RESULTING IN SERIOUS DAMAGE TO
YOUR COMPONENTS AND/OR VEHICLE.
2015 PXA Mono Amplifiers Rev F.indd 22015 PXA Mono Amplifiers Rev F.indd 2 10/23/2015 2:31:51 PM10/23/2015 2:31:51 PM
3
12V
12V
Model External Fuse
PXA200.1 1 x 15 Ampere
PXA500.1 1 x 45 Ampere
battery
external fuse
(15A)
external fuse
(45A)
remote
turn-on
remote turn-on
speaker outputs
speaker outputs
+
+
-
-
RCA inputs
(remove to use
hi-level input)
bare-metal chassis ground
bare-metal chassis ground
bare-metal
chassis
ground
insert power and
ground terminal
adapter
bare-metal
chassis ground
≤18”
(45cm)
≤18”
(45cm)
≤24”
(60cm)
≤24”
(60cm)
Cut the looped red power cable located on the PXA harness and install a 15A (PXA200.1) or 45A (PXA500.1)
fuse. Fuse installation should be within 18” (45cm) of the battery and in-line with the harness’ power cable, which
is connected to your amplifi er. If you ever need to remove the amplifi er from the vehicle after it has been installed,
the ground wire should be the last wire disconnected from the amplifi er--just the opposite as when you installed it.
PXA200.1
PXA500.1
KICKER KISL (optional)
from source unit high-level speaker outputs
to amplifi er
PXA500.1: Use 8 gauge wire if the
power wire is greater than 10 feet in
length; 10 gauge if less.
2015 PXA Mono Amplifiers Rev F.indd 32015 PXA Mono Amplifiers Rev F.indd 3 10/23/2015 2:31:51 PM10/23/2015 2:31:51 PM
Product Specifications
| Brand: | Kicker |
| Category: | Receiver |
| Model: | PXA500.1 |
Do you need help?
If you need help with Kicker PXA500.1, ask a question below and other users will answer you
Receiver Kicker User Manuals

14 October 2024
14 October 2024
14 October 2024
14 October 2024
14 October 2024
14 October 2024
14 October 2024
14 October 2024
14 October 2024
14 October 2024
Receiver User Manuals
- Receiver Sony
- Receiver Bosch
- Receiver Brondi
- Receiver Jensen
- Receiver Hartke
- Receiver Goobay
- Receiver Avantree
- Receiver Cayin
- Receiver Axton
- Receiver Kogan
- Receiver Yamaha
- Receiver Extron
- Receiver Lindy
- Receiver Pioneer
- Receiver NuPrime
- Receiver Ecler
- Receiver AudioControl
- Receiver Rotel
- Receiver Toa
- Receiver Marantz
- Receiver Pyle
- Receiver Wet Sounds
- Receiver JVC
- Receiver VMV
- Receiver S.M.S.L
- Receiver Auna
- Receiver OSD Audio
- Receiver Power Dynamics
- Receiver DataVideo
- Receiver Audizio
- Receiver Vonyx
- Receiver Bluesound
- Receiver Blackstar
- Receiver Cambridge
- Receiver MB Quart
- Receiver Aplic
- Receiver CSL
- Receiver NUVO
- Receiver Block
- Receiver Smart-AVI
- Receiver Advance
- Receiver Artsound
- Receiver Denon
- Receiver Yorkville
- Receiver Valcom
- Receiver Mosconi
- Receiver JBL
- Receiver Helix
- Receiver Soundstream
- Receiver Bellari
- Receiver Rolls
- Receiver Ground Zero
- Receiver Karma
- Receiver Glemm
- Receiver EA
- Receiver Match
- Receiver Renkforce
- Receiver Scansonic
- Receiver SPL
- Receiver Audiotec Fischer
- Receiver Crunch
- Receiver A-NeuVideo
- Receiver Classé
- Receiver FoneStar
- Receiver Monitor Audio
- Receiver Peavey
- Receiver Crown
- Receiver Fosi Audio
- Receiver Graupner
- Receiver Antelope Audio
- Receiver Vaddio
- Receiver ESX
- Receiver Omnitronic
- Receiver Russound
- Receiver MEE Audio
- Receiver GigaBlue
- Receiver Mx Onda
- Receiver Black Hydra
- Receiver Electro-Voice
- Receiver Boss
- Receiver JL Audio
- Receiver Shanling
- Receiver Atlas Sound
- Receiver Ashly
- Receiver Audiolab
- Receiver Memphis Audio
- Receiver AVM
- Receiver Primare
- Receiver PureLink
- Receiver Kramer
- Receiver ATen
- Receiver Blustream
- Receiver Yaesu
- Receiver Musical Fidelity
- Receiver RDL
- Receiver Dynacord
- Receiver Ferguson
- Receiver DAP Audio
- Receiver REL Acoustics
- Receiver Inovonics
- Receiver BZBGear
- Receiver Ram Audio
- Receiver Strong
- Receiver Phoenix Gold
- Receiver HiFi ROSE
- Receiver Intelix
- Receiver Comprehensive
- Receiver Deaf Bonce
- Receiver Fiio
- Receiver Lab Gruppen
- Receiver GlobalSat
- Receiver AVMATRIX
- Receiver Koda
- Receiver Technical Pro
- Receiver Marshall Electronics
- Receiver Naim
- Receiver Anthem
- Receiver Audison
- Receiver Hifonics
- Receiver Geemarc
- Receiver Loxjie
- Receiver Clare Controls
- Receiver Edwards Signaling
- Receiver Hegel
- Receiver August
- Receiver PTN-electronics
Latest Receiver User Manuals
27 October 2024
27 October 2024
27 October 2024
27 October 2024
27 October 2024
27 October 2024
27 October 2024
27 October 2024
27 October 2024
27 October 2024