Magnus VT-200 Manual
Read below 📖 the manual in Italian for Magnus VT-200 (5 pages) in the Tripod category. This guide has been helpful for 27 people and has been rated 4.5 stars on average by 2 users
Page 1/5

Owner’s
Manual
Video Tripod
VT-100/200/300/350
5/4/18 11:48 AM
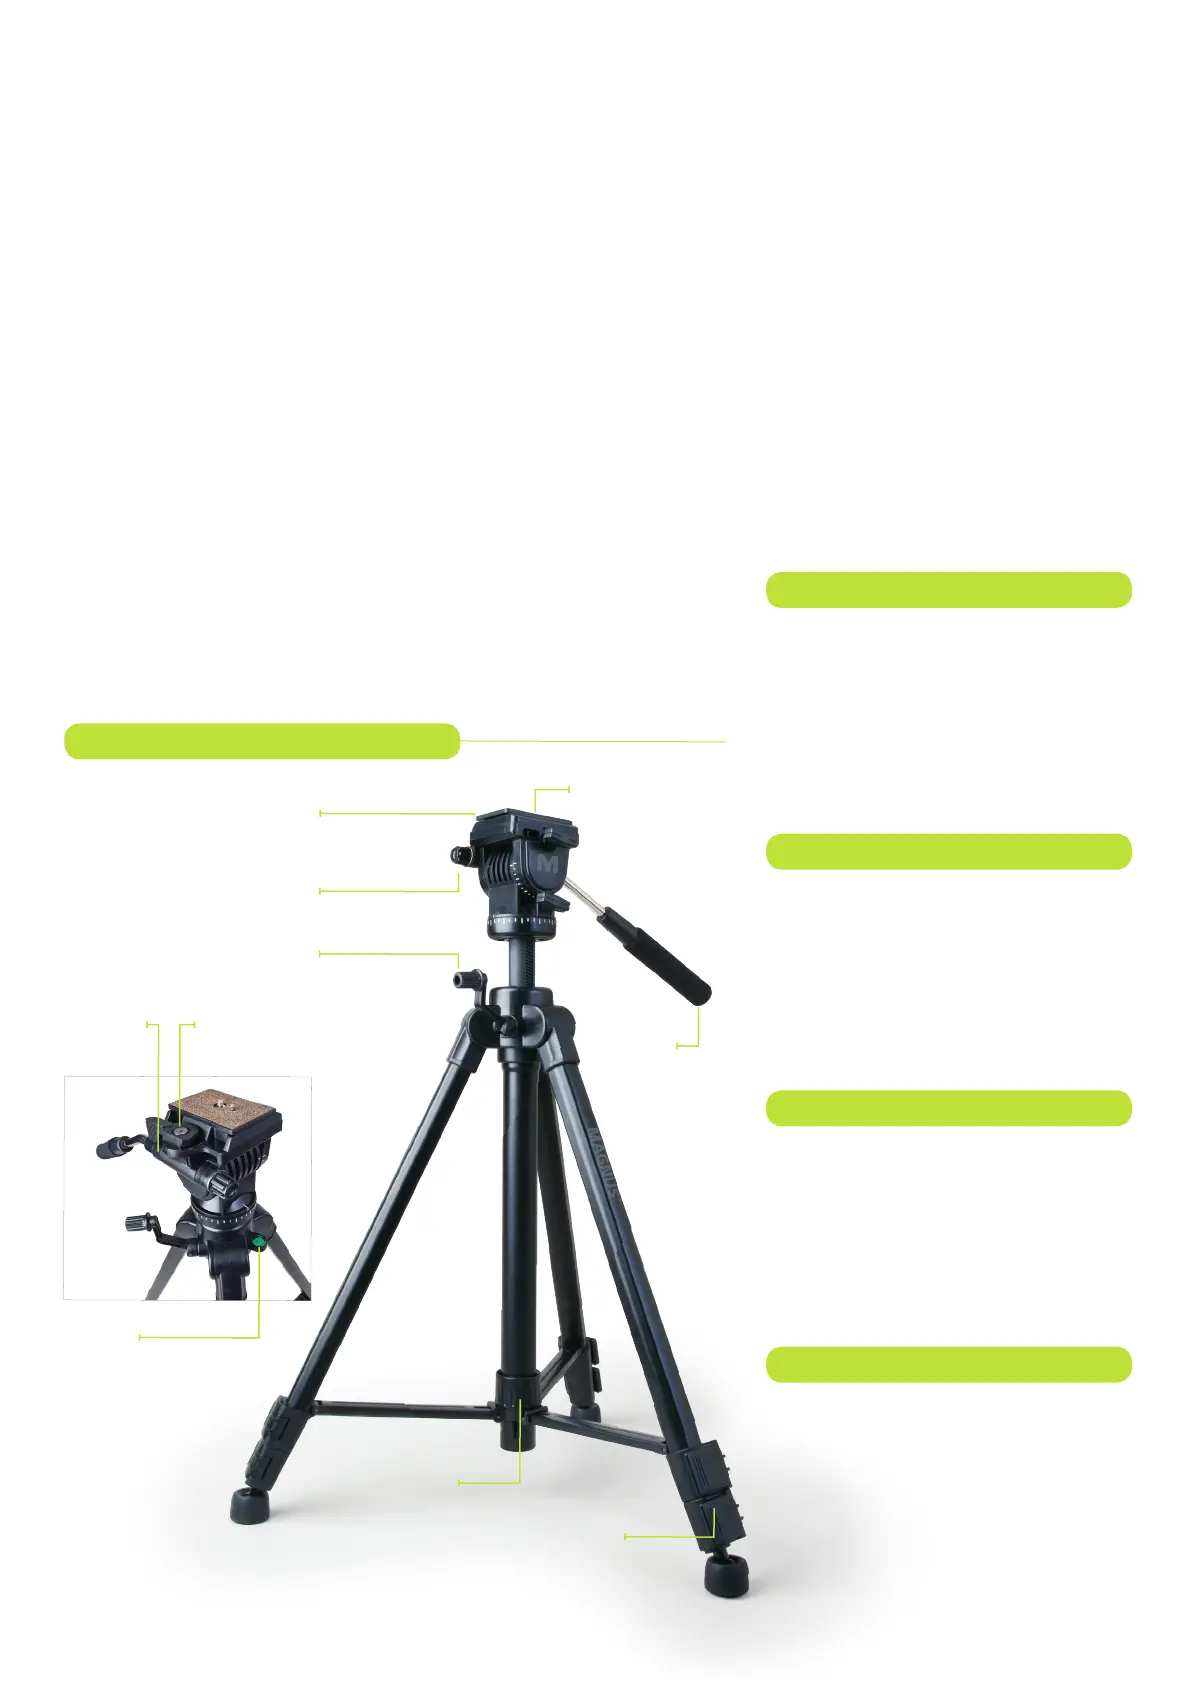
Tilt/Pan
Bar
Universal ¼-20
Mounting Screw
Locking Mid-Level
Spreader
Center Column
Hand Crank
Quick-Release
Mounting Plate
Leg
Flip-Lock
Tilt/Pan Bar
Locking Knob
Congratulations
on your
purchase of the
VT-100/200/300/350
Video Tripod
by
Magnus.
All Magnus tripods are designed to
balance features professionals want
with the affordability they need, yet
be durable enough to provide many
years of trouble-free service and
enjoyment. Please carefully read
these instructions for setting up and
breaking down your tripod.
Key Features
• Two-way pan head for smooth motion
• Gear-driven center column with friction
control
• Auto-lock, quick-release mounting
• Separate pan and tilt locks
• Bubble level for accurate setup
• Mid-level spreader for stability on uneven
surfaces
• Full 360° pan range
• Carry case with shoulder strap
Safety Warnings
• Never set up or pull down a tripod while a
camera is mounted
• Do not move the tripod or adjust the legs
while a camera is mounted
• Do not exceed the maximum weight
capacity of the tripod
• Never leave a camera unattended on the
tripod
• The camera should be securely fastened
to the quick-release mou
nting plate before
mounting it to the tripod
• Never mount a camera to the tripod until all
tripod legs are locked and stabilized
• Do not stand on, rest on, or hang anything
from the mid-level spreader
• Do not attempt to remove the mid-level
spreader
• Do not lift or move the tripod by the head
• Keep hands clear of the inside of the legs, to
avoid trapping fingers
• Safe operation of the tripod is the user’s
responsibility
Video Tripod Components
Float Level
Mounting Plate
Capture Release
Tilt/Pan Bar
Mount
VT-100 Specs
• 4.4 lb. (2 kg) load capacity
• 59˝ (150 cm) to 18.75˝ (47.5 cm) height
range
• 20˝ (50.8 cm) folded length
• 3.15 lb. (1.4 kg) weight
VT-200 Specs
• 6.6 lb. (3 kg) load capacity
• 60˝ (152 cm) to 20˝ (50.8 cm) height
range
• 21.75˝ (55.25 cm) folded length
• 3.45 lb. (1.5 kg) weight
VT-300 Specs
• 15 lb. (6.8 kg) load capacity
• 64.3˝ (163 cm) to 25˝ (63.5 cm) height
range
• 26.5˝ (67.3 cm) folded length
• 4.5 lb. (2 kg) weight
VT-300 Specs
• 15 lb. (6.8 kg) load capacity
• 82˝ (208 cm) to 25.5˝ (67.8 cm) height
range
• 27.5˝ (69.9 cm) folded length
• 5.45 lb. (2.5 kg) weight
VT-200 Specs
VT-100 Specs
VT-300 Specs
VT-350 Specs
VT-xxx Manual.indd 1

Tearing Down Your Tripod
Setting Up Your Tripod
1
Assess Shooting Area
To set up your tripod, begin by removing the
tripod from the box and/or carry case. Assess
your shooting area to determine a stable area
to set up your camera.
7
Remove the Mounting Plate
Rotate the mounting plate lock so that the
flat side is against the mounting plate. The
mounting plate will pop free.
1
Unmount Camera
Rotate the mounting plate lock forward until the
mounting plate pops free. Lift the camera up
and out until it is free of the tripod.
3
Spread the Tripod
Plant the front leg of the tripod. Lift the back two
legs and pull back to spread the tripod to the
full extension of the mid-level spreader. Check
the float level to verify that the tripod is level.
Readjust the legs if necessary. Lock the mid-level
spreader by rotating the knob clockwise.
9
Mount Camera to Tripod
Make certain that your tripod legs are locked
and the tripod is stable and ready for mounting
your camera. From the right side of the tripod,
slide the mounting plate down and left onto
the tripod head. Push down until the mounting
plate clicks.
2
Extend Legs
Always extend the legs from the top flip-locks
first. Pull each flip-lock and extend the leg to its
desired height. Match the length of the legs and
relock the flip-locks.
8
Mount Camera to Plate
Attach the mounting plate to your camera.
Be certain that the retractable alignment pin
sets into its pocket on the camera. Screw the
threaded stud on the plate into the bottom of
the camera.
2
Lower Center Column (if raised)
Release the center column locking knob. Using
the hand crank, lower the center column all the
way down. Secure the locking knob and fold the
hand crank down.
All images are for illustrative purposes only.
Your tripod may look slightly different.
Center Column
Lock Knob
Float
Level
Product Specifications
| Brand: | Magnus |
| Category: | Tripod |
| Model: | VT-200 |
Do you need help?
If you need help with Magnus VT-200, ask a question below and other users will answer you
Tripod Magnus User Manuals

18 October 2024
18 October 2024
18 October 2024
18 October 2024
18 October 2024
18 October 2024
18 October 2024
18 October 2024
17 October 2024
17 October 2024
Tripod User Manuals
- Tripod Neewer
- Tripod Kogan
- Tripod Vello
- Tripod Manfrotto
- Tripod Kodak
- Tripod E-Image
- Tripod Celly
- Tripod Revo
- Tripod Sachtler
- Tripod IOptron
- Tripod Tiltall
- Tripod Square Jellyfish
- Tripod Proaim
- Tripod Libec
- Tripod Gravity
- Tripod Celestron
- Tripod Glide Gear
- Tripod Vanguard
- Tripod Vinten
- Tripod Stalco
- Tripod SteadiCam
- Tripod ARRI
- Tripod Fidlock
- Tripod Vortex
- Tripod Robus
- Tripod Miller
- Tripod Studio Assets
- Tripod Easyrig
- Tripod Peak Design
- Tripod Hohem
- Tripod Flycam
- Tripod Velbon
- Tripod 3 Legged Thing
- Tripod FLM
- Tripod Fat Gecko
Latest Tripod User Manuals
27 October 2024
26 October 2024
25 October 2024
24 October 2024
18 October 2024
18 October 2024
18 October 2024
18 October 2024
17 October 2024
17 October 2024