Alpine SS-SB10 Manual
Read below 📖 the manual in Italian for Alpine SS-SB10 (8 pages) in the Speaker category. This guide has been helpful for 23 people and has been rated 4.5 stars on average by 2 users
Page 1/8
EN: IMPORTANT NOTICE!
PLEASE READ FIRST BEFORE INSTALLING SPEAKERS
In order to maximize and maintain peak speaker performance
the following guidelines are being provided. Please read this
notice carefully before operating the speakers.
1. Do not over-drive the amplier. Over-driving the ampli-
er will result in distortion or clipping and can damage
any speaker.
2. Make sure gain controls are properly set. (Follow instruc-
tions in amplier owner’s manual.)
3. Make sure that the speaker is properly rated for the
amplier.
4. Make sure that volume, bass, treble, equalization or
crossover settings do not cause the amplier to over-
drive.
Failure to follow these guidelines may result in burned or dam-
aged speaker voice coils which will void your warranty.
If further assistance is necessary, please contact your Alpine
authorized dealer.
NOTE
TO ENSURE SAFE USE, ALWAYS FOLLOW THESE PRECAU
TIONS.
The installation of this product requires specialized skills
and experience. We recommend that you have the product
installed by an Alpine authorized dealer.
Before you use this product, be sure to carefully read this
installation manual so that you can use the product correctly,
Failing to do so could lead to damaged equipment or an acci-
dent. Alpine Electronics bears no responsibility for problems
that arise as a result of failure to follow the instructions in the
manual.
• Make sure enclosure is secured to the vehicle. Failing to
do so can lead to electric shock, injury or damage to
equipment.
• When making a hole in the vehicle body, be careful to
avoid damaging pipes, the fuel tank, electrical wiring,
and the like. This kind of damage could lead to an
accident or re.
• Do not install the product where it may be exposed to
water or in a place with high levels of humidity or dust.
Doing so could lead to re or damaged equipment.
DE: WICHTIGER HINWEIS!
BITTE LESEN SIE DIESE HINWEISE VOR DEM EINBAU DER LAUT-
SPRECHER
Um die optimale Leistung der Lautsprecher zu gewährleisten,
beachten Sie bitte die folgenden Hinweise. Lesen Sie diese
Hinweise sorgfältig durch, bevor Sie die Lautsprecher in
Betrieb nehmen.
1. Übersteuern Sie den Verstärker nicht. Eine Übersteuer-
ung des Verstärkers führt zu Verzerrungen oder Clipping
und kann jeden Lautsprecher beschädigen.
2. Stellen Sie sicher, dass die Verstärkungsregler richtig
eingestellt sind. (Befolgen Sie die Anweisungen in der
Bedienungsanleitung des Verstärkers.)
3. Stellen Sie sicher, dass der Lautsprecher für den Verstärk-
er richtig ausgelegt ist.
4. Stellen Sie sicher, dass die Einstellungen für Lautstärke,
Bässe, Höhen, Equalizer oder Frequenzweiche nicht zu
einer Übersteuerung des Verstärkers führen.
Die Nichtbeachtung dieser Richtlinien kann zu verbrannten
oder beschädigten Schwingspulen der Lautsprecher führen,
wodurch Ihre Garantie erlischt.
Wenn Sie weitere Hilfe benötigen, wenden Sie sich bitte an
Ihren autorisierten Alpine Händler.
HINWEIS
UM EINE SICHERE VERWENDUNG ZU GEWÄHRLEISTEN, BE
FOLGEN SIE IMMER DIESE VORSICHTSMASSNAHMEN.
Die Installation dieses Produkts erfordert spezielle Fähigkeiten
und Erfahrung. Wir empfehlen, das Produkt von einem autoris-
ierten Alpine Händler installieren zu lassen.
Lesen Sie diese Installationsanleitung sorgfältig durch, bevor
Sie dieses Produkt verwenden, damit Sie das Produkt richtig
verwenden können. Andernfalls kann es zu Schäden an der
Ausrüstung oder zu einem Unfall kommen. Alpine übernimmt
keine Verantwortung für Probleme, die durch die Nichtbeach-
tung der Anweisungen im Handbuch entstehen.
• Vergewissern Sie sich, dass das Gehäuse am Fahrzeug
befestigt ist. Andernfalls kann es zu Stromschlägen, Ver-
letzungen oder Schäden an der Ausrüstung kommen.
• Wenn Sie ein Loch in die Fahrzeugkarosserie bohren,
achten Sie darauf, dass Sie keine Rohre, den Kraftsto-
tank, elektrische Leitungen oder Ähnliches beschädigen.
Solche Schäden können zu einem Unfall oder Brand
führen.
• Installieren Sie das Produkt nicht an einem Ort, an dem
es Wasser oder hoher Luftfeuchtigkeit oder Staub aus-
gesetzt ist. Dies kann zu einem Brand oder zu Schäden
am Gerät führen.
FR : AVIS IMPORTANT !
À LIRE AVANT D’INSTALLER LES HAUT-PARLEURS
An d’optimiser et de maintenir les performances des haut-
parleurs, les directives suivantes sont fournies. Veuillez lire
attentivement cette notice avant d’utiliser les enceintes.
1. Ne surchargez pas l’amplicateur. Une surcharge de
l’amplicateur entraîne une distorsion ou un écrêtage et
peut endommager les haut-parleurs.
2. Assurez-vous que les commandes de gain sont correcte-
ment réglées. (Suivre les instructions du manuel d’utilisa-
tion de l’amplicateur).
3. Assurez-vous que l’enceinte est adaptée à l’amplicateur.
4. Assurez-vous que les réglages du volume, des basses, des
aigus, de l’égalisation ou du crossover n’entraînent pas
une surcharge de l’amplicateur.
Le non-respect de ces consignes peut entraîner la brûlure ou
l’endommagement des bobines acoustiques du haut-parleur,
ce qui annulera votre garantie.
Si une assistance supplémentaire est nécessaire, veuillez con-
tacter votre revendeur Alpine agréé.
REMARQUE
POUR GARANTIR UNE UTILISATION EN TOUTE SÉCURITÉ,
SUIVEZ TOUJOURS CES PRÉCAUTIONS.
L’installation de ce produit requiert des compétences et une
expérience spécialisées. Nous vous recommandons de faire
installer le produit par un distributeur agréé Alpine.
Avant d’utiliser ce produit, assurez-vous de lire attentive-
ment le présent Guide d’installation an de pouvoir utiliser le
produit correctement. Le non-respect de cette consigne peut
entraîner des dommages matériels ou un accident. Alpine
Electronics ne peut être tenue responsable des problèmes
résultant du non-respect des instructions du présent guide.
• Assurez-vous que l’enceinte est xée au véhicule. Le
non-respect de cette consigne peut entraîner une élec-
trocution, des blessures ou des dommages à l’équipe-
ment.
• Lorsque vous faites un trou dans la carrosserie du
véhicule, veillez à ne pas endommager les tuyaux, le
réservoir de carburant, le câblage électrique, etc. Ce type
de dommage peut entraîner un accident ou un incendie.
• N’installez pas le produit dans un endroit où il risque
d’être exposé à l’eau ou dans un lieu où le taux d’humid-
ité ou de poussière est élevé. Cela pourrait entraîner un
incendie ou endommager l’équipement.
IT: AVVISO IMPORTANTE!
LEGGERE PRIMA DI INSTALLARE I DIFFUSORI
Al ne di massimizzare e mantenere le prestazioni dei diusori,
vengono fornite le seguenti linee guida. Leggete attentamente
questo avviso prima di mettere in funzione i diusori.
1. Non sovraccaricare l’amplicatore. Il sovraccarico
dell’amplicatore provoca distorsione o clipping e può
danneggiare i diusori.
2. Accertarsi che i controlli di guadagno siano impostati
correttamente. (Seguire le istruzioni riportate nel man-
uale dell’amplicatore).
3. Accertarsi che il diusore sia adatto all’amplicatore.
4. Accertarsi che le impostazioni di volume, bassi, acuti,
equalizzazione o crossover non provochino l’over-drive
dell’amplicatore.
La mancata osservanza di queste linee guida può causare la
bruciatura o il danneggiamento delle bobine mobili dei diu-
sori, con conseguente annullamento della garanzia.
Se è necessaria ulteriore assistenza, contattare il rivenditore
autorizzato Alpine.
NOTA
PER GARANTIRE UN USO SICURO, SEGUIRE SEMPRE QUESTE
PRECAUZIONI.
Per garantire un uso sicuro, seguire sempre queste
precauzioni.
L’installazione di questo prodotto richiede competenze ed
esperienza speciche. Si consiglia di far installare il prodotto
da un rivenditore autorizzato Alpine.
Prima di utilizzare il prodotto, assicurarsi di leggere
attentamente il presente manuale di installazione in modo
da poterlo utilizzare correttamente, altrimenti si potrebbero
vericare danni all’apparecchiatura o incidenti. Alpine
Electronics non si assume alcuna responsabilità per problemi
derivanti dalla mancata osservanza delle istruzioni contenute
nel manuale.
• Assicurarsi che la custodia sia ssata al veicolo. In caso
contrario, si possono vericare scosse elettriche, lesioni o
danni alle apparecchiature.
• Quando si eettua un foro nella carrozzeria del veicolo,
fare attenzione a non danneggiare le tubature, il
serbatoio del carburante, i cavi elettrici e simili. Questo
tipo di danno potrebbe causare incidenti o incendi.
• Non installare il prodotto in luoghi esposti all’acqua o
con alti livelli di umidità o polvere. Ciò potrebbe causare
incendi o danni alle apparecchiature.
ES: ¡AVISO IMPORTANTE!
LEA ESTO ANTES DE INSTALAR LOS ALTAVOCES
Para maximizar y mantener el máximo rendimiento de los
altavoces, se proporcionan las siguientes pautas. Lea este aviso
detenidamente antes de utilizar los altavoces.
1. No sobrecargue el amplicador. La sobrecarga del am-
plicador provocará distorsión o recorte y puede dañar
cualquier altavoz.
2. Asegúrese de que los controles de ganancia estén cong-
urados correctamente. (Siga las instrucciones del manual
del propietario del amplicador).
3. Asegúrese de que el altavoz esté correctamente clasica-
do para el amplicador.
4. Asegúrese de que los ajustes de volumen, graves,
agudos, ecualización o crossover no provoquen una
sobrecarga del amplicador.
El incumplimiento de estas directrices puede provocar que las
bobinas de voz de los altavoces se quemen o se dañen, lo que
anulará la garantía.
Si necesita más ayuda, póngase en contacto con su distribui-
dor autorizado de Alpine.
NOTA
PARA UN USO SEGURO, SIGA SIEMPRE LAS SIGUIENTES
PRECAUCIONES
La instalación de este producto requiere habilidades y expe-
riencia especializadas. Le recomendamos que un distribuidor
autorizado de Alpine instale el producto.
Antes de utilizar este producto, asegúrese de leer detenida-
mente este manual de instalación para poder utilizarlo cor-
rectamente. De lo contrario, podría dañar el equipo o provocar
un accidente. Alpine Electronics no se hace responsable de
los problemas que surjan como resultado de no seguir las
instrucciones del manual.
• Asegúrese de que la carcasa esté bien sujeta al vehículo.
De lo contrario, podría sufrir una descarga eléctrica,
lesiones o daños en el equipo.
• Al hacer un agujero en la carrocería del vehículo, tenga
cuidado de no dañar las tuberías, el depósito de combus-
tible, el cableado eléctrico y similares. Este tipo de daños
podría provocar un accidente o un incendio.
• No instale el producto en lugares donde pueda estar
expuesto al agua o en lugares con altos niveles de hume-
dad o polvo. De lo contrario, podría provocar un incendio
o dañar el equipo.
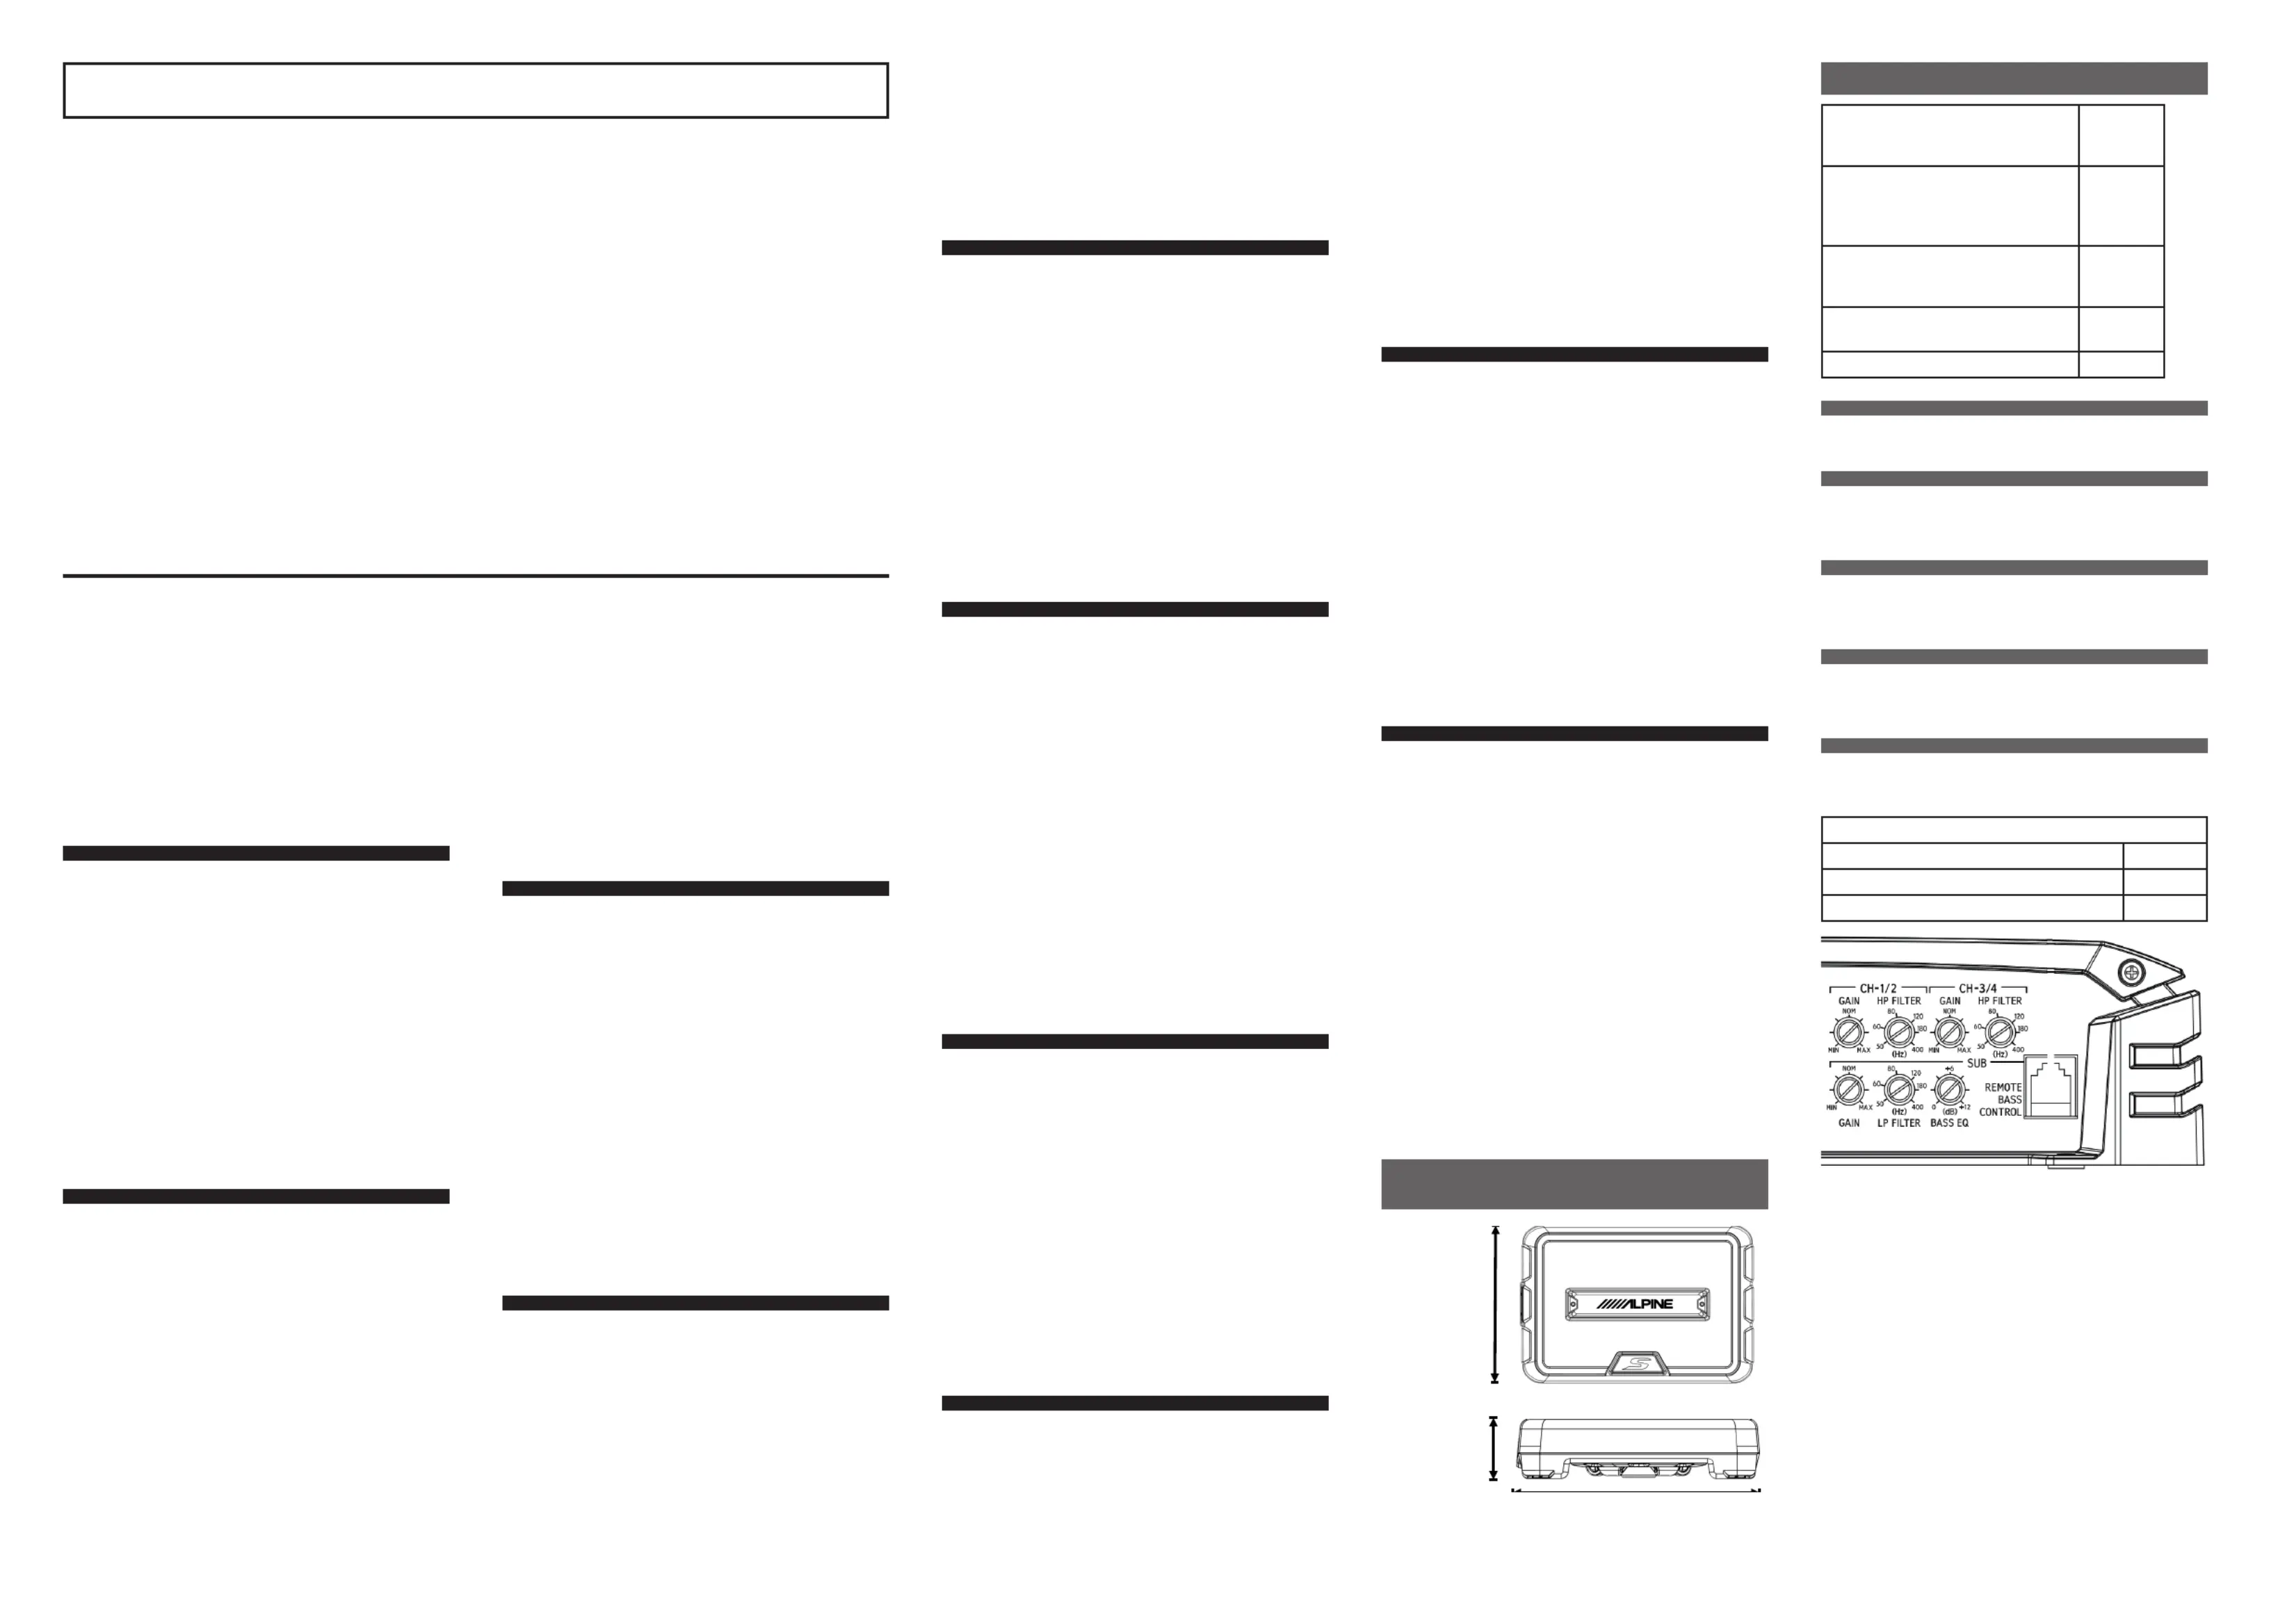
Dimensions/ Abmessungen/
Dimensions/ Dimensioni/
Dimensiones
317,5 mm
115 mm
470 mm
Specications/ Spezikationen/ Spécications/ Speciche/
Speciche tecniche
Power Handling/ Belastbarkeit/ Tenue
en puissance/ Gestione della potenza/
Potencia
300 Wrms
Resonance frequency/ Resonanz-
frequenz/ Fréquence de résonance/
Frequenza di risonanza/ Frecuencia de
resonancia
55 Hz
Frequency Response/ Frequenzgang/
Réponse en fréquence/ Risposta in
frequenza/ Respuesta en frecuencia
35 - 200 Hz
Impedance/ Impedanz/ Impédance/
Impedance /Impedenza
2
Weight/ Gewicht/ Poids/ Peso/ Peso 4,8 kg
EN: Example Amplier Settings
Use these settings as a reference. Actual settings may vary
based on input conguration. Always have your system in-
stalled and tuned by an Alpine authorized professional.
DE: Beispiel für Verstärkereinstellungen
Verwenden Sie diese Einstellungen als Referenz. Die tatsäch-
lichen Einstellungen können je nach Eingangskonguration
variieren. Lassen Sie Ihr System immer von einem von Alpine
autorisierten Fachhändler installieren und einstellen.
FR: Exemple de réglages de l’amplicateur
Utilisez ces paramètres comme référence. Les réglages réels
peuvent varier en fonction de la conguration de l’entrée.
Faites toujours installer et régler votre système par un profes-
sionnel agréé par Alpine.
IT: Esempio di impostazioni dell’amplicatore
Utilizzare queste impostazioni come riferimento. Le impostazi-
oni eettive possono variare in base alla congurazione degli
ingressi. Il sistema deve essere sempre installato e messo a
punto da un professionista autorizzato Alpine.
ES: Ejemplo de conguración del amplicador
Utilice estos ajustes como referencia. Los ajustes reales pueden
variar en función de la conguración de entrada. Haga que un
profesional autorizado de Alpine instale y ajuste su sistema.
S-A55V
LP FILTER 80 Hz
GAIN NOM
BASS EQ 0
FOR CAR USE ONLY/ NUR FÜR AUTOMOBIL GEBRAUCH/ POUR APPLICATION AUTOMOBILE UNIQUEMENT/
SOLO PER L’USO IN AUTO/ SÓLO PARA USO EN COCHE
10” SSHALLOW SUBWOOFER
PRELOADED DOWNFIRE CABINET
SS-SB10
INSTALLATION MANUAL
EINBAUANLEITUNG
GUIDE D’INSTALLATION
MANUALE D’INSTALLAZIONE
MANUAL DE INSTALACIÓN
ALPINE ELECTRONICS MARKETING, INC.
1-7, Yukigaya-Otsukamachi, Ota-ku,
Tokyo 145-0067, JAPAN
Phone: 03-5499-4531
ALPS ALPINE EUROPE GmbH
Ohmstraße 4
85716 Unterschleißheim, Germany
Phone: 089-3242640
For contact information in your
respective country, please visit:
www.alpine-europe.com/distribution.html
ALPINE ELECTRONICS OF AMERICA, INC.
1500 Atlantic Boulevard, Auburn Hills,
Michigan 48326, U.S.A.
Phone 1-800-ALPINE-1 (1-800-257-4631)
ALPINE ELECTRONICS OF AUSTRALIA PTY. LTD.
161-165 Princes Highway,
Hallam Victoria 3803, Australia
Phone 03-8787-1200
ALPS ALPINE ASIA CO.,LTD.
The 9th Towers, Tower B, 24th Floor,
33/4 Rama 9 Road Huay Kwang, Bangkok, 10310, Thailand
Phone +66 (2) 0909596
x 4
x 4
x 8
x 4
x 4
Parts List/ Teileliste/ Liste des pièces/ Lista de piezas/ Lista de piezas
Required Tools/ Benötigtes Werkzeug/ Outils nécessaires/ Herramientas necesarias/
Attrezzi necessari
1
2
1
EN: Screwdriver PH 2
DE: Schraubendreher PH 2
FR: Tournevis PH 2
IT: Cacciavite PH 2
ES: Destornillador PH 2
2 EN: Cordless screwdriver with
extended PH 2 bit
DE: Akkuschrauber mit verlängertem PH 2 Bit
FR: Visseuse avec embout PH 2
rallongé
IT: Cacciavite a batteria con punta PH 2
estesa
ES: Atornillador inalámbrico con punto PH 2
extendido
1
2
3
4
5
6
1
EN: Polymer Cabinet with Subwoofer
DE: Kunststogehäuse mit Subwoofer
FR: Caisson avec subwoofer
IT: Cabinet in polimero con subwoofer
ES: Cajón de polímero con subwoofer
2 EN: Steel Mounting Brackets
DE: Metall-Montagehalterungen
FR: Supports de montage en acier
IT: Stae di montaggio in acciaio
ES: Soportes de acero
3 EN: M5X12 Machine Screw Phillips
DE: M5x12 Maschinenschraube mit
Kreuzschlitz
FR: Vis M5X12 Phillips
IT: M5X12 Vite a macchina Phillips
ES: Tornillo de máquina M5X12 Phillips
4 EN: Self-tapping screw
DE: Blechschraube
FR: Vis autotaraudeuse
IT: Vite autolettante
ES: Tornillo autorroscante
5 EN: Foam Insulation Pad
DE: Isolierende Schaumunterlage
FR: Coussin d’isolation en mousse
IT: Cuscinetto isolante in schiuma
ES: Aislador de espuma
6 EN: M5 toothed lock washer
DE: M5 Zahnscheibe
FR: M5 Rondelle dentée
IT: Disco dentato M5
ES: M5 Arandela dentada
2
Ω
x 1
1
2
3
4
5
ENGLISH
1
Turn the case over as shown. Install the (4)
foam insulation pads in the location shown on the
bottom side of the cabinet. Peel o the protective
layer and press the adhesive side into position.
2
Place the (4) steel mounting bracket into de-
sired position. Each bracket can rotate 90 degrees.
3
Secure each of the (4) brackets by tightening
the M5 × 12 machine screw shown with a toothed
lock washer. Using a cordless screwdriver or a
screwdriver, tighten the screws into each brass
insert.
4
Place the enclosure face down and using a
drill secure the metal brackets using self-tapping
screws. Install 2 screws in each leg (8 Total).
5
Connect the positive and negative speaker
output from your amplier into the push terminal.
DEUTSCH
1
Drehen Sie das Gehäuse wie gezeigt um.
Installieren Sie die (4) Schaumsto-Isolierpads
an der auf der Unterseite des Gehäuses angege-
benen Stelle. Ziehen Sie die Schutzschicht ab und
drücken Sie die Klebeseite in Position.
2
Bringen Sie die (4) Metall-Montagehalterun-
gen in die gewünschte Position. Jede Halterung
kann um 90 Grad gedreht werden.
3
Sichern Sie jede der (4) Halterungen, indem
Sie die abgebildete M5 × 12 Maschinenschraube
mit Verwendung einer Zahnscheibe festziehen.
Drehen Sie die Schrauben mit einem Akkuschrau-
ber oder einem Schraubendreher fest in jede
Messinghülse.
4
Drehen Sie das Gehäuse um und befestigen
Sie die Metallhalterungen mit Blechschrauben.
Bringen Sie 2 Blechschrauben in jedem Blech an
(insgesamt 8).
5
Verbinden Sie die Lautsprecherausgänge +
und - Ihres Verstärkers mit den Anschlussklem-
men.
FRANÇAIS
1
Retourner le caisson comme indiqué. Installez
les (4) coussins d’isolation en mousse à l’emplace-
ment indiqué sur la face inférieure du boîtier.
Retirez la couche protectrice et appuyez sur la
face adhésive pour la mettre en place.
2
Placez les (4) supports de montage en acier
dans la position souhaitée. Chaque support peut
pivoter de 90 degrés.
3
Fixez chacun des (4) supports en serrant la vis
mécanique M5 × 12 illustrée avec une rondelle
dentée. À l’aide d’un tournevis ou d’une visseuse,
serrez les vis dans chaque insert en laiton.
4
Placer le caisson face vers le bas et, à l’aide
d’une perceuse, xer les supports métalliques à
l’aide de vis autotaraudeuses. Installer 2 vis dans
chaque pied (8 au total).
5
Connectez les sorties positive et négative de
votre amplicateur à la borne de raccordement.
ITALIANO
1
Capovolgere il mobile come illustrato.
Installare i (4) cuscinetti isolanti in schiuma nella
posizione indicata sul lato inferiore del cabinet.
Staccare lo strato protettivo e premere il lato ade-
sivo in posizione.
2
Posizionare le (4) stae di montaggio in
acciaio nella posizione desiderata. Ogni staa può
ruotare di 90 gradi.
3
Fissare ciascuna delle (4) stae stringendo la
vite M5 × 12 indicata con una rondella dentata.
Utilizzando un avvitatore a batteria o un caccia-
vite, serrare le viti in ciascun inserto in ottone.
4
Posizionare l’involucro a faccia in giù e con
un trapano ssare le stae metalliche con viti
autolettanti. Installare 2 viti in ciascuna gamba (8
in totale).
5
Collegare l’uscita positiva e negativa dei diu-
sori dell’amplicatore al terminale di spinta.
ESPAÑOL
1
Dé la vuelta a la caja como se muestra. Instale
las (4) almohadillas de espuma aislante en la
ubicación que se muestra en la parte inferior del
cajón. Retire la capa protectora y presione el lado
adhesivo en su posición.
2
Coloque los (4) soportes de montaje de acero
en la posición deseada. Cada soporte puede girar
90 grados.
3
Fije cada uno de los soportes (4) apretando
el tornillo para máquina M5x12 con una arandela
dentada. Con el atornillador o un destornillador
apriete los tornillos en cada inserto de latón.
4
Coloque la carcasa boca abajo y, con un
taladro, je los soportes metálicos con tornillos
autorroscantes. Coloque 2 tornillos en cada pata
(8 en total).
5
Conecte la salida positiva y negativa del
altavoz de su amplicador a los terminales de
entrada.
Product Specifications
| Brand: | Alpine |
| Category: | Speaker |
| Model: | SS-SB10 |
Do you need help?
If you need help with Alpine SS-SB10, ask a question below and other users will answer you
Speaker Alpine User Manuals

13 October 2024
13 October 2024
13 October 2024
Speaker User Manuals
- Speaker Sony
- Speaker Xiaomi
- Speaker LG
- Speaker Bosch
- Speaker IKEA
- Speaker HP
- Speaker Philips
- Speaker Panasonic
- Speaker Hama
- Speaker Vorago
- Speaker Jensen
- Speaker Avantree
- Speaker Edifier
- Speaker Reflexion
- Speaker Meridian
- Speaker Teufel
- Speaker Kogan
- Speaker Soundcore
- Speaker Turbosound
- Speaker GoGEN
- Speaker Pro-Ject
- Speaker Yamaha
- Speaker Morel
- Speaker Axis
- Speaker Extron
- Speaker Media-tech
- Speaker Pioneer
- Speaker EarFun
- Speaker Ecler
- Speaker Audac
- Speaker Woxter
- Speaker KEF
- Speaker Audio-Technica
- Speaker Toa
- Speaker Metra
- Speaker Pyle
- Speaker Sencor
- Speaker Bose
- Speaker Orava
- Speaker Grundig
- Speaker JVC
- Speaker Kicker
- Speaker Auna
- Speaker Midland
- Speaker OSD Audio
- Speaker Power Dynamics
- Speaker Fenton
- Speaker Vonyx
- Speaker Bluesound
- Speaker Hertz
- Speaker Kenwood
- Speaker MB Quart
- Speaker Bigben
- Speaker Aplic
- Speaker CSL
- Speaker Bearware
- Speaker NUVO
- Speaker Maginon
- Speaker Infiniton
- Speaker Roku
- Speaker GPO
- Speaker Advance
- Speaker Sonance
- Speaker AXESS
- Speaker Be Cool
- Speaker Artsound
- Speaker Denon
- Speaker Ion
- Speaker Marshall
- Speaker Yorkville
- Speaker V-Tac
- Speaker MyDJ
- Speaker Valcom
- Speaker Celly
- Speaker JBL
- Speaker Infinity
- Speaker Majority
- Speaker Nedis
- Speaker Sharp
- Speaker Helix
- Speaker Genesis
- Speaker Klipsch
- Speaker Worx
- Speaker Muse
- Speaker Ground Zero
- Speaker Karma
- Speaker Glemm
- Speaker Match
- Speaker Speed-Link
- Speaker Renkforce
- Speaker Definitive Technology
- Speaker QSC
- Speaker WHD
- Speaker Q Acoustics
- Speaker Karcher
- Speaker GoldenEar
- Speaker Pyramid
- Speaker FoneStar
- Speaker Trevi
- Speaker Monitor Audio
- Speaker Canton
- Speaker Fresh N Rebel
- Speaker Energy Sistem
- Speaker Bauhn
- Speaker PSB
- Speaker Vizio
- Speaker Polk
- Speaker ESX
- Speaker Omnitronic
- Speaker MEE Audio
- Speaker Monacor
- Speaker ModeCom
- Speaker Hercules
- Speaker Black Hydra
- Speaker Electro-Voice
- Speaker Wharfedale
- Speaker Boss
- Speaker Tannoy
- Speaker Mount-It!
- Speaker GMB Audio
- Speaker Mad Dog
- Speaker Ashly
- Speaker Memphis Audio
- Speaker Focal
- Speaker ATen
- Speaker Genelec
- Speaker Bazooka
- Speaker Lamax
- Speaker NGS
- Speaker Aiaiai
- Speaker RCF
- Speaker SVS
- Speaker Aiwa
- Speaker N-Gear
- Speaker Atlas
- Speaker PowerBass
- Speaker Prime3
- Speaker Harman Kardon
- Speaker Lexibook
- Speaker Ibiza Sound
- Speaker Creative
- Speaker Aconatic
- Speaker DAP Audio
- Speaker REL Acoustics
- Speaker Sonus Faber
- Speaker Xcellon
- Speaker OWI
- Speaker Titanwolf
- Speaker Weather X
- Speaker HK Audio
- Speaker Phoenix Gold
- Speaker Krüger And Matz
- Speaker Indiana Line
- Speaker Blue Tees
- Speaker BASSBOSS
- Speaker Polsen
- Speaker Deaf Bonce
- Speaker Tangent
- Speaker FBT
- Speaker Transparent
- Speaker IHome
- Speaker Martin Logan
- Speaker Andover
- Speaker ILive
- Speaker Moonki
- Speaker BlueAnt
- Speaker HuddleCamHD
- Speaker X JUMP
- Speaker PulseAudio
- Speaker Urban Revolt
- Speaker Audison
- Speaker Boynq
- Speaker Dynaudio
- Speaker Clarity
- Speaker VIETA PRO
- Speaker Potter
- Speaker Sonoro
- Speaker Yamazen
- Speaker OTTO
- Speaker Soen
- Speaker Miller & Kreisel
- Speaker Qian
- Speaker Iriver
- Speaker Standard Horizon
- Speaker The Box
- Speaker August
Latest Speaker User Manuals
27 October 2024
27 October 2024
27 October 2024
27 October 2024
27 October 2024
27 October 2024
27 October 2024
27 October 2024
27 October 2024
27 October 2024