Elba EGSI-C1545(PK) Manual
Elba
Steam cleaner
EGSI-C1545(PK)
Read below 📖 the manual in Italian for Elba EGSI-C1545(PK) (10 pages) in the Steam cleaner category. This guide has been helpful for 27 people and has been rated 4.5 stars on average by 2 users
Page 1/10

GARMENT STEAM IRON
MODEL:EGSI-C1545(PK)
Owner's Manual
Please read this manual carefully
before operating your set.
Retain it for future reference.
Record model number and serial
number of the set.
See the label attached on the set and
quote this information to your dealer
when you require service.
For The Warranty Terms & Conditions, Please Refer To Warranty Certificate.
1. Read all instructions before use.
2. To avoid the hazard caused by the overload of the circuit, do not use the extension cord.
3. Do not immerse the appliance, power cord or plug in water or any other liquids.
4. Do not leave this appliance unattended while it is in operating or it is still hot.
5. Do not contact directly the steam head to people, animals or cloth that one is wearing.
6. To reduce the risk of electric shock, do not disassemble or attempt to repair the appliance on
your own. Return the appliance to the nearest authorized service center for examination,
repair or adjustment.
7. The use of foreign accessory attachments that are not supplied by ELBA is not
recommended as it may result in fire, electric shock or personal injury.
8. Please fill in water before power on the appliances. Observe the water level in the water
tank while operating.
9. Do not lay the hose on the ground or wind it.
10. Only use the steam head in an up and down vertical position. Never use the steam head in a
horizontal position or tilt into a backward position, this may result in water discharge.
11. Be cautious of hot steam that sprays out from the steam head. To reduce the risk of
contact with hot steam emitting from the steam head, hold the handle away from your
body while operating the appliance.
12. Move the appliance by grasping the telescopic pole. Do not force the casters if they are struck.
Drain the water from water tank and water reservoir before inspecting the casters.
13. Allow the appliance to cool completely for at least 30 minutes and drain the water from the water
tank and water reservoir before storing.
14. Always unplug the appliance before refilling or draining.
15. Unplug the appliance before cleaning, moving or when the appliance is not in use.
16. Keep the appliance away from inflammable materials and chemicals.
17. Do not operate the appliance in the event of abnormity, or damage to the cord or the plug.
18. Grasp the plug to unplug it, do not unplug by pulling the power cord.
19. Do not fill the water tank with hot water, corrosive cleaning agent, perfume, vinegar, starch,
ironing aids or any other chemicals, or otherwise, the appliance will be damaged.
De-mineralized water or distilled water is strongly recommended.
20. Use this appliance for its intended use only.
21. This product has been designed for domestic use only. Any commercial use, inappropriate
use or failure to comply with the instructions, the manufacturer accepts no responsibility and
the warranty will not apply.
22. This appliance is intended for household use only. This is a floor appliance and never
carries it while in use.
23. Children must be supervised to ensure that they do not play with the appliance.
24. This appliance is not designed to be used by people (including children) with a physical,
sensory or mental impairment, or people without knowledge or experience, unless they are
supervised or given prior instructions concerning the use of the appliance by someone
responsible for their safety.
IMPORTANT SAFEGUARDS
When using this appliance, basic precautions should always be followed, including the
following:
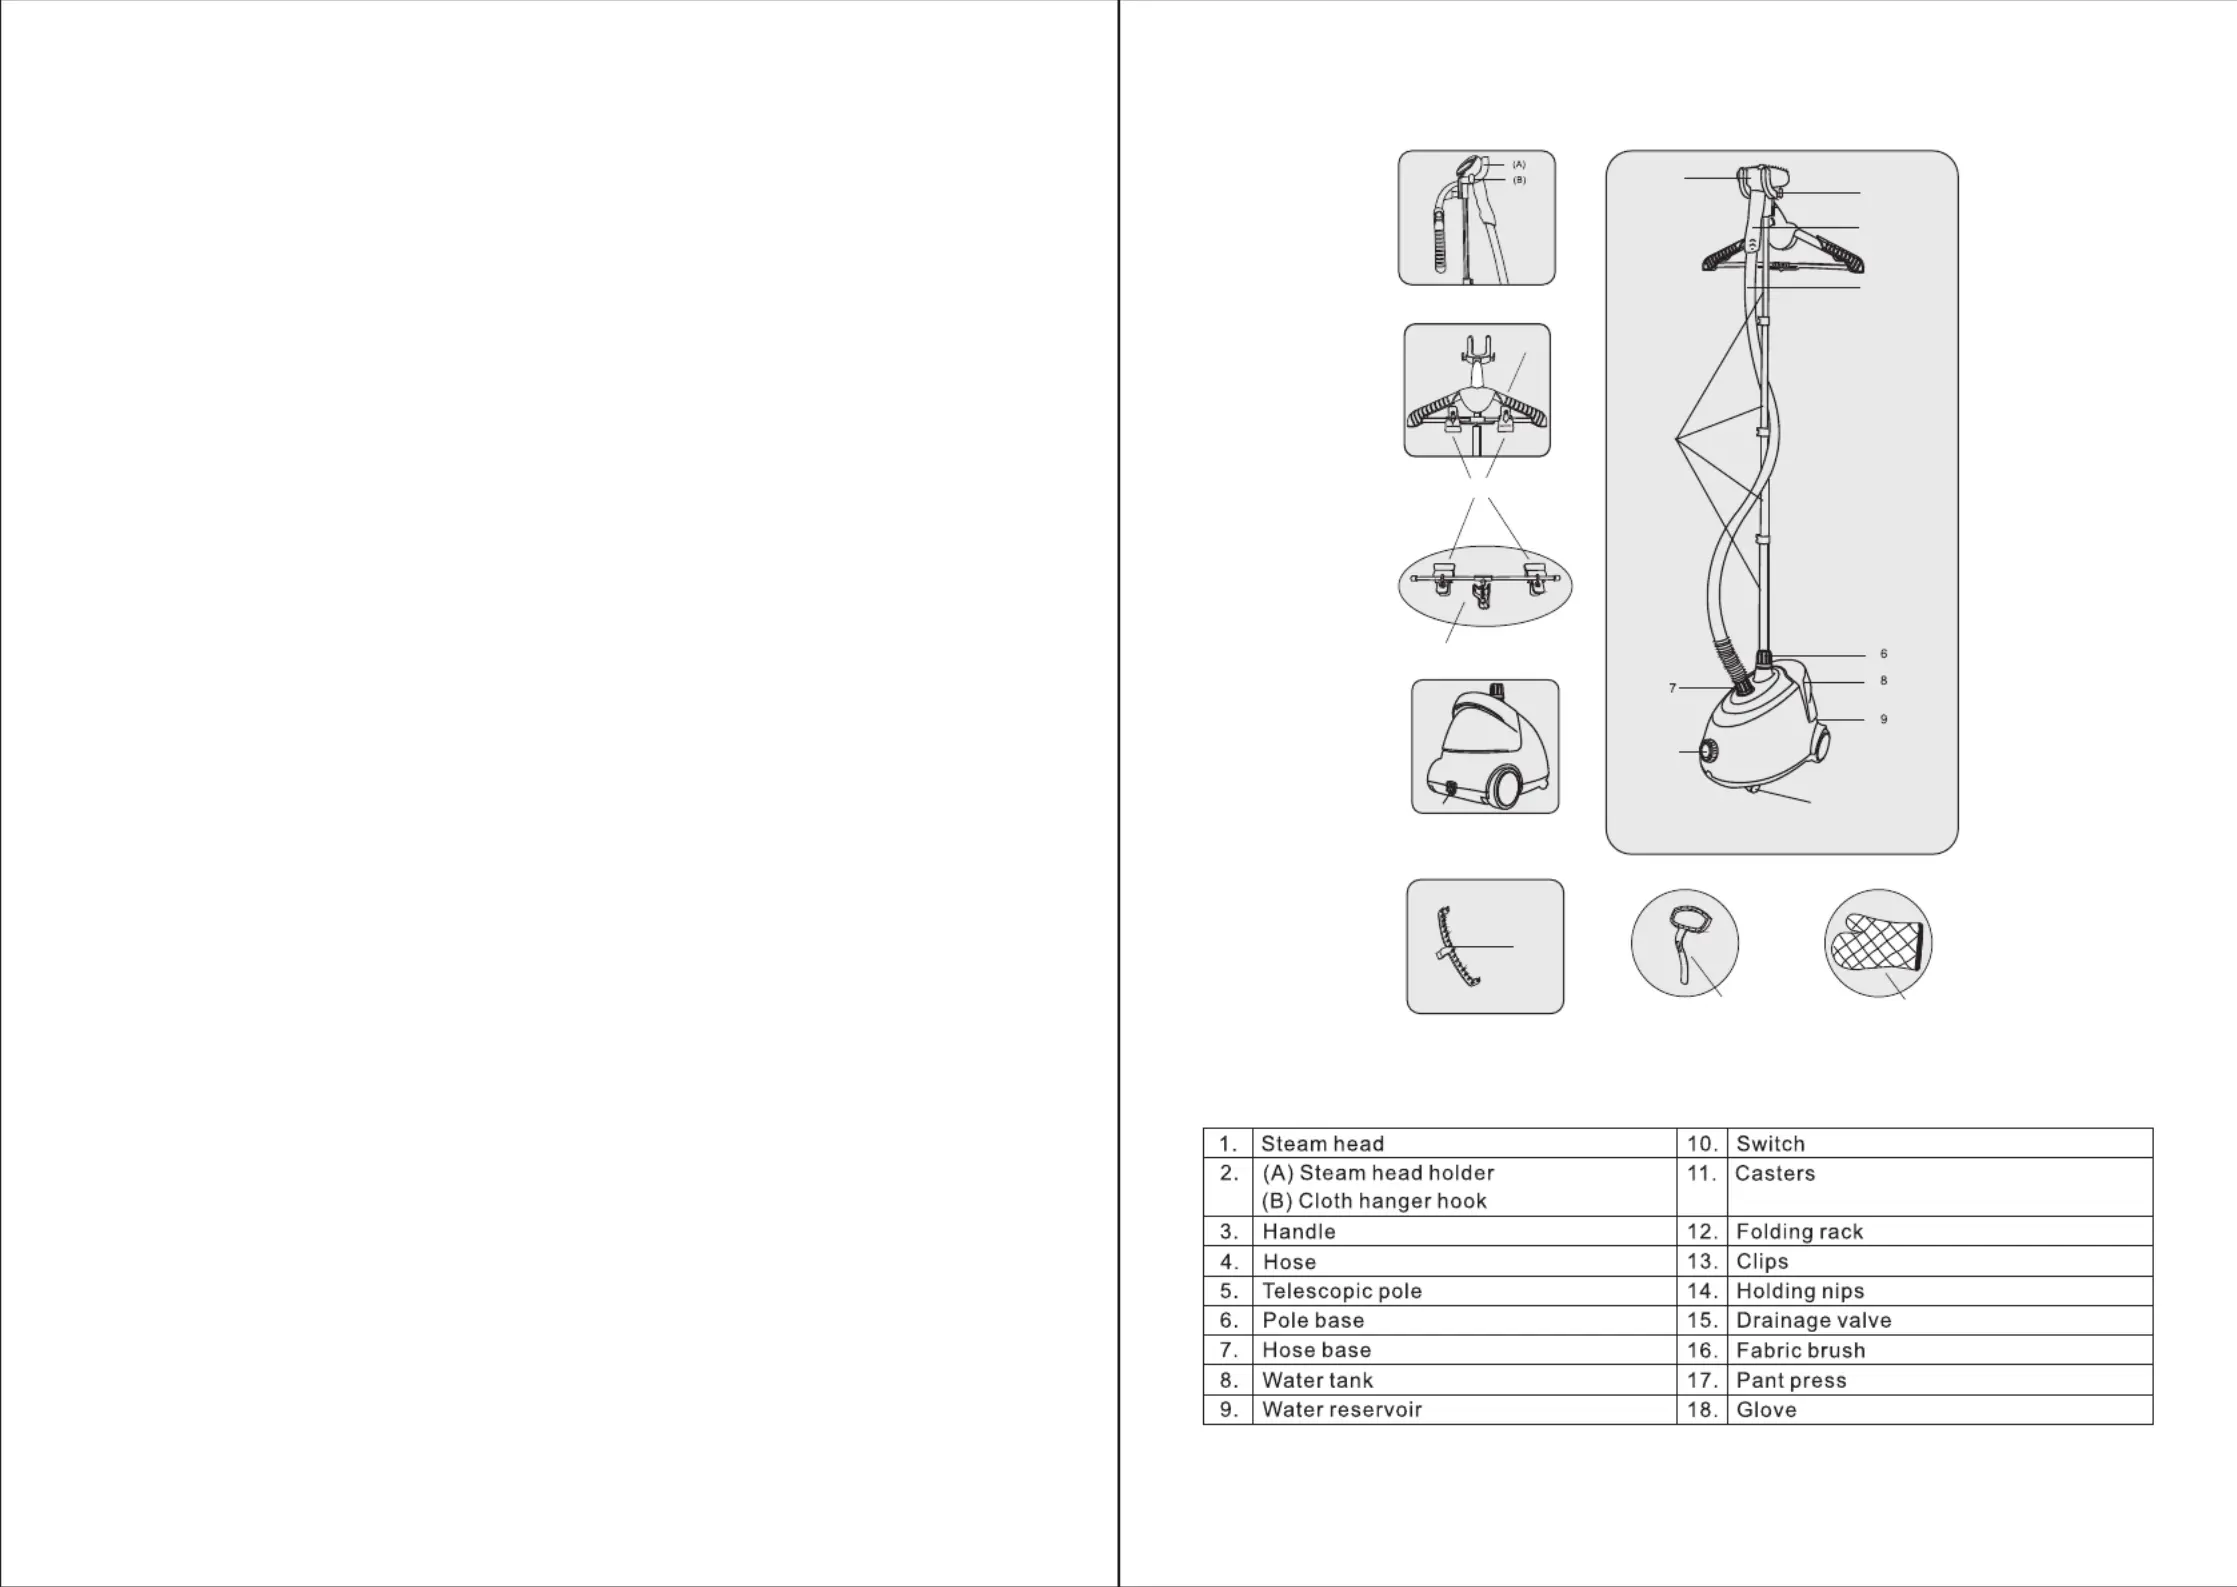
PRODUCT DESCRIPTION
2
2
14
12
13
15
16
17
18
1
2
5
11
10
3
4
FIGURE 1
1 2

FOLDING RACK ASSEMBLY
1. Insert the cloth hanger hook (A) into the telescopic pole (B) shown in figure 6.
2. Insert the folding rack (C) into the hole at the cloth hanger hook (A) about tilting 40 degree
(C) in figure 7.
3. Press and fasten the folding rack (D) vertically as shown in figure 8.
4. Pull the folding rack (E) gently towards both sides, until two bars (F) are on the same
straight-line and completely extended as per figure 9 and 10.
5. Push and lock the sleeve (G) in place by aligning the dot on the bar (F) in figure 11.
3. Hang the garment such as trousers you wish to steam and fix it by the two clips and the
holding nips as shown in figure 14.
ASSEMBLY INSTRUCTIONS
1. Loosen the clips on the telescopic pole. Pull the whole pole to its full extension and tighten
the clips. Put the cloth hanger hook onto the top of the telescopic pole as shown in figure 2.
2. Insert the bottom of the telescopic pole into the pole base then turn the pole base lock
clockwise until tightened and insert the hose onto the hose base by turning the fitting on the
end of the hose clockwise as shown in figure 3. Hands tighten only. Do not over-tighten!
3. Hang the steam head on the steam head holder as shown in figure 4.
CAUTION:
1. Always hang the steam head on the steam head holder when not in use to prevent scalding.
2. The telescopic pole must be fully extended during steam operation to ensure smooth lining
of the hose and provide a free flow of steam.
3. Do not pull the hose with excessive force or else damage will occur and cause steam
leakage. Do not move the appliance by pulling the hose. Move the appliance by grasping
the telescopic pole.
1. Turn off the appliance and wait until no steam is emitted from the steam head.
2. Assemble the flute of fabric brush / pant press towards the peg that at the bottom of steam
head.
3. Push the fabric brush / pant press gently until it is firm in place.
CAUTION: Do not install the accessories while steam is emitting from the steam head to avoid burns!
FABRIC BRUSH AND PANT PRESS ASSEMBLY
The garment steam iron comes with fabric brush and pant press. To attach these accessories to
the steam head:
FIGURE 5
Push
pull
pull
FIGURE 6 FIGURE 7 FIGURE 8
FIGURE 11
FIGURE 10FIGURE 9
HOLDING NIPS AND CLIPS ASSEMBLY
1. Insert the pin A1 and pin A2 on the clip A in hole B1 and B2 to fix the holding nips on the
telescopic pole as per figure 12.
2. Fix the two clips on the lower bar of folding rack (figure 13).
FIGURE 12 FIGURE 13
FIGURE 14
FIGURE 2 FIGURE 3 FIGURE 4
3 4
Product Specifications
| Brand: | Elba |
| Category: | Steam cleaner |
| Model: | EGSI-C1545(PK) |
Do you need help?
If you need help with Elba EGSI-C1545(PK), ask a question below and other users will answer you
Steam cleaner Elba User Manuals

13 October 2024
Steam cleaner User Manuals
- Steam cleaner Electrolux
- Steam cleaner Philips
- Steam cleaner Cecotec
- Steam cleaner Kogan
- Steam cleaner G3 Ferrari
- Steam cleaner Conair
- Steam cleaner Sencor
- Steam cleaner VAX
- Steam cleaner Tower
- Steam cleaner Shark
- Steam cleaner Hamilton Beach
- Steam cleaner Ambiano
- Steam cleaner Bissell
- Steam cleaner Di4
- Steam cleaner Home Electric
- Steam cleaner Gruene
Latest Steam cleaner User Manuals
26 October 2024
26 October 2024
24 October 2024
15 October 2024

14 October 2024
14 October 2024
13 October 2024
13 October 2024
13 October 2024
13 October 2024