Extron FF 220T Manual
Read below 📖 the manual in Italian for Extron FF 220T (17 pages) in the Speaker category. This guide has been helpful for 22 people and has been rated 4.5 stars on average by 2 users
Page 1/17
1
FF 220T • Setup Guide
This setup guide contains installation information about the Extron FF 220T Flat Field
®
speaker. This speaker is designed for use
in plenum rated ceiling spaces and can be dropped into a standard square (2-foot by 2-foot or 600 mm by 600 mm) or rectangular
(2-foot by 4-foot or 600 mm by 1200 mm with supplied cross bars) false ceiling tile space on a T-bar grid.
WARNING: May result in serious injury. Installation and service must be performed by authorized personnel only.
NOTE: The FF 220T comes in two ceiling tile configurations depending on the tile unit of measurement:
• US version (part #42-141-03) Drops into 2 x 2 (61 cm x 61 cm) or 2 x 4 (61 cm x 122 cm) —' ' ' '
suspended tile ceilings
• Metric version (part #42-141-23)
— Drops into 600 mm x 600 mm or 600 mm x 1200 mm suspended tile
ceilings
Be sure to order the correct part number as the two configurations are not interchangeable and will not
fit correctly.
Factors to Consider Before Installation
zInstallation of conduit and conduit adapters must conform to all applicable
building codes and local ordinances.
zInstallation in a plenum-rated environment requires a wire gauge of
12 AWG to 18 AWG, as shown on the right. Conduit may be required.
zIf using secondary support cables, the installer provides the cables.
Installation
1. Disconnect power — Power down all attached devices before proceeding.
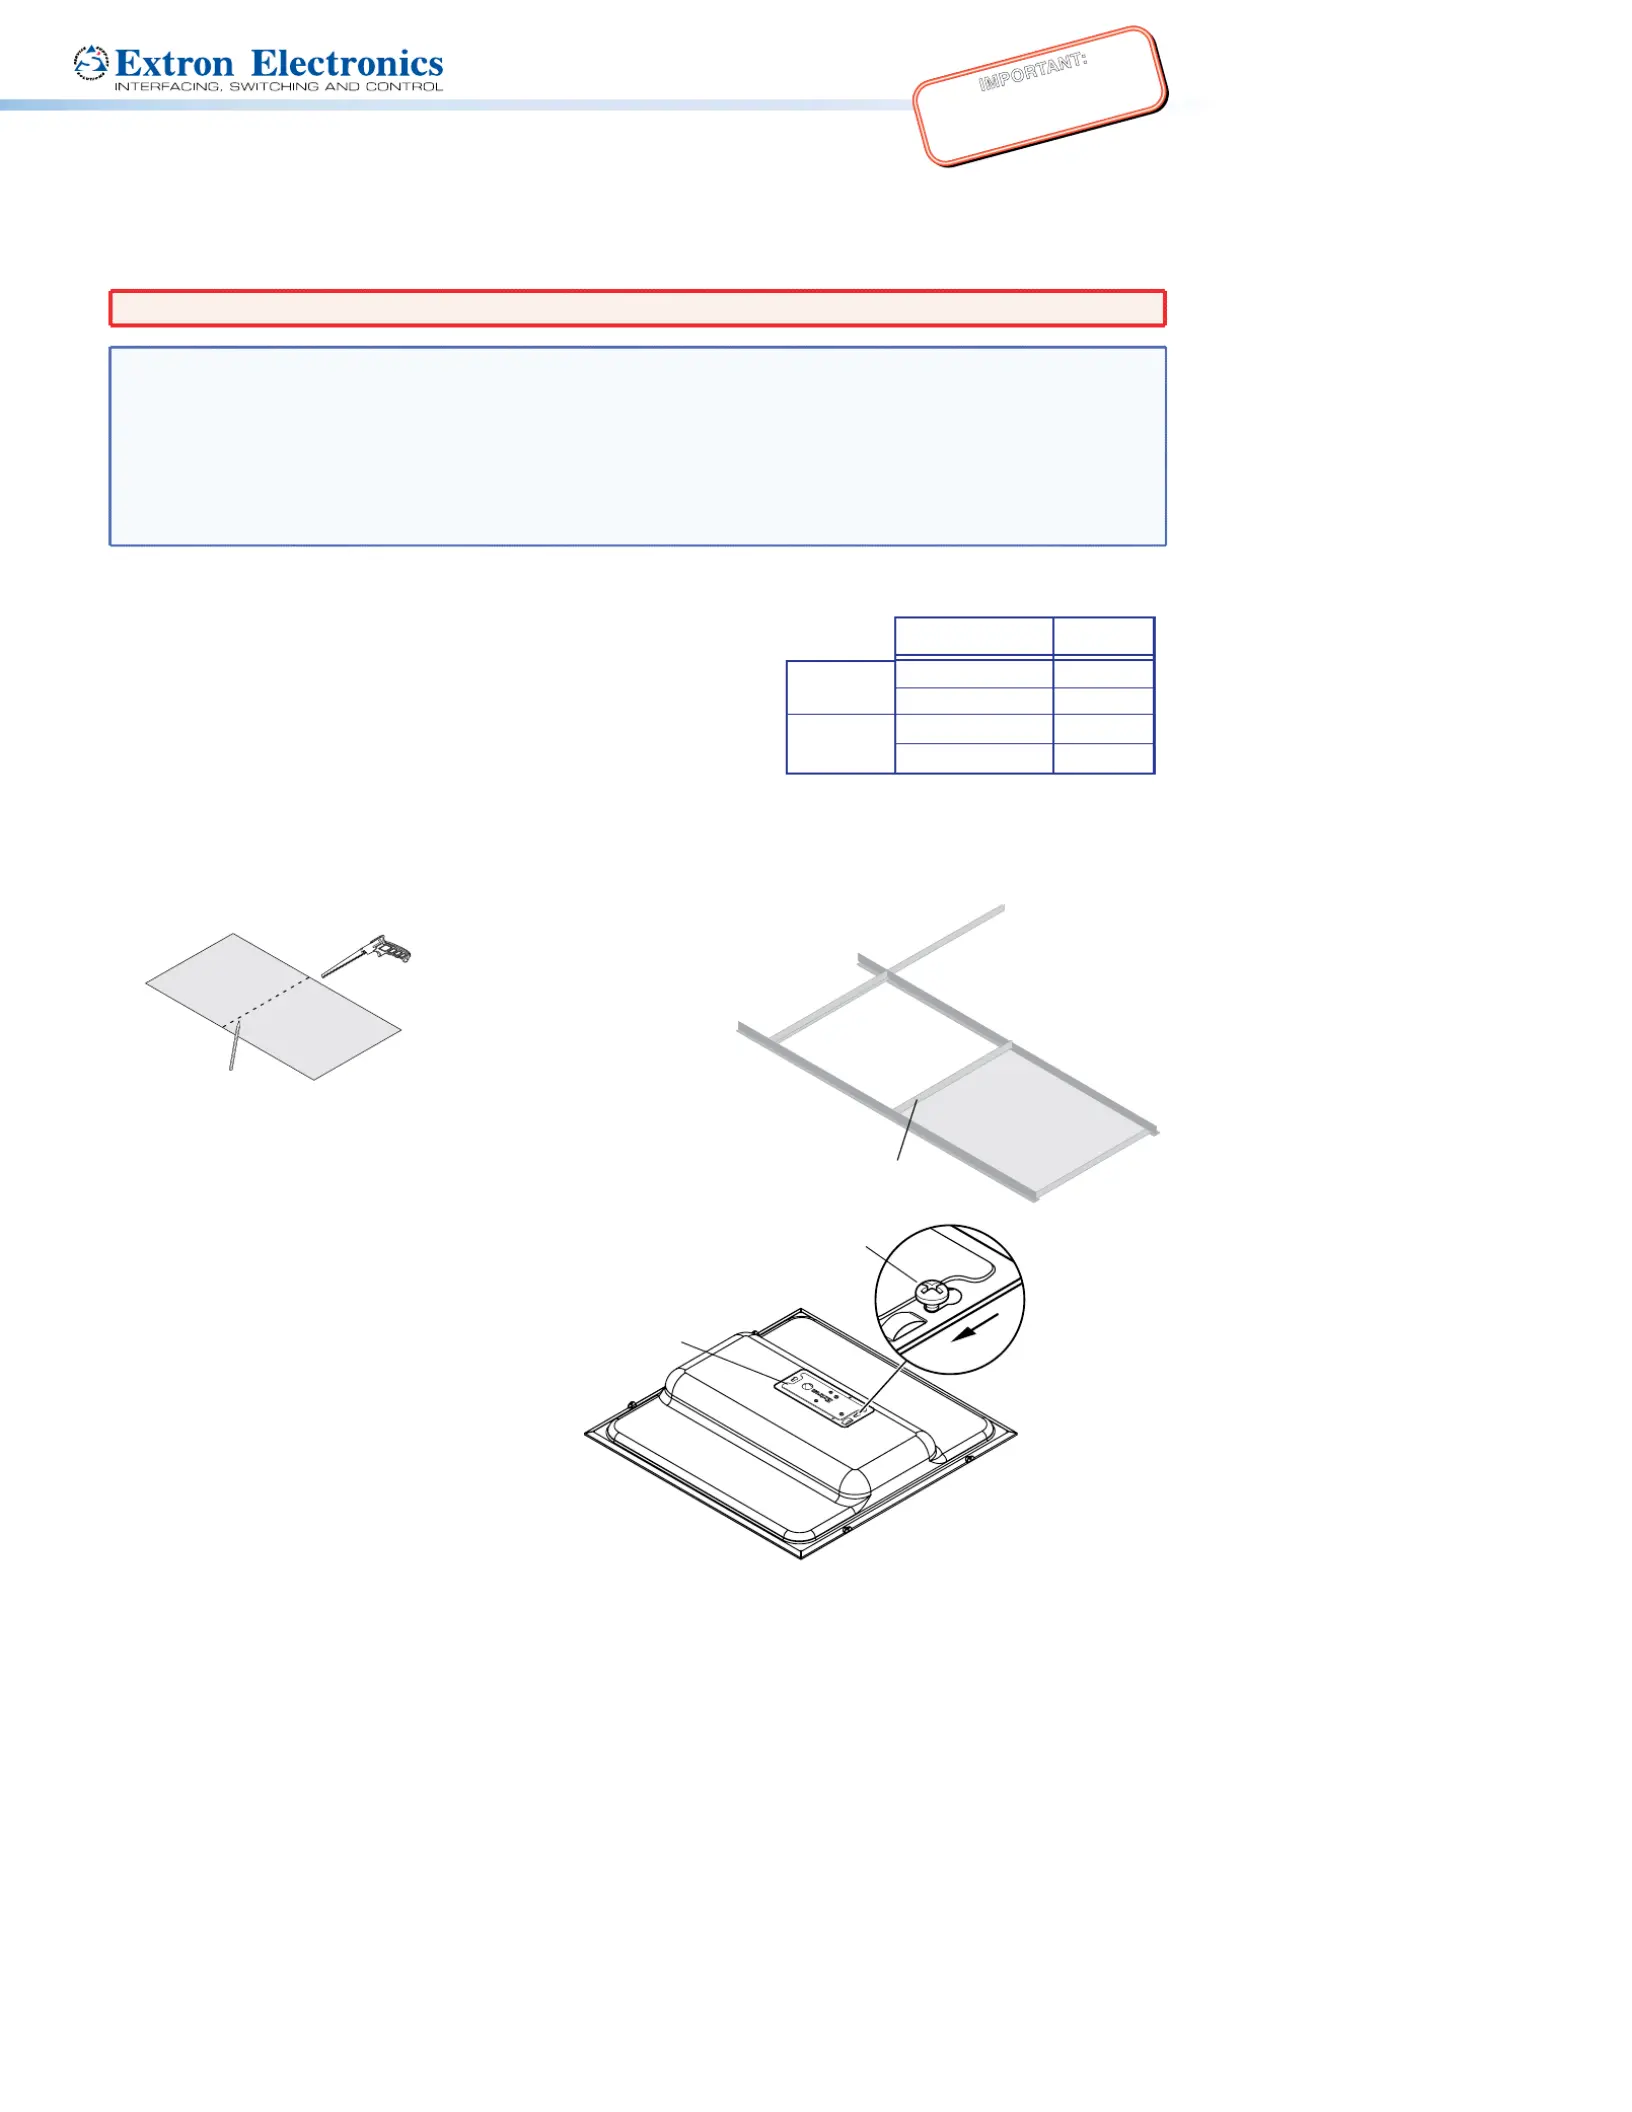
2. Remove and cut ceiling tile — Remove the square ceiling tile where the FF 220T will be installed. If the ceiling has
rectangular tiles, cut the tile in half, as shown below.
Rectangular Ceiling Tile
Dr Line At aw
Halfw Pointay
Cut Material
3. Install the T-rail in a rectangular tile — When the ceiling uses rectangular
tiles, install the T-rail crosspiece into the ceiling opening up against the
cut tile, as shown on the right.
4. Transformer cover plate — Loosen, but do
not remove, the two screws on the top of
the transformer cover plate, as shown on
the right. Next, slide and remove the
transformer cover plate, which is installed
with the transformer side down.
IMPORTANT:
Refer to www.extron.com for the complete
user guide, installation instructions, and
specifications before connecting the
product to the power source.
T-rail
Crosspiece
(supplied)
Ceiling Tile
Number of Wires
per Connection Point
Maximum
Wire Gauge
1 12 GAW
2 14 GAW
1 14 GAW
2 16 GAW
Wire Gauge Table
8Ω
Configuration
70 V/100 V
Configuration
Loosen, t do not remobu ve
the 2 transformer co r plate ve
screws in the 2 yhole slotke s.
Transformer Cover Plate

2
5. Route the cables through the cover plate —
Using a flexible conduit:
a. Route the wires through the conduit.
b. Insert the conduit into the cover plate opening
using an appropriate conduit adapter, and secure
the conduit to the plate, as shown below.
c. Pull the wires out of the conduit and through the
cover plate.
6. Distributed audio system (70 V or 100 V) or direct connection —
• if wiring a 70 V or 100 V distributed system and using the transformer, proceed to step 7.
• if bypassing the transformer and wiring directly from the amplier, proceed to step 9.
7. For 70 V or 100 V distributed audio systems, connect cables from the amplier to the transformer on the FF 220T transformer
cover plate.
Amplifier
70 V or 100 V Distribution System
(through the transformer)
FF 220T
Additional FF 220Ts
can be attached to
to the tap connector.
See step .7f
Transformer
Transformer
FF 220T
Black (-)
To Second
Speaker
Red (+)
Red (+)
Black (-)
From Amplifier
(70V/100V)
(Red) To Te Spea r + ke rminal
(Black) To Te Spea r - ke rminal
NC
1 W
2 W4 W8 W16 WCOM
70 V
100 V
COM NC 16 W 8 W 4 W W 1 W
a. Pull the wires from the amplier through and out of the conduit, if a conduit is used.
b. Route the two wires from the amplier through the cover plate hole to the transformer side. See the wire gauge table on
page for maximum speaker wire sizes.1
Cable Clamp Adapter
Transformer Cover Plate
Secondary Attachment
Point
Rear of Speaker
Flexible Conduit Adapter
Flexible Conduit
Transformer Cover Plate
Secondary Attachment
Point
Rear of Speaker
Using apeaker wires without a conduit:
a. Secure the cable clamp adapter (included) to
the cover plate.
b. Insert the wires through the cable clamp and
cover plate, as shown below.
c. Tighten the clamp screws.
FF 220T Setup Guide (Continued)

3
c. Strip 3/16” (5 mm) from the wire ends and keep the wire end strands together by twisting them. Do not tin the wires.
d. Secure the wires to the appropriate taps on the captive screw
connectors of the 7-connector terminal block (on the transformer
side of the cover plate) as indicated on the tap label. See the note
below. The black, negative (-) wire attaches to the “COM” terminal,
and the red, positive (+) wire attaches to the desired terminal tap.
See the diagram at right.
NOTE: Observe the 70 V or 100 V system
designation as indicated on the tap label.
NC
1 W
2 W4 W8 W16 WCOM
70 V100 V
COM NC 16 W 8 W 4 W 2 W 1 W
e. Use a small at blade screwdriver to tighten the
terminal block screws.
f. To wire additional speakers, route speaker wires
from the second speaker through the cover plate
hole to the transformer side, and twist the black
negative (-) wires together and twist the red
positive (+) wires together before inserting them into
the terminal block. Additional speakers can be daisy
chained this way, as shown at right.
8. Connect wires from the transformer to the speaker.
a. Keep the wire strands together by twisting them (do not tin the wires).
b. Connect the red positive (+) wire to the + speaker terminal and connect the black negative (-) wire to the - speaker
terminal as shown below.
c. Proceed to step .10
9. For direct speaker connection, see the block diagram below.
a. Route the wires from the amplier to the speaker using the same procedure for routing speaker wire (and conduit if
applicable) through the transformer cover plate as described in steps 4 through 7b (see the wire gauge table on
page for maximum speaker wire sizes). Strip 3/16 inch (5 mm) from the ends of the two speaker wire leads (+ and -) 1
coming from the amplier. Keep the wire strands together by twisting them (do not tin the wires), and secure the wires to
the input terminals of the speaker while observing the correct polarity.
Direct Connection
(bypassing the transformer)
Amplifier
Transformer
FF 220T
b. Connect the red positive (+) wire to the + speaker terminal and connect the black negative (-) wire to the - speaker
terminal depending on whether one or two speakers are being connected, as shown below.
Red Wire
Bla ireck W
From Amplifier
One Speaker
From Amplifier
Red Wire
Bla ireck W
To Second Speaker
From Amplifier
To Second Speaker
Two Speakers
NC
1 W
2 W4 W16 WCOM
70 V
100 V
COM NC 16 W 8 W 4 W 2 W 1 W
8 W
Wiring to a Single Speaker
NC
1 W
2 W4 W16 WCOM
70 V
100 V
COM NC 16 W 8 W 4 W 2 W 1 W
8 W
Red Wires
Black Wires
From Amplifier (+)
To Next Speaker (tap)
From Amplifier (-)
To Next Speaker (com)
FF 220T Setup Guide (Continued)
Product Specifications
| Brand: | Extron |
| Category: | Speaker |
| Model: | FF 220T |
Do you need help?
If you need help with Extron FF 220T, ask a question below and other users will answer you
Speaker Extron User Manuals

13 October 2024
13 October 2024
13 October 2024
13 October 2024
13 October 2024
13 October 2024
13 October 2024
13 October 2024
13 October 2024
13 October 2024
Speaker User Manuals
- Speaker Sony
- Speaker Xiaomi
- Speaker LG
- Speaker Bosch
- Speaker IKEA
- Speaker HP
- Speaker Philips
- Speaker Panasonic
- Speaker Hama
- Speaker Vorago
- Speaker Jensen
- Speaker Avantree
- Speaker Edifier
- Speaker Reflexion
- Speaker Meridian
- Speaker Teufel
- Speaker Kogan
- Speaker Soundcore
- Speaker Turbosound
- Speaker GoGEN
- Speaker Pro-Ject
- Speaker Yamaha
- Speaker Morel
- Speaker Axis
- Speaker Media-tech
- Speaker Pioneer
- Speaker EarFun
- Speaker Ecler
- Speaker Audac
- Speaker Woxter
- Speaker KEF
- Speaker Audio-Technica
- Speaker Toa
- Speaker Metra
- Speaker Pyle
- Speaker Sencor
- Speaker Bose
- Speaker Orava
- Speaker Grundig
- Speaker JVC
- Speaker Kicker
- Speaker Auna
- Speaker Midland
- Speaker OSD Audio
- Speaker Power Dynamics
- Speaker Fenton
- Speaker Vonyx
- Speaker Bluesound
- Speaker Hertz
- Speaker Kenwood
- Speaker MB Quart
- Speaker Bigben
- Speaker Aplic
- Speaker CSL
- Speaker Bearware
- Speaker NUVO
- Speaker Maginon
- Speaker Infiniton
- Speaker Roku
- Speaker GPO
- Speaker Advance
- Speaker Sonance
- Speaker AXESS
- Speaker Be Cool
- Speaker Artsound
- Speaker Denon
- Speaker Ion
- Speaker Marshall
- Speaker Yorkville
- Speaker V-Tac
- Speaker MyDJ
- Speaker Valcom
- Speaker Celly
- Speaker JBL
- Speaker Infinity
- Speaker Majority
- Speaker Nedis
- Speaker Sharp
- Speaker Helix
- Speaker Genesis
- Speaker Klipsch
- Speaker Worx
- Speaker Muse
- Speaker Ground Zero
- Speaker Karma
- Speaker Glemm
- Speaker Match
- Speaker Speed-Link
- Speaker Renkforce
- Speaker Definitive Technology
- Speaker QSC
- Speaker WHD
- Speaker Q Acoustics
- Speaker Karcher
- Speaker GoldenEar
- Speaker Pyramid
- Speaker FoneStar
- Speaker Trevi
- Speaker Monitor Audio
- Speaker Canton
- Speaker Fresh N Rebel
- Speaker Energy Sistem
- Speaker Bauhn
- Speaker PSB
- Speaker Vizio
- Speaker Polk
- Speaker ESX
- Speaker Omnitronic
- Speaker MEE Audio
- Speaker Monacor
- Speaker ModeCom
- Speaker Hercules
- Speaker Black Hydra
- Speaker Electro-Voice
- Speaker Wharfedale
- Speaker Boss
- Speaker Tannoy
- Speaker Mount-It!
- Speaker GMB Audio
- Speaker Mad Dog
- Speaker Ashly
- Speaker Memphis Audio
- Speaker Focal
- Speaker Alpine
- Speaker ATen
- Speaker Genelec
- Speaker Bazooka
- Speaker Lamax
- Speaker NGS
- Speaker Aiaiai
- Speaker RCF
- Speaker SVS
- Speaker Aiwa
- Speaker N-Gear
- Speaker Atlas
- Speaker PowerBass
- Speaker Prime3
- Speaker Harman Kardon
- Speaker Lexibook
- Speaker Ibiza Sound
- Speaker Creative
- Speaker Aconatic
- Speaker DAP Audio
- Speaker REL Acoustics
- Speaker Sonus Faber
- Speaker Xcellon
- Speaker OWI
- Speaker Titanwolf
- Speaker Weather X
- Speaker HK Audio
- Speaker Phoenix Gold
- Speaker Krüger And Matz
- Speaker Indiana Line
- Speaker Blue Tees
- Speaker BASSBOSS
- Speaker Polsen
- Speaker Deaf Bonce
- Speaker Tangent
- Speaker FBT
- Speaker Transparent
- Speaker IHome
- Speaker Martin Logan
- Speaker Andover
- Speaker ILive
- Speaker Moonki
- Speaker BlueAnt
- Speaker HuddleCamHD
- Speaker X JUMP
- Speaker PulseAudio
- Speaker Urban Revolt
- Speaker Audison
- Speaker Boynq
- Speaker Dynaudio
- Speaker Clarity
- Speaker VIETA PRO
- Speaker Potter
- Speaker Sonoro
- Speaker Yamazen
- Speaker OTTO
- Speaker Soen
- Speaker Miller & Kreisel
- Speaker Qian
- Speaker Iriver
- Speaker Standard Horizon
- Speaker The Box
- Speaker August
Latest Speaker User Manuals
27 October 2024
27 October 2024
27 October 2024
27 October 2024
27 October 2024
27 October 2024
27 October 2024
27 October 2024
27 October 2024
27 October 2024