Extron MIX 301 Manual
Extron
Mixing console
MIX 301
Read below 📖 the manual in Italian for Extron MIX 301 (18 pages) in the Mixing console category. This guide has been helpful for 29 people and has been rated 4.5 stars on average by 2 users
Page 1/18
1
MIX 301 • User Guide
The MIX 301 is a three-input, one-output line level audio mixer. It accepts balanced or unbalanced input signals, and provides a
balanced or unbalanced output. The MIX 301 accommodates input sources with various impedances. Three recessed input gain
controls on the front panel enable adjustment of mix levels from -80 dB to +20 dB.
MIC to Line
Preamplifier
RS-232/
ML
C/
I
R
Tx
R
x
I
R
1
2
V
A
B
C
PREAM
P
10
0-240V
1
.0A MAX.
50-
60Hz
IN
PUT 4
AUDI
O
IN
PUTS
LINE LEVEL
MONO
AUDIO
AUDIO
L
I
NEO U
T
AUX/MIX
ADJUST
-42d
B
TO
+24dB
L
R
L
R
L
R
1
2
3
INPUTS
OUTPUTS
VDE
O
B
G
R
Y
1
INPUTS
MONIT
45
6
C
D
I
R
E
C
T
X
FMR
COM
4/8
ohm
100V
70V
AMPLIFIED
O
U
T
PU
T
20
W
ATTS MONO
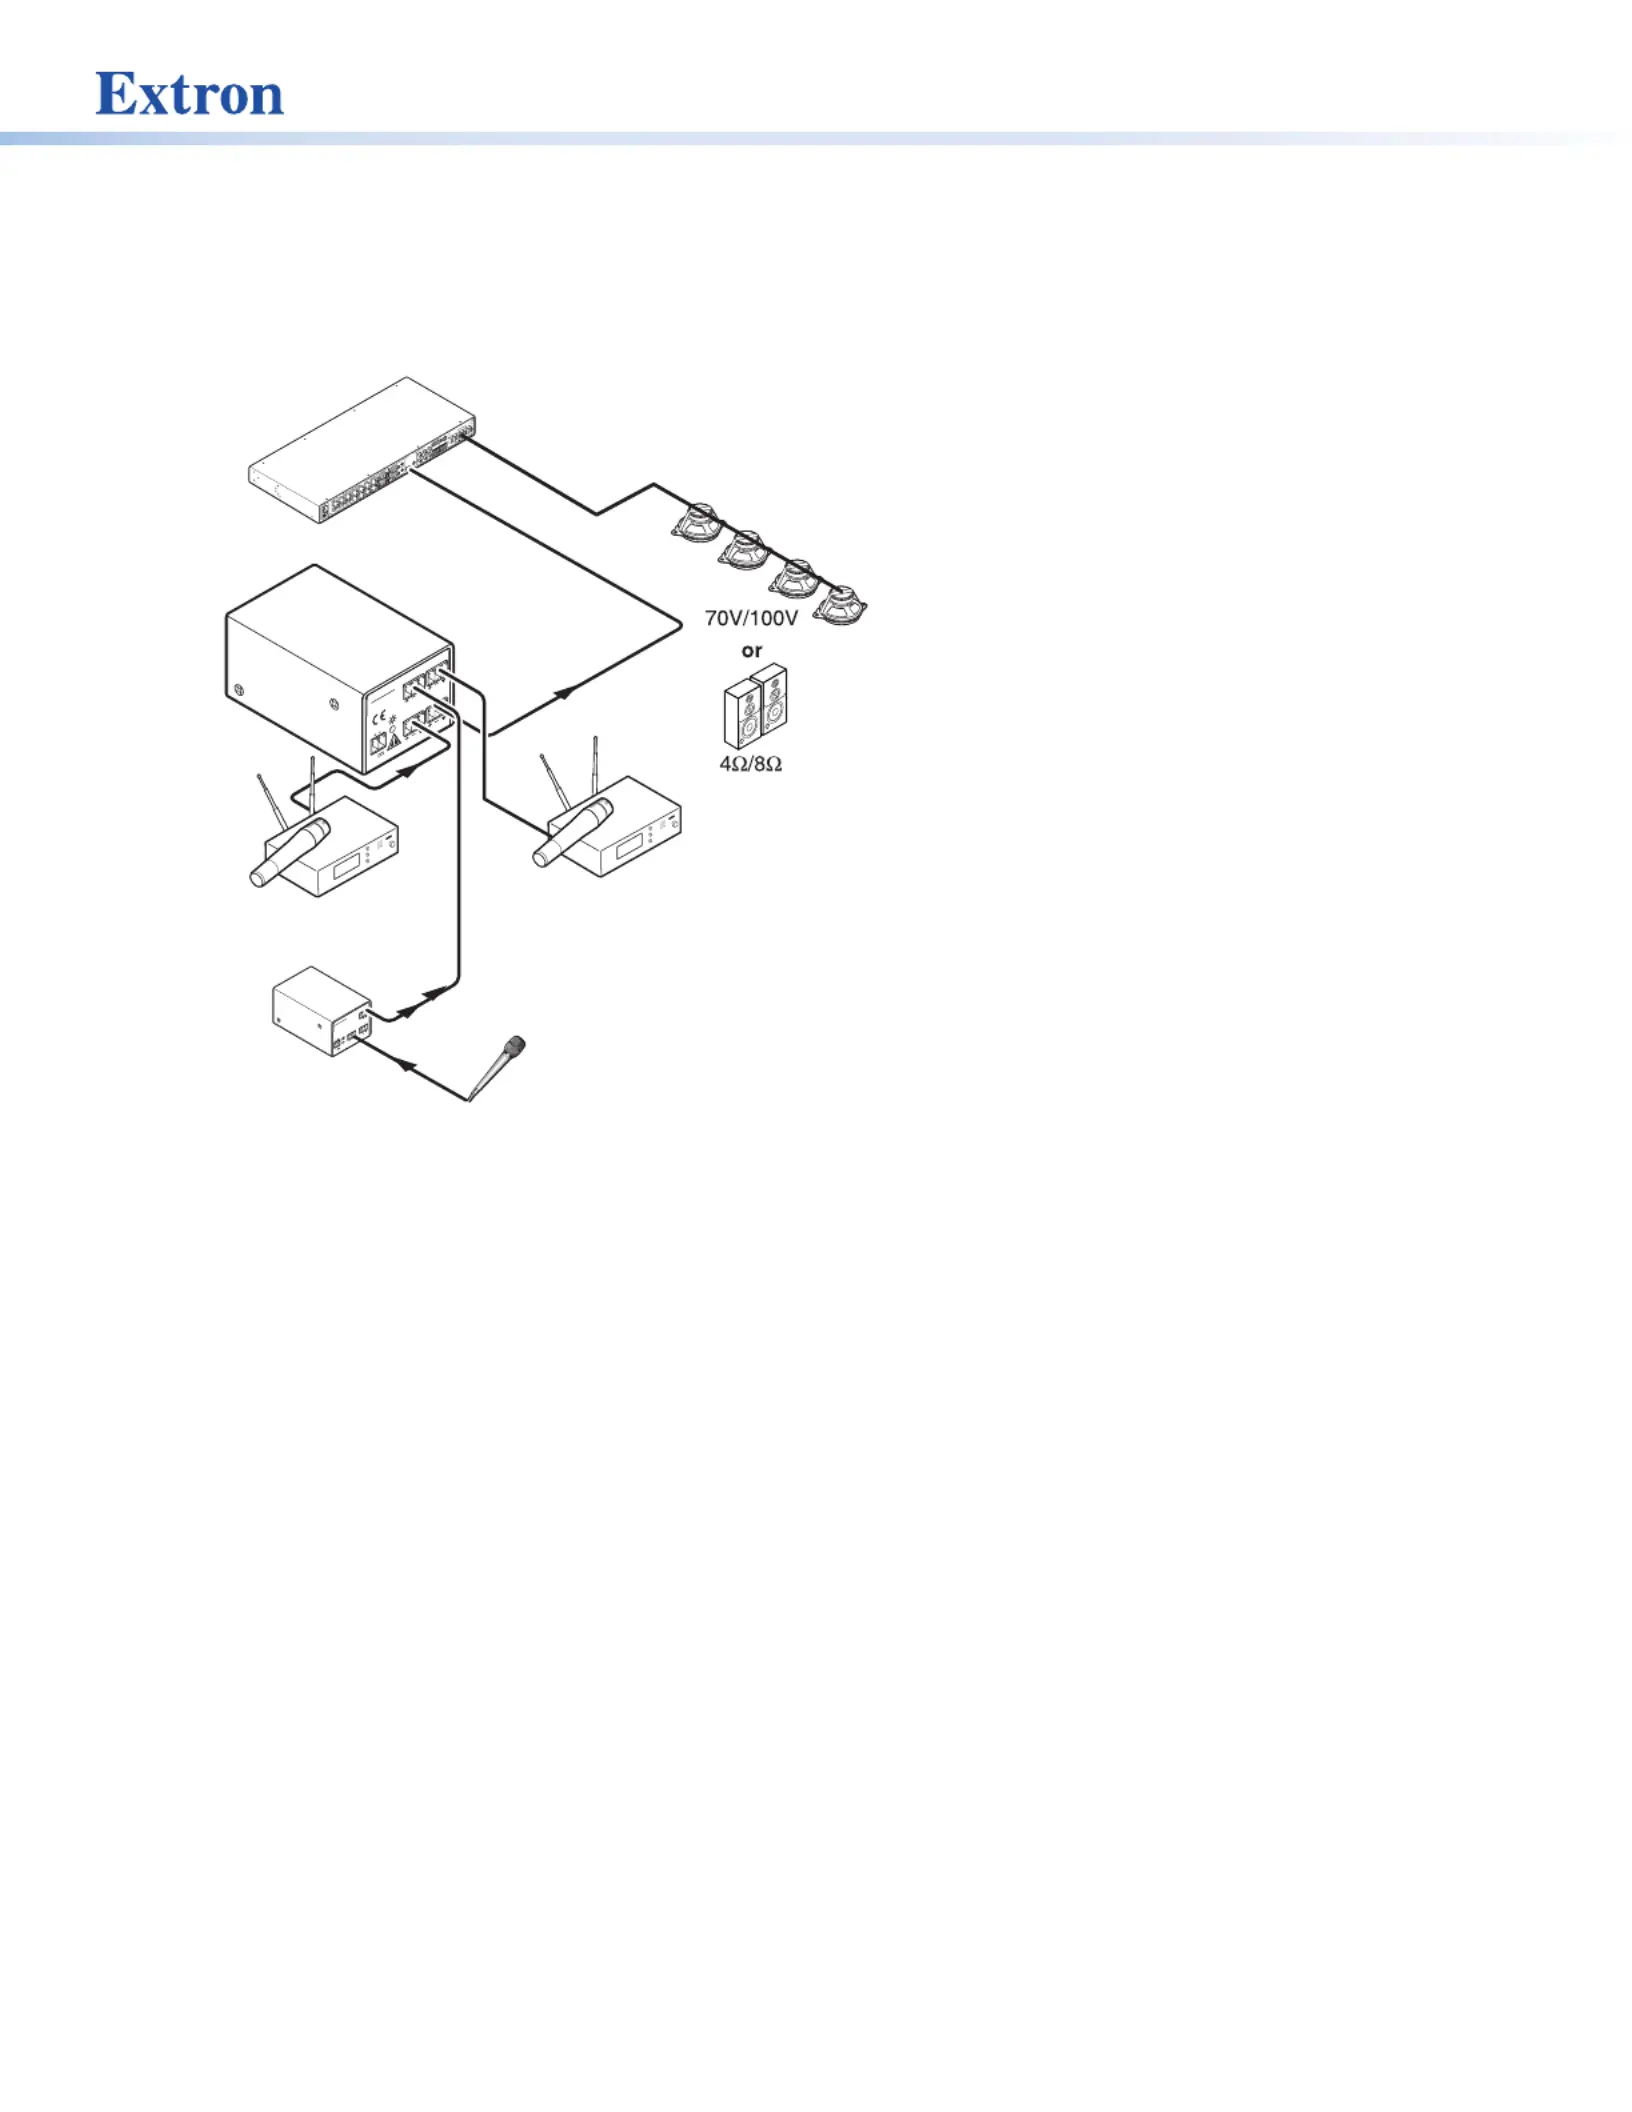
Mono Amplified Output
Switcher
Speakers
Wireless
Microphone System
AUX/MIX
Input
Wireless
Microphone System
Extron
MIX 301
3 Channel
Mixer
MIX 301
3 CHANNEL
MIXER
IN 2 MIX OUT
IN 1 IN 3
12V
0.5a MAX
Microphone
12V
0.5a
POWER
MAX
MIC
INPUT REMOTE
VOL/MUTE
MLP 101
MIC TO LINE
PREAMPLIFIER
10V
MIC
OUT
CH 003
CH 003
Figure 1. MIX 301 Application Diagram
Features
• Inputs — Captive screw connectors
• Outputs — Captive screw connectors
• Balanced and unbalanced signal compatibility
• Gain control for each channel — Wide adjustment range from -80 dB to +20 dB
• Compact size — Easy installation in a rack or in limited space
• Rack-mountable — 1U, one-eighth rack width metal enclosure
• External Extron Everlast™ power supply included
Mounting the MIX 301
The MIX 301 can be set on a table, mounted on a rack shelf, mounted on the back of the rack, mounted under a desk or table, or
installed on a projector mount (go to the Extron for mounting options). website
UL Rack Mounting Guidelines
The following Underwriters Laboratories (UL) guidelines pertain to the safe installation of the MIX 301 in a rack.
1. Elevated operating ambient temperature — If installed in a closed or multi-unit rack assembly, the operating ambient
temperature of the rack environment may be greater than room ambient temperature. Therefore, install the MIX 301 in an
environment compatible with the maximum ambient temperature (Tma = +122 °F, +50 °C) specied by Extron.
2. Reduced air flow — Install the equipment in a rack so that the amount of air ow required for safe operation of the
equipment is not compromised.
2
MIX 301 • User Guide (Continued)
3. Mechanical loading — Mount the equipment in the rack so that a hazardous condition is not achieved due to uneven
mechanical loading.
4. Circuit overloading — Connect the equipment to the supply circuit and consider the effect that circuit overloading might
have on overcurrent protection and supply wiring. Appropriate consideration of equipment nameplate ratings should be used
when addressing this concern.
5. Reliable earthing (grounding) — Maintain reliable grounding of rack-mounted equipment. Pay particular attention to supply
connections other than direct connections to the branch circuit (e.g. use of power strips).
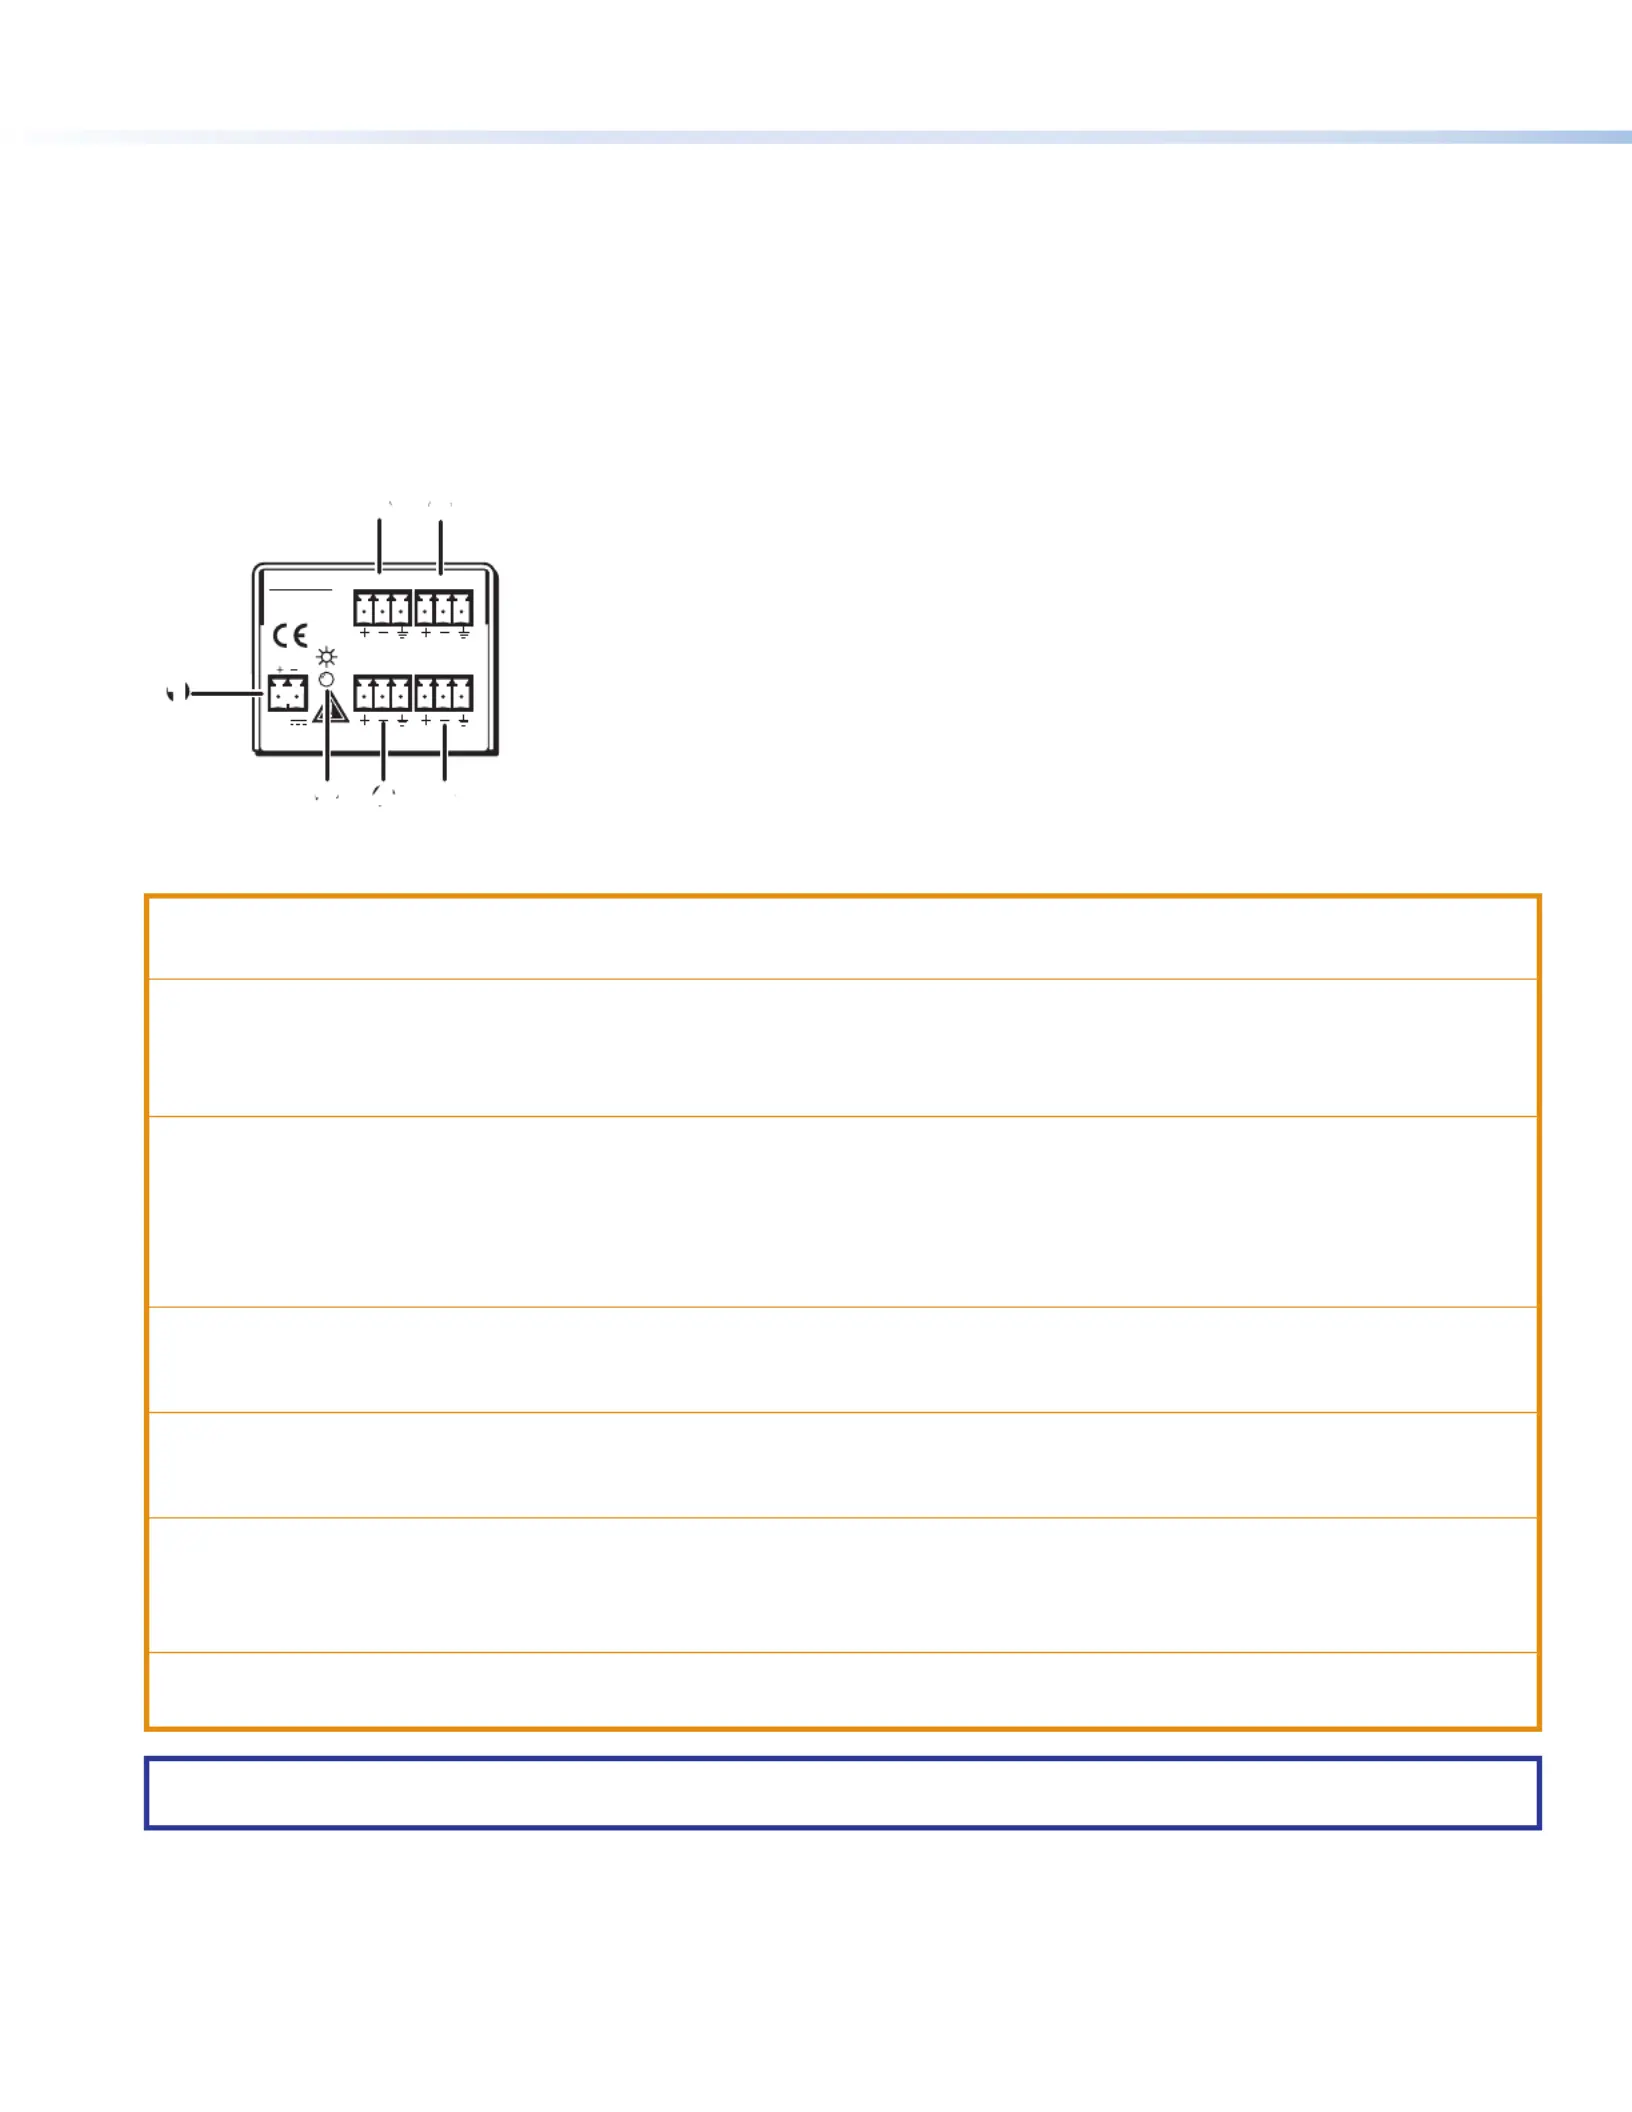
Rear Panel Features and Cabling
MIX 301
3 CHANNEL
MIXER
IN 2 MIX OUT
IN 1 IN 3
12V
0.2 A MAX
2 4 6
5
3
1
1
Captive screw power input connector
2
Power LED
345
Balanced/unbalanced input connectors (IN 1, IN 2, IN 3)
6
Balanced output connector (MIX OUT)
Figure 2. MIX 301 Rear Panel
ATTENTION:
AVERTISSEMENT :
• Always use a power supply provided by or specified by Extron. Use of an unauthorized power supply voids all regulatory
compliance certification and may cause damage to the supply and the end product.
• Utilisez toujours une source d’alimentation fournie ou recommandée par Extron. L’utilisation d’une source d’alimentation non
autorisée annule toute conformité réglementaire et peut endommager la source d’alimentation ainsi que le produit final.
• When you are connecting the power supply, voltage polarity is extremely important. Applying power with incorrect
voltage polarity could damage the power supply and the interface. Identify the power cord negative lead by the ridges on
the side of the cord.
• Lorsque vous connectez la source d’alimentation, la polarité de la tension est extrêmement importante. Une alimentation
avec une polarité de tension incorrecte peut endommager la source d’alimentation ainsi que l’interface. Il est essentiel
d’identier une connexion négative du cordon d’alimentation au niveau des stries sur les parties latérales du cordon.
• The two power cord wires must be kept separate while the power supply is plugged in. Remove the power before wiring.
• Les deux cordons d’alimentation doivent être maintenus à l’écart tant que la source d’alimentation est branchée. Coupez
l’alimentation avant de faire les raccordements.
• The length of the exposed wires in the stripping process is . The ideal length is 3/16 inches (5 mm).important
• La longueur des câbles exposés est lorsque l’on entreprend de les dénuder. La longueur idéale est de 5mm importante
(3/16inches).
• Do not tin the wire leads before installing into the connector. Tinned wires are not as secure in the connector and could
be pulled out. They may also break after being bent several times.
• Ne pas étamer les conducteurs avant de les insérer dans le connecteur. Les câbles étamés ne sont pas aussi bien xés
dans le connecteur et pourraient être tirés. Ils peuvent aussi se casser après avoir été pliés plusieurs fois.
• To verify the polarity before connection, plug in the power supply with no load and check the output with a voltmeter.
• Pour vérier la polarité avant la connexion, brancher l’alimentation hors charge et mesurer sa sortie avec un voltmètre.
NOTE: Your MIX 301 may have shipped with a blue captive screw connector. This blue connector can be plugged into either
a blue or an orange power receptacle. The blue connector does not have the extended tail or the included tie-wrap.
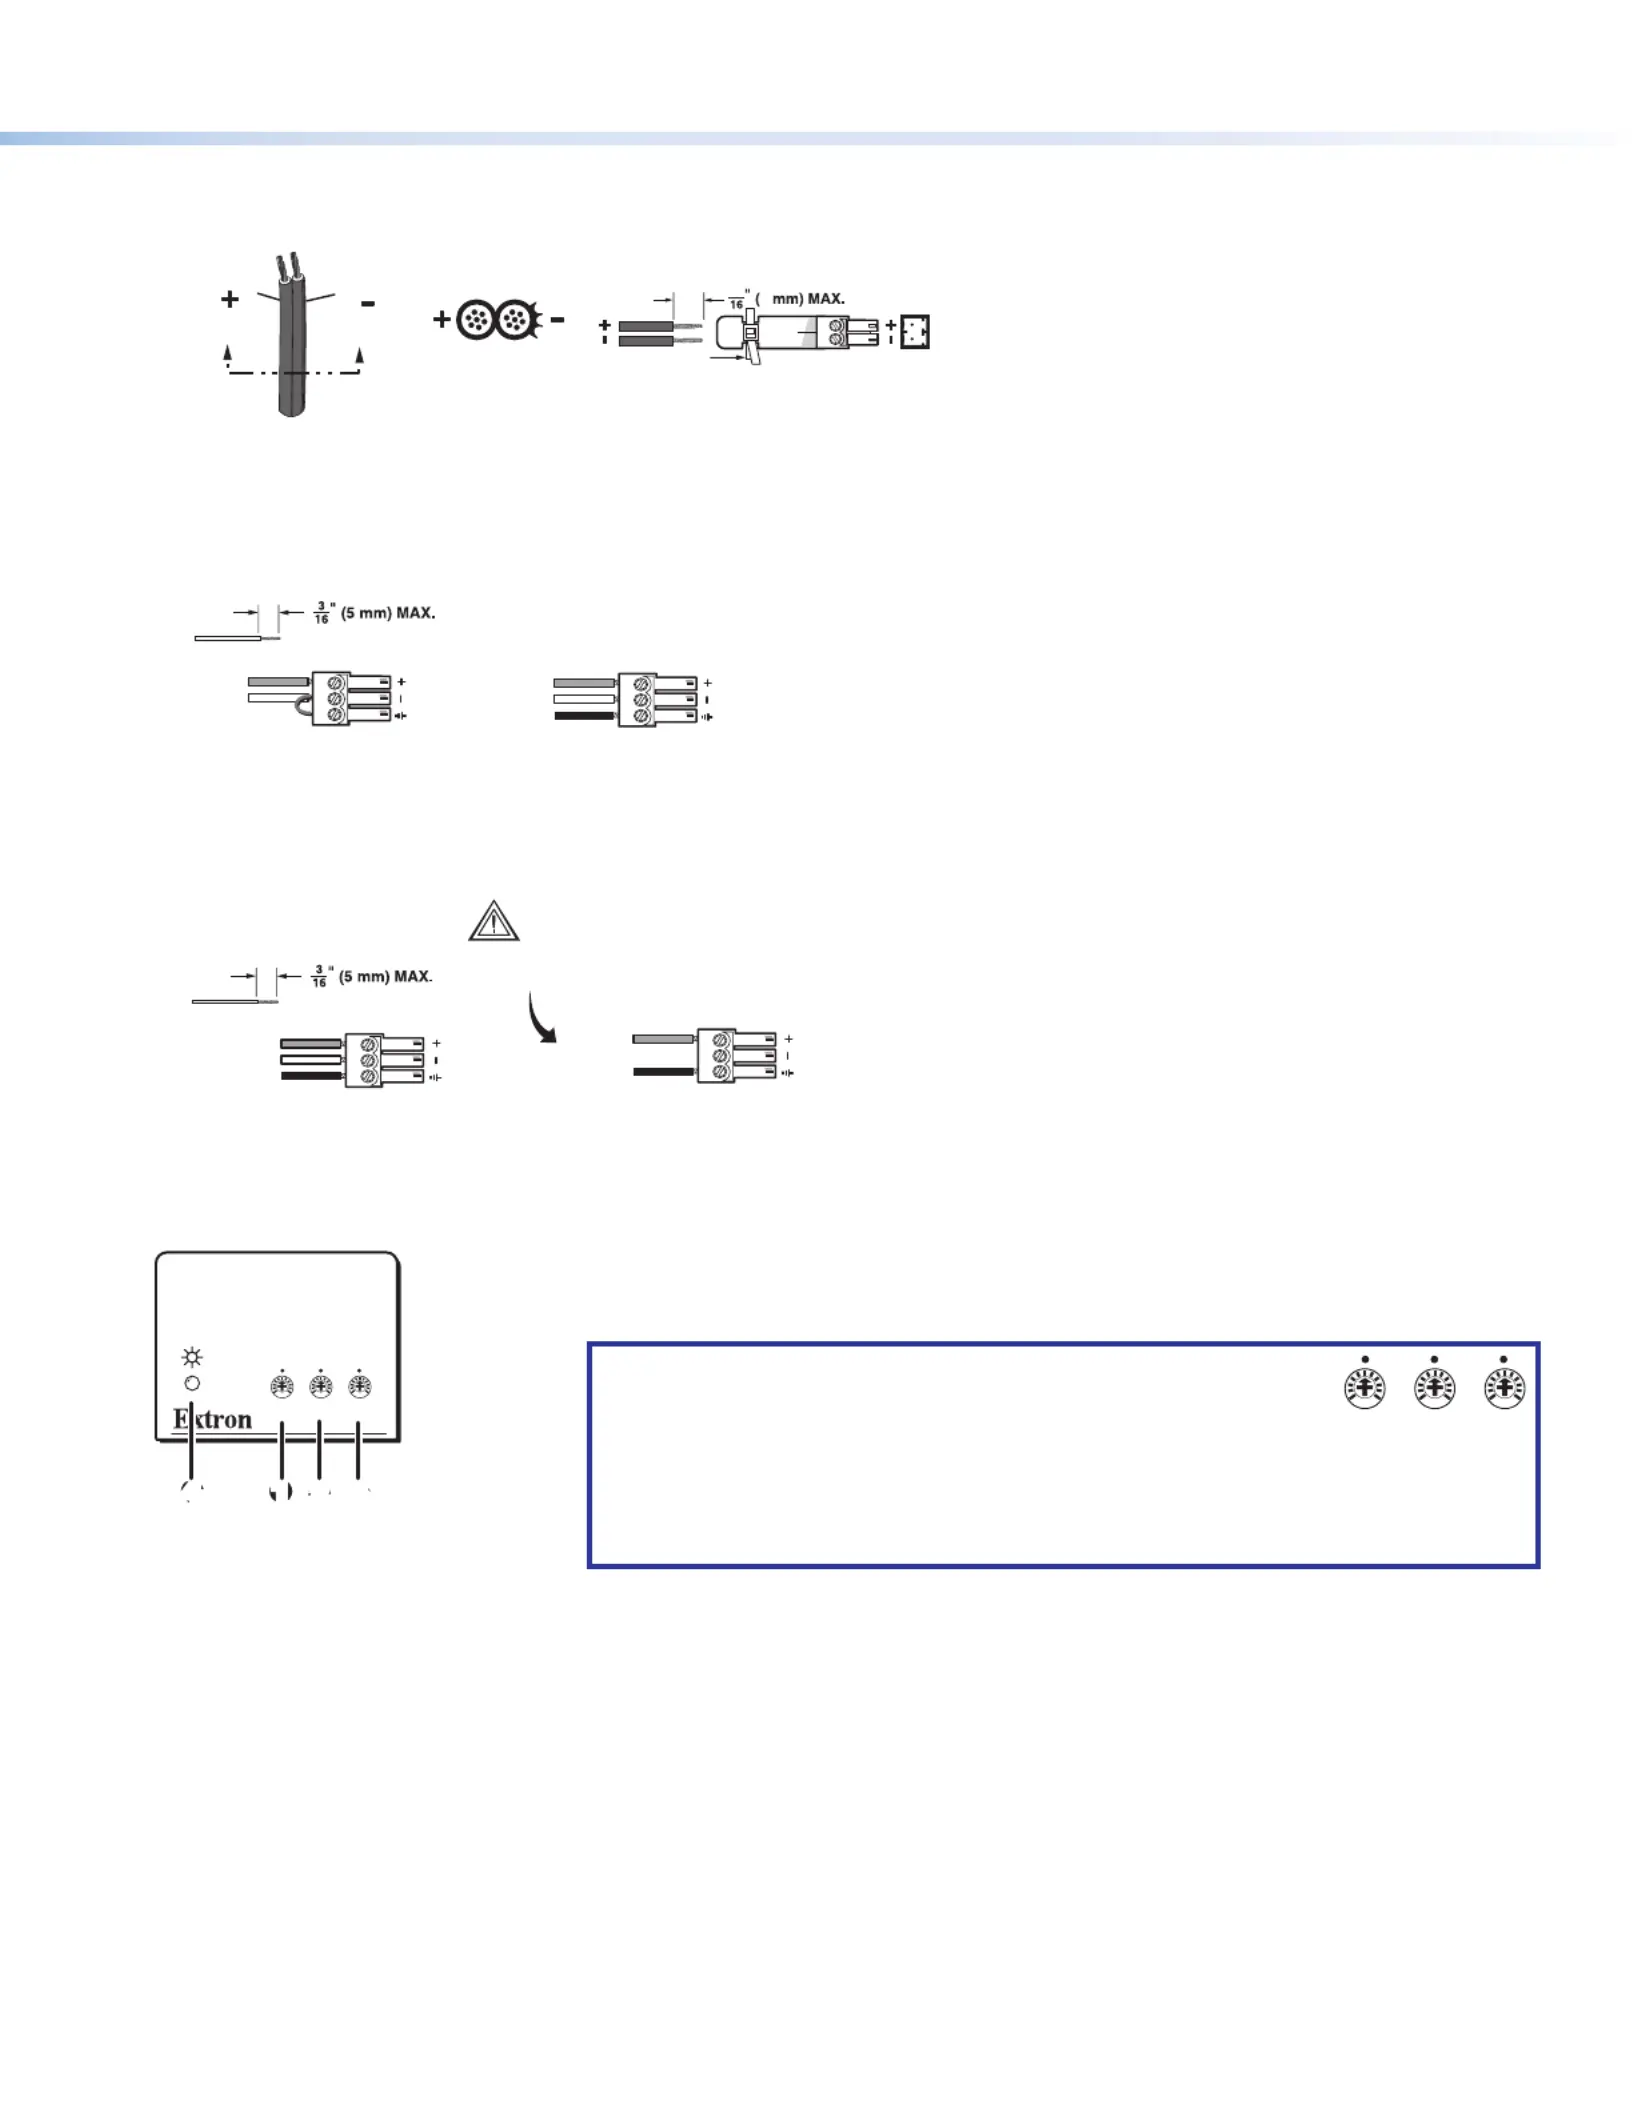
3
1
(see Captive screw power input connector figure2 on the previous page) — Connect the included 12 VDC external power
supply into the 2-pole 3.5 mm captive screw connector. Be careful to observe the correct polarity.
Captive Screw
Connector
Tie Wrap
Power Supply
Output Cord
Ridges
Smooth
A A
SECTION A–A
5
3
2
— Lights green to indicate that the MIX 301 has power.Power LED
345
— The balanced/unbalanced mono audio input is wired to Balanced/unbalanced input connectors (IN 1, IN 2, IN 3)
a 3-pole, 3.5 mm captive screw connector. Wire the connector as shown below.
Tip
Slee ve
Ring
Tip
Slee
ve
Unbalanced Input
Left or Right
Balanced Input
6
— The balanced mono output is wired to a 3-pole, 3.5 mm captive screw Balanced output connector (MIX OUT)
connector. Wire the connector as shown below for balanced or unbalanced output devices.
Unbalanced Output
Tip
Slee ve
NO GROUND HERE
Tip
Slee ve
Ring
Balanced Output
CAUTION
For unbalanced audio, connect the sleeve(s)
to the ground. connect the slee to DO NOT ve
the negative (-) contact.
Front Panel Features
123
MTP SERIES
12
3
4
Figure 3. Front Panel
Features
123
— Adjusts the audio input gain for each input. Input channel audio gain controls
The gain is adjusted by rotating the screw and the adjustment range is from mute
(fully counterclockwise) to +20 dB (fully clockwise). See the note below.
NOTE: Unity gain (0 dB) for each input channel is around the
123
12 o’clock (vertical) position with the potentiometer adjustment
screws vertically aligned with the indicator dots, as shown on
the right:
The potentiometers of the MIX 301 are set precisely to unity gain at the factory.
Once an adjustment screw is turned, test equipment will be required to accurately
reset the potentiometer to unity gain.
4
— Lights green to indicate that the MIX 301 has power.Power LED
Product Specifications
| Brand: | Extron |
| Category: | Mixing console |
| Model: | MIX 301 |
Do you need help?
If you need help with Extron MIX 301, ask a question below and other users will answer you
Mixing console Extron User Manuals

13 October 2024
13 October 2024
Mixing console User Manuals
- Mixing console Braun
- Mixing console Philips
- Mixing console Arendo
- Mixing console Exquisit
- Mixing console Power Dynamics
- Mixing console Concept
- Mixing console Vonyx
- Mixing console Hyundai
- Mixing console Røde
- Mixing console Valcom
- Mixing console Blaze
- Mixing console Bellari
- Mixing console Karma
- Mixing console Glemm
- Mixing console SPL
- Mixing console Radial Engineering
- Mixing console DAP Audio
- Mixing console OWI
- Mixing console Dangerous Music
Latest Mixing console User Manuals
26 October 2024
20 October 2024
17 October 2024
15 October 2024
15 October 2024
15 October 2024
15 October 2024
15 October 2024
15 October 2024
15 October 2024