IOIO IC 400 YA Manual
IOIO
Not categorized
IC 400 YA
Read below 📖 the manual in Italian for IOIO IC 400 YA (9 pages) in the Not categorized category. This guide has been helpful for 24 people and has been rated 4.5 stars on average by 2 users
Page 1/9
ren. Niemals mit nassen Händen das Netzteil stecken
oder lösen.
! Erstickungsgefahr! Kinder können Kleinteile,
Verpackungs- oder Schutzfolien verschlucken. Halten Sie
Kinder vom Produkt und dessen Verpackung fern!
! Lebens- und Verletzungsgefahr! Achten Sie
bei der Überwachung von Babys oder Kleinkindern darauf,
dass das Gerät und das Kabel außer Reichweite des
Kindes sind.
! Schützen Sie Ihr Gerät vor Nässe, Staub,
Flüssigkeiten, Chemikalien, Dämpfen, Hitze und direkter
Sonneneinstrahlung. Ihr Gerät ist nicht wasserdicht, halten
Sie Ihr Gerät trocken.
! Verwenden Sie ausschließlich das Originalzu-
behör. Schließen Sie nur vom Hersteller freigegebenes
Zubehör an.
Verpackungsinhalt
Prüfen Sie den Verpackungsinhalt Ihrer Kamera, bevor Sie Ihre
Kamera in Betrieb nehmen. Sollte etwas fehlen oder beschädigt
sein, wenden Sie sich an unseren Service.
■ IP-Kamera IC 400YA
■ Netzteil
■ Montagematerial:
Schrauben, Dübel, Montagehalter
■ Bedienungsanleitung
Systemvoraussetzungen
Sie benötigen ein internetfähiges Smartphone/Tablet mit den
Betriebssystemen Android (ab 4.1) oder iOS (ab 8) und die aktu-
ellste Version der App Tuya Smart.
Ihre Kamera muss für die erstmalige Inbetriebnahme mit der
App Tuya Smart und dem WLAN Ihres Routers verbunden werden.
Ihre Kamera und Ihr Smartphone/Tablet müssen im selben WLAN
angemeldet sein.
Beachten Sie bei der Auswahl des Montageorts die folgenden
Punkte.
■ Ihre Kamera bendet sich innerhalb der Reichweite Ihres kabel-
losen Heimnetzwerks (WLAN).
■ Beachten Sie unbedingt die örtlichen Vorschriften und Gesetze.
Merkmale
Durch Ihre Funktionen zur Erfassung von Bild und Ton, bietet Ihnen
Ihre Kamera viele Einsatzmöglichkeiten zur Überwachung oder
Kommunikation.
Alle Funktionen sind ebenfalls aus der Ferne über die App Tuya
Smart von Ihrem Smartphone/Tablet aus steuerbar.
■ Bewegungserkennung
Ihre Kamera erkennt automatisch Bewegungen. Beim
Erkennen einer Bewegung erhalten Sie eine Push-Be-
nachrichtigung auf Ihr Smartphone/Tablet und die
Kamera macht automatisch ein Foto. Diese Funktion
können Sie in der App Tuya Smart ein-/ausschalten.
■
Verbinden Sie sich aus der Ferne über die App Tuya Smart mit
Ihrer Kamera. Sehen Sie sich das Live-Bild oder aufgezeichnete
Aufnahmen an und steuern Sie weitere Funktionen. Steuern Sie
den Blickwinkel (horizontal und vertikal) der Kamera.
■ Gegensprechfunktion
Hören oder sprechen Sie über die App Tuya Smart direkt in den
überwachten Raum.
■
Geben Sie über die App Tuya Smart den Zugri auf Ihre Kamera
frei und lassen Sie vertrauenswürdige Personen das Live-Bild der
Kamera betrachten und Funktionen steuern.
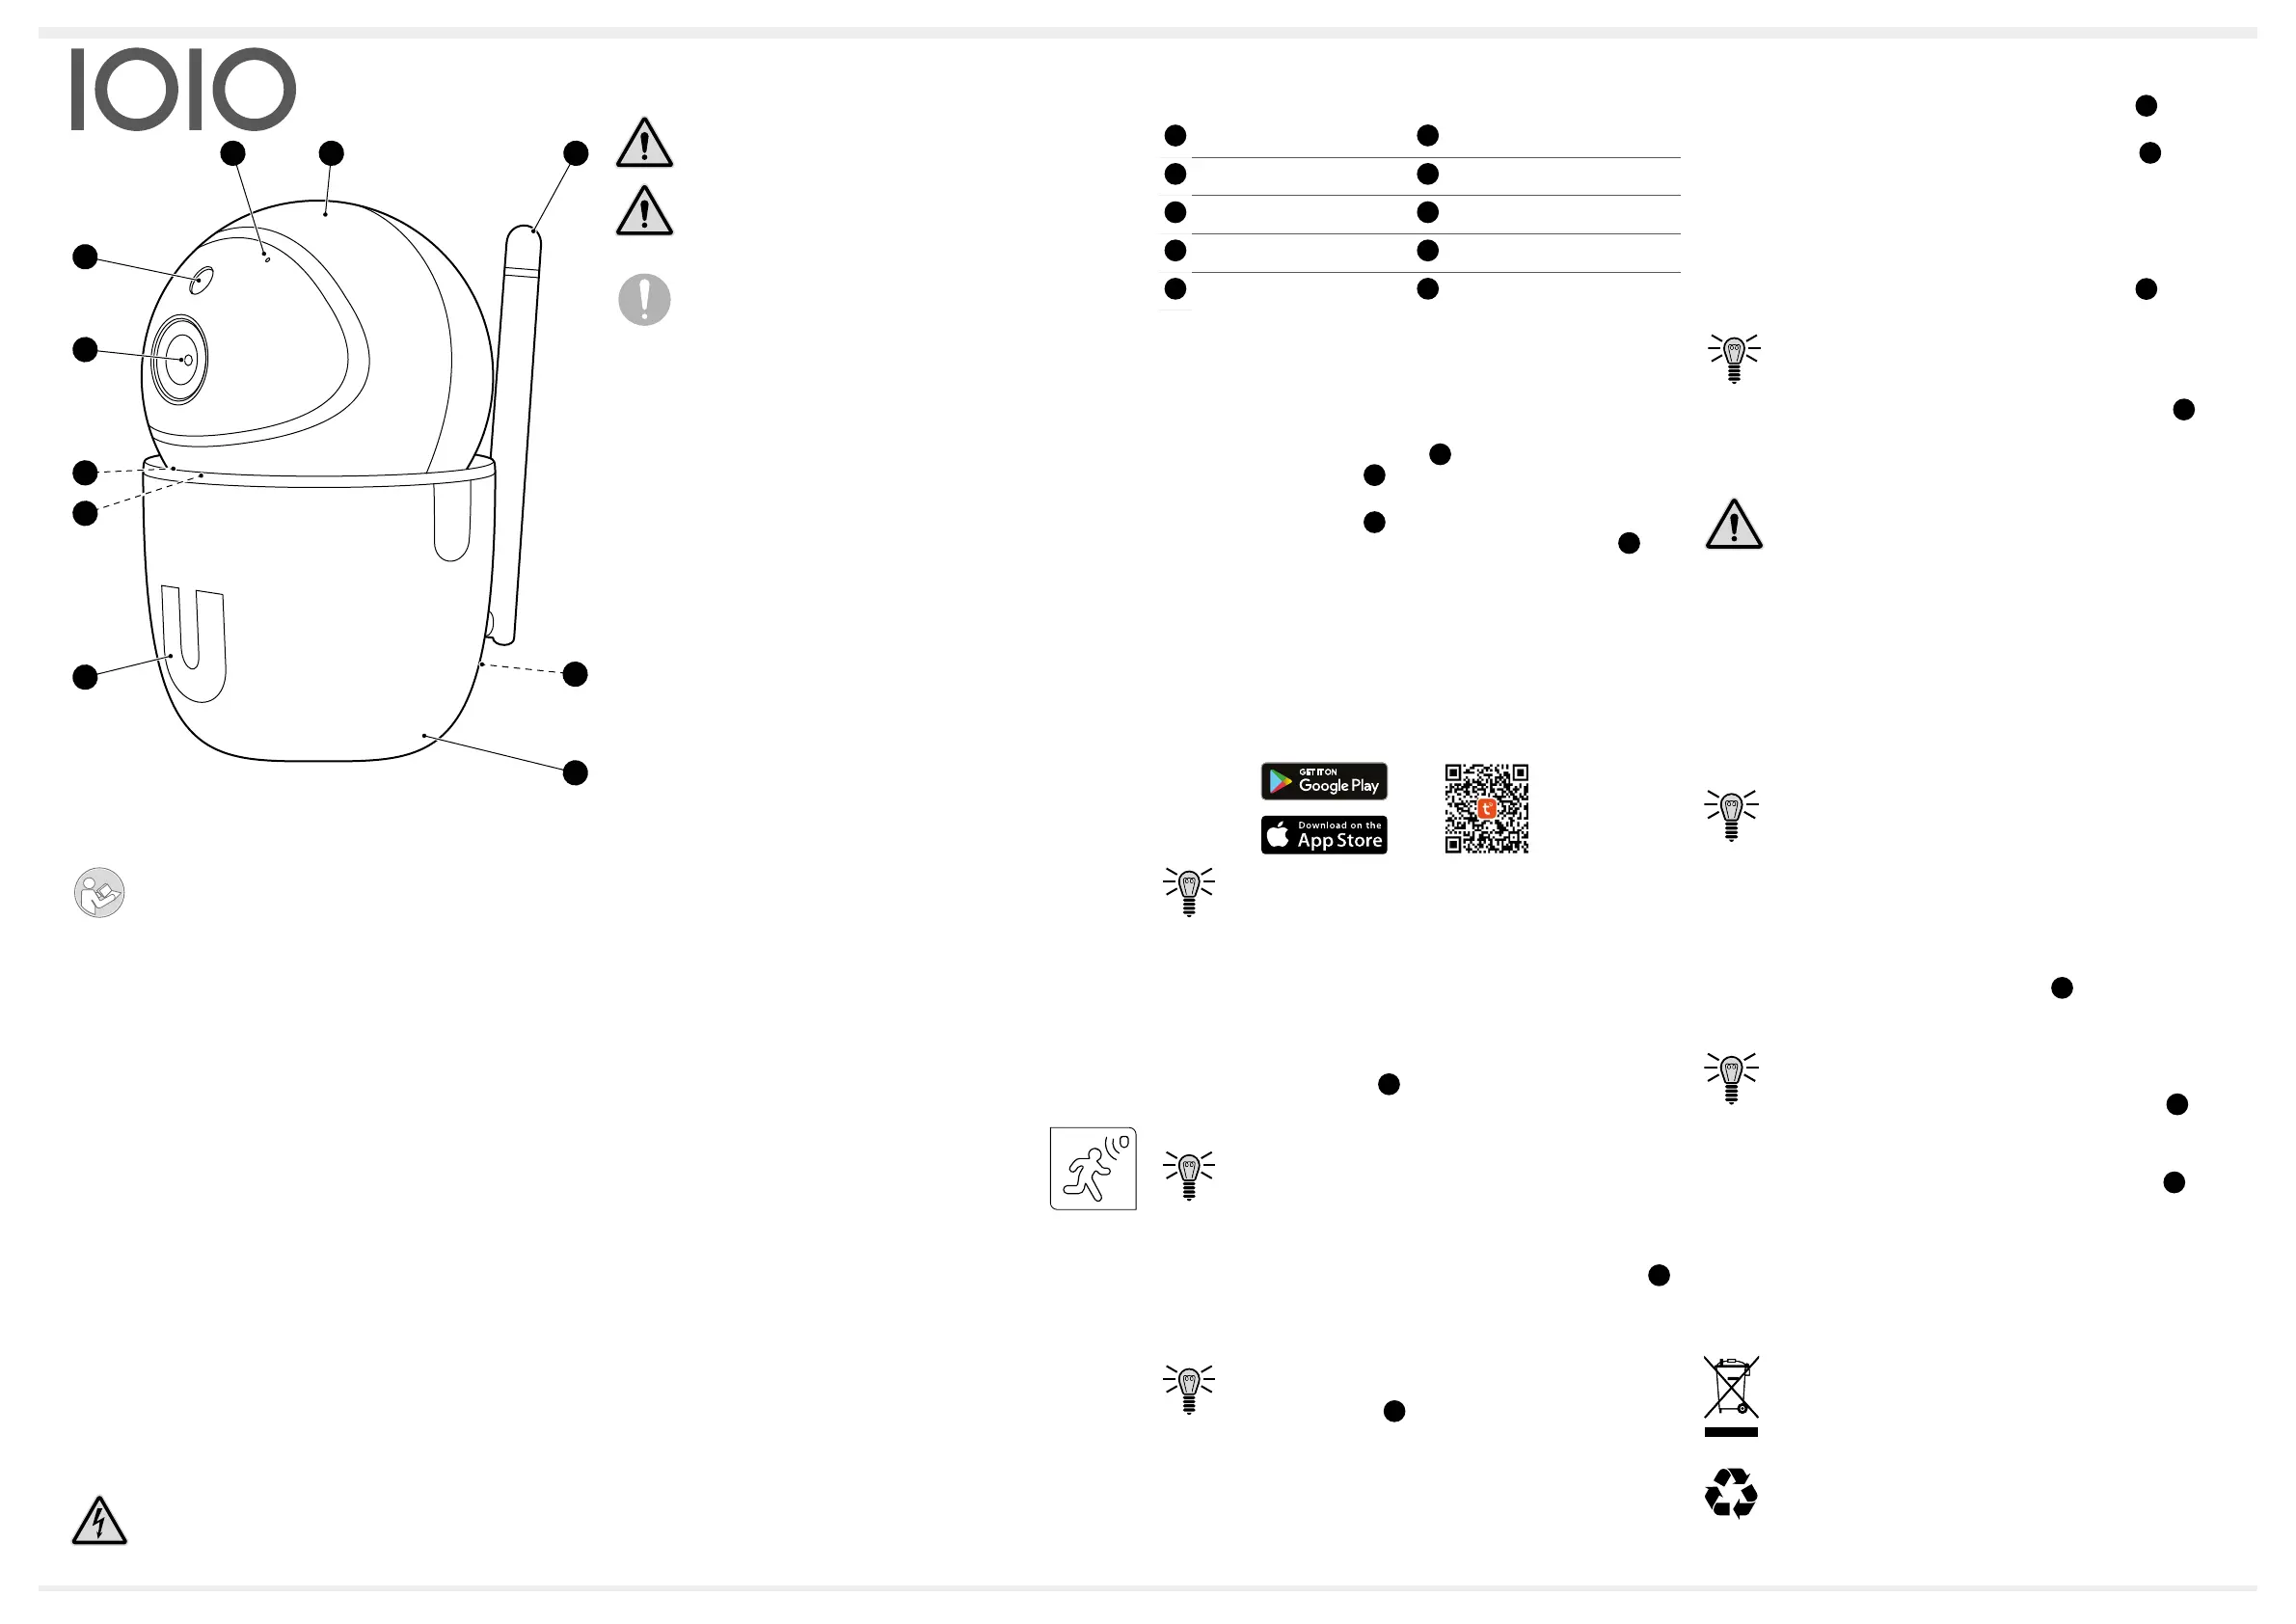
Übersicht
Die Abbildungen zeigen Ihnen Ihre Kamera im Detail.
1
Mikrofon
6
Lautsprecher
2
Gerätekopf
7
MicroSD-Kartenfach
3
WLAN-Antenne
8
Taste Reset
4
MicroUSB-Anschluss
9
Kameralinse
5
Gerätefuß
10
Infrarot-Sensor
microSD-Speicherkarte einsetzen (optional)
Wenn Sie Fotos oder Videos lokal auf Ihrer Kamera speichern
möchten, können Sie eine microSD-Speicherkarte (nicht im Lie-
ferumfang enthalten) mit bis zu 64 GB Speicher in Ihre Kamera
einsetzen.
1. Schieben Sie den Gerätekopf
2
nach oben, damit Sie das
MicroSD-Kartenfach
7
erreichen.
2. Setzen Sie die microSD-Speicherkarte in das
MicroSD-Kartenfach
7
ein. Achten Sie auf die Ausrichtung
der microSD-Speicherkarte. Das MicroSD-Kartenfach
7
gibt
die korrekte Ausrichtung vor.
► Die microSD-Speicherkarte rastet hörbar ein.
App Tuya Smart installieren
Zur weiteren Einrichtung der Kamera und Verbindung mit Ihrem
Heimnetzwerk (WLAN) folgen Sie den Anweisungen in der
App Tuya Smart.
1. Lade Sie die App Tuya Smart aus dem App Store bzw. von
Google Play herunter oder scannen Sie diesen QR-Code.
Achten Sie darauf, dass sich Ihre Kamera und Ihr Smart-
phone/Tablet im Bereich des gleichen Heimnetzwerks
(WLAN) benden.
2. Önen Sie die App Tuya Smart auf Ihrem Smartphone/Tablet
und fügen Sie ein neues Gerät hinzu.
3. Wählen Sie im Bereich Videoüberwachung den Gerätetyp
Sicherheitskamera aus.
4. Folgen Sie den weiteren Anweisungen in der App.
► Bei erfolgreicher Verbindung hören Sie die Bestätigung aus
dem Lautsprecher
6
Ihrer Kamera.
5. Nutzen Sie die App, um Ihre Kamera optimal auszurichten und
Funktionen zu nutzen.
Bei Fragen und Problemen bezüglich der App Tuya Smart
wenden Sie sich an www.go-europe.com.
Kamera anschließen
Ihre Kamera funktioniert nur mit angeschlossenem Netzteil.
1. Verbinden Sie das Netzteil mit dem MicroUSB-Anschluss
4
Ihrer Kamera.
2. Schließen Sie den Netzteil an einer ordnungsgemäß installier-
ten Steckdose an.
Ihre Kamera schaltet sich automatisch ein und ist bereit
zur Verbindung, sobald Sie die entsprechende Ansage aus
dem Lautsprecher
6
Ihrer Kamera hören.
3. Stellen Sie Ihre Kamera auf einer achen und ebenen Oberä-
che auf.
4. Richten Sie Ihre Kamera mit der App Tuya Smart optimal aus.
Wenn Sie Ihre Kamera längere Zeit nicht benutzen, trennen Sie die-
ses vom Stromnetz. Die Kamera kann auch an einer Power-Bank
betrieben werden.
Kamera auf Kamerastativ montieren (optional)
Bei Bedarf können Sie Ihre Kamera mit dem Gerätefuß
5
auf
einem Kamerastativ (nicht im Lieferumfang enthalten) montieren.
1. Schrauben Sie das Kamerastativ an den Gerätefuß
5
Ihrer
Kamera an.
2. Optional verwenden Sie den mitgelieferten Montagehalter.
3. Richten Sie Ihre Kamera mit der App Tuya Smart optimal aus.
Kamera an der Wand montieren (optional)
Bei Bedarf können Sie Ihre Kamera mit dem Gerätefuß
5
an einer
Wand oder Decke montieren.
Achten Sie darauf, dass sich am Montageort eine freie
und zugängliche Steckdose bendet oder verwenden Sie
alternativ eine Power-Bank.
1. Ziehen Sie das Netzteil aus dem MicroUSB-Anschluss
4
Ihrer Kamera.
2. Stellen Sie sicher, dass sich am Montageort keine Strom-, Was-
ser- oder Gasleitungen benden.
! Lebensgefahr durch Stromschlag oder
Gasexplosion! Achten Sie bei der Montage auf eventuell in
der Wand verlegte Strom- oder Gasleitungen. Achten Sie
darauf, dass Sie nicht versehentlich Strom- oder Gaslei-
tungen beschädigen. Wenden Sie sich im Zweifelsfall an
einen Fachmann!
3. Messen Sie den Abstand der Bohrlöcher am gewünschten
Montagehalter aus.
4. Markieren Sie die Bohrlöcher im ausgemessenen Abstand an
dem Montageort an der Wand oder Decke.
5. Bohren Sie zwei Bohrlöcher.
6. Setzen Sie zwei passende Dübel aus dem mitgeliefertem Mon-
tagematerial ein.
Je nach Montageuntergrund empfehlen wir Ihnen die
Verwendung von Spezial-Dübeln.
7. Befestigen Sie Ihre Kamera mit zwei Schrauben.
8. Richten Sie Ihre Kamera mit der App Tuya Smart optimal aus.
Kamera zurücksetzen
Sie können Ihre Kamera zurücksetzen. Dadurch wird die Verbin-
dung mit Ihrem WLAN und der App Tuya Smart getrennt.
1. Drücken und halten Sie die Taste Reset
8
für ca 5 sek.
► Sie hören eine entsprechende Ansage aus dem Lautspre-
cher Ihrer Kamera.
Nach dem Zurücksetzen, schaltet sich Ihre Kamera
automatisch ein und ist bereit zur Verbindung, sobald Sie
die entsprechende Ansage aus dem Lautsprecher
6
Ihrer Kamera hören.
Reinigung und Wartung
1. Ziehe Sie das Netzteil aus dem MicroUSB-Anschluss
4
Ihrer
Kamera.
2. Reinigen Sie die Oberäche mit einem trockenen oder leicht
angefeuchteten Tuch.
Dieses Gerät erfordert keine spezielle Wartung. Reparaturen am
Gerät dürfen nur von einem Fachmann durchgeführt werden.
Entsorgung
Das nebenstehende Symbol bedeutet, dass elektrische
und elektronische Altgeräte aufgrund gesetzlicher Bestim-
mungen getrennt vom Hausmüll zu entsorgen sind.
Entsorgen Sie Ihr Gerät bei der Sammelstelle Ihres kom-
munalen Entsorgungsträgers.
Entsorgen sie Verpackungsmaterialien entsprechend den
lokalen Vorschriften.
D IP-KAMERA IC 400YA
Lesen Sie die Bedienungsanleitung aufmerksam durch
und beachten Sie die Hinweise bei der Handhabung des
Geräts. Bewahren Sie die Bedienungsanleitung für eine
spätere Verwendung auf.
Bestimmungsgemäße Verwendung
Die IP-Kamera IC 400YA – im Folgenden Kamera oder Gerät – ist
geeignet für die Videoüberwachung von Innenbereichen bei Tag
und Nacht.
Bei der Installation und der Auswahl des Einsatzgebiets Ihrer
Kamera ist darauf zu achten, dass die Persönlichkeitsrechte Dritter
sowie die jeweils geltenden örtlichen Vorschriften und Gesetze nicht
verletzt werden.
Voraussetzung für eine bestimmungsgemäße Verwendung ist die
sachgemäße Installation sowie die Beachtung und Einhaltung der
Hinweise in dieser Bedienungsanleitung. Jede andere Verwendung
als in der bestimmungsgemäßen Verwendung beschrieben gilt als
nicht bestimmungsgemäß.
Ihre Kamera ist nicht geeignet für die Verwendung in Feuchträumen
oder explosionsgefährdeten Bereichen.
Die Überwachung von Dritten ist ohne die jeweilige ausdrückliche
Erlaubnis unzulässig und kann rechtliche Schritte nach sich ziehen.
Eigenmächtige Veränderungen oder Umbauten sind nicht zulässig.
Ihre Kamera ist ausschließlich geeignet für den privaten Gebrauch.
Sicherheitshinweise
Bewahren Sie sich vor körperlichen Schäden und beachten Sie die
Hinweise!
! Gefahr eines elektrischen Schlags! Niemals Ihr
Gerät oder Komponenten önen oder reparieren. Niemals
blanke Kontakte mit metallischen Gegenständen berüh-
10
9
1
6
5
2 3
8
7
4

Das Gerät und das Verpackungsmaterial sind recycelbar,
entsorgen Sie diese getrennt für eine bessere Abfallbe-
handlung. Das Triman-Logo gilt nur für Frankreich.
a
c
d
b
Das Gerät und das Verpackungsmaterial sind recycelbar,
entsorgen Sie diese getrennt für eine bessere Abfallbe-
handlung. Informieren Sie sich bei Ihrer Kommune über die
Möglichkeiten der korrekten Entsorgung. Beachten sie die
folgende Kennzeichnung des Verpackungsmaterials: (a)
Nummern, (b) Abkürzungen und (c) Material mit folgender
Bedeutung: 1–7: Kunststoe / 20–22: Papier und Pappe /
80–98: Verbundstoe, sowie (d) Art der Verpackung. Das
Logo gilt nur für Italien.
Fragen und Service
Lieber Kunde,
wir freuen uns, dass Sie sich für dieses Gerät entschieden haben.
Bei Fragen und Problemen steht Ihnen unsere Service-Hotline
unter der Telefonnummer +49 (0)180 5 007514 (Kosten aus dem dt.
Festnetz bei Drucklegung: 14ct/Min., mobil maximal 42ct/Min.) zur
Verfügung.
Weitere Informationen nden Sie in unserem Retouren-Portal
(RMA) im Bereich Support auf unserer Internetseite
www.go-europe.com.
Eine Rücksendung erfolgt unter Beifügung des Kaufbelegs und
idealerweise in der Originalverpackung an:
WSG Wilhelmshavener Service Gesellschaft mbH
Krabbenweg 14
26388 Wilhelmshaven (Germany)
Vereinfachte EU-Konformitätserklärung
Wir, GO Europe GmbH, Zum Kraftwerk 1, 45527 Hattingen,
DEUTSCHLAND, erklären in alleiniger Verantwortung,
dass das Produkt, den EU-Richtlinien: 2014/53/EU
und 2011/65/EU entspricht. Den gesamten Text der
EU-Konformitätserklärung nden Sie unter folgender
Internetadresse oder durch Scannen des QR-Codes:
http://productip.com/?f=128401
Technische Daten
Gewicht ca. 161 g
Abmessungen (L × B × H) 58 × 60 × 105 mm
Kamerawinkel 110°
Schwenkwinkel 110° vertikal, 360° horizontal
zulässige Umgebungsbe-
dingungen
+5 °C bis +50 °C bei 10 % - 80 %
relativer Luftfeuchtigkeit
Sendefrequenz 2,4 GHz (WLAN)
Sendeleistung 14,98 dBm
WLAN IEEE 802.11 b/g/n
Verschlüsselung WEP, WPA, WPA2
Spannungsversorgung Eingangsspannung:
■ 100 - 240 V
AC
, 50/60 Hz, 0,5 A
Ausgangsspannung:
■ 5 V
DC
, 1 A
1080p (Full HD)
Infrarot-Sensor ja, mit IR-Cut-Filter
Speicherkarte microSD bis zu 64 GB
Schnittstellen MicroUSB-Anschluss
Mikrofon ja
Lautsprecher ja
Audio und Video Intercom-Funktion
App (iOS/Android) Tuya Smart
Hersteller
GO Europe GmbH
Zum Kraftwerk 1, 45527 Hattingen
Germany
www.go-europe.com
G IP CAMERA IC 400YA
Read the operating manual thoroughly and observe all the
information contained when using the device. Keep the
operating manual close by for future reference.
Intended Use
The IC 400YA IP camera, subsequently referred to simply as the
camera, is designed to perform video surveillance (CCTV) of indoor
areas by day and night.
When installing and selecting the area of application of the camera,
pay attention to the personal rights of third-parties and that the
respective, applicable local laws and regulations are not violated.
A condition for complying with the intended use is that the equip-
ment is installed correctly and the information in the manual is
observed and maintained. Any use other than that described in the
Section “Intended Use” is considered unintended use.
The camera is not suitable for use in wet rooms or potentially explo-
sive areas.
Monitoring of third-parties is not permitted without having obtained
the respective, explicit authorisation and could have legal conse-
quences.
Unauthorised modications or reconstructions are not permitted.
The camera is only intended for private use.
Safety Instructions
Avoid any personal injury by paying attention to the following infor-
mation!
! Risk of electric shock! Never open or attempt
to repair the device or its components. Never touch bare
contacts with metallic objects. Never plug-in or unplug the
power adapter when your hands are wet.
! Risk of suocation! Children can swallow small
parts, packaging and protective foils. Keep the product
and packaging out of reach of children!
! Risk of fatal or personal injury! When monitor-
ing babies or small children, ensure that the device and
cable are out of reach of the child.
! Protect the device from damp, dust, liquids,
chemicals, vapours, heat and direct sunlight. The device is
not waterproof so keep it dry.
! Only use original accessories. Only connect
accessories approved by the manufacturer to the device.
Package Contents
Check the package contents of the camera carefully before putting
the camera into operation. If anything is missing or damaged,
please contact our Service Department.
■ IC 400YA IP camera
■ Power adapter
■ Assembly material:
screws, dowels, mounting adapter
■ Operating manual
System Requirements
You need a web-capable smartphone which has the Android (from
4.1) or iOS (from 8) operating system and the latest version of the
Tuya Smart app.
To put the camera into operation for the rst time it must be con-
nected to the Tuya Smart app and the wi of your router.
The camera and smartphone/tablet PC must be connected to the
same wi.
Observe the following points when selecting the assembly location.
■ The camera must be within the range of the wireless home
network (wi).
■ It is essential to observe local laws and regulations!
Features
The camera’s ability to compile pictures and sound means it has
many areas of application in the elds of surveillance and commu-
nication.
All the functions can also be controlled via remote access using the
Tuya Smart app on your smartphone/tablet PC.
■ Motion detection
The camera detects movements automatically. On
detecting a movement, you receive a push notication
on your smartphone/tablet PC and the camera auto-
matically takes a photo. This function can be switched
on/o in the Tuya Smart app.
■ Remote access
You can enjoy remote access to the camera via the Tuya Smart
app. You can then watch live pictures or a video recording and
control other functions. The viewing angle (horizontal and vertical)
of the camera can also be controlled.
■ Intercom function
You can use the Tuya Smart app to listen or speak directly into the
room being monitored.
■ Shared access
You can use the Tuya Smart app to share access to your camera
and allow trusted persons to watch the live images from the camera
and control functions.
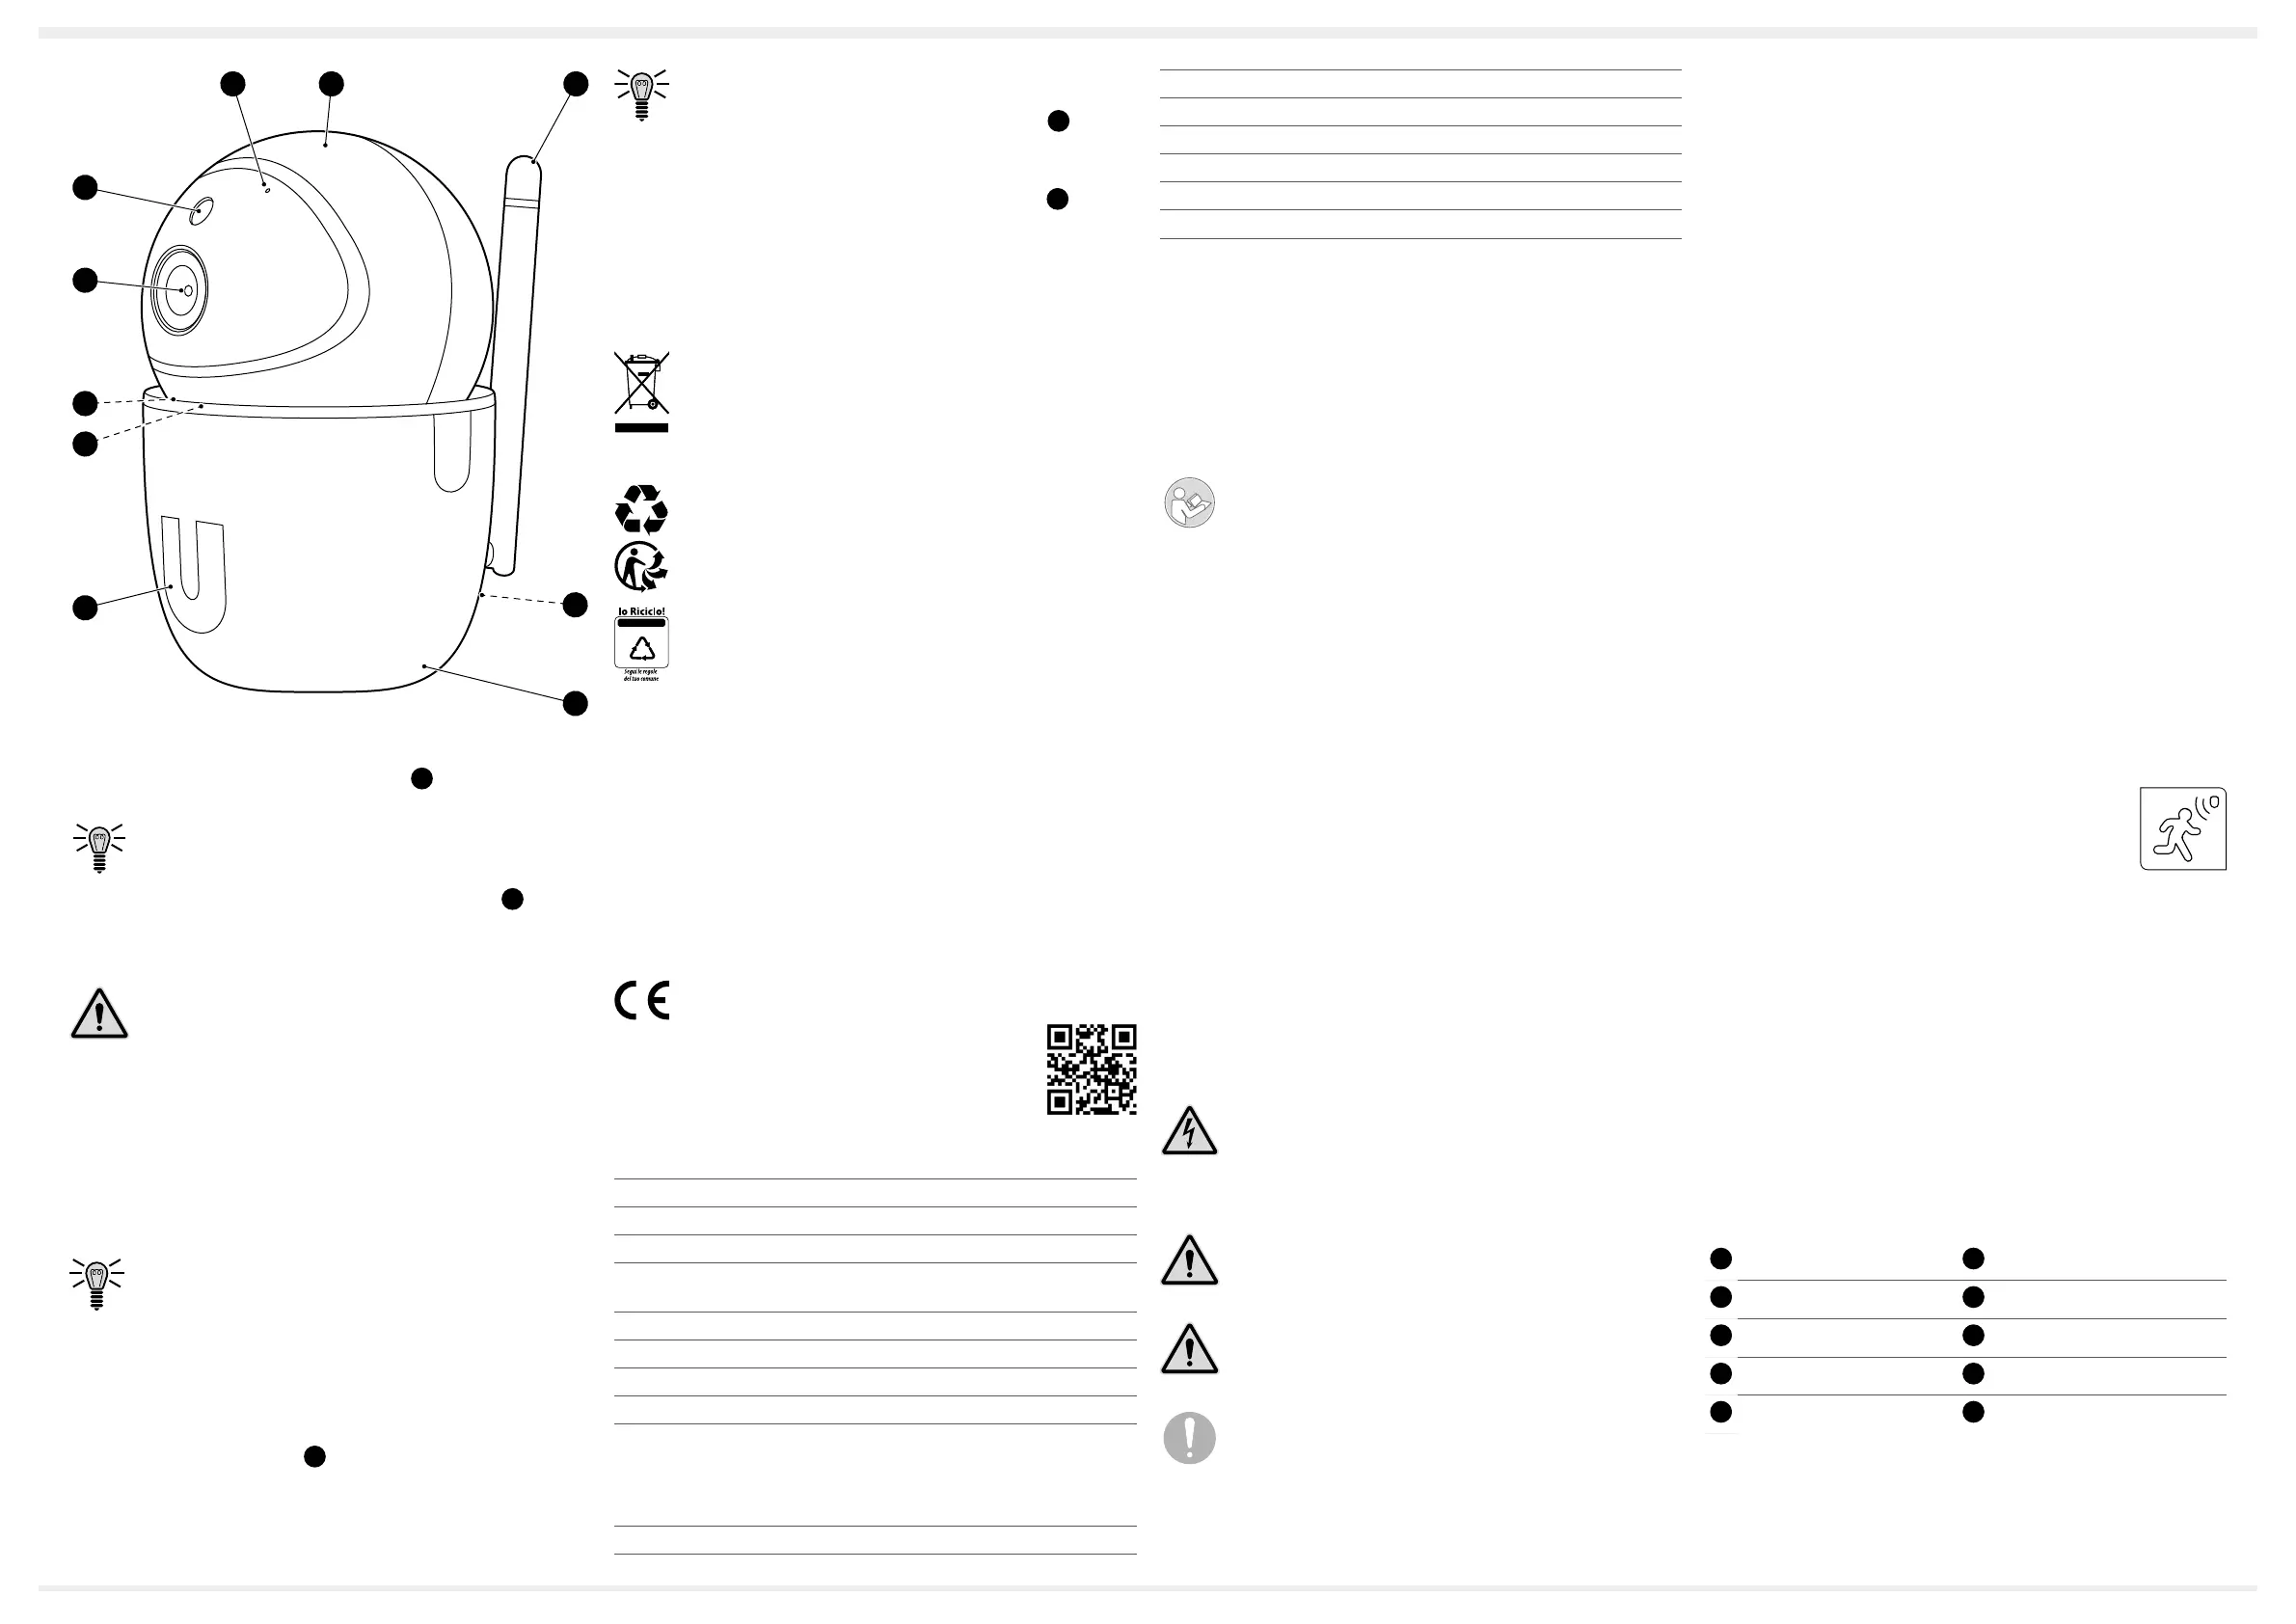
General View
The gures illustrate the camera in detail.
1
Microphone
6
Loudspeaker
2
Device head
7
MicroSD card slot
3
Wi antenna
8
Reset button
4
MicroUSB port
9
Camera lens
5
Device base
10
Infrared sensor
Inserting a MicroSD Memory Card (Option)
If you want to save photos or videos locally on the camera, you
can insert a microSD memory card (not contained in the package
supplied) with up to 64 GB memory space in the camera.
1. Pull the device head
2
upwards so that you can access the
microSD card slot
7
.
2. Insert the microSD memory card in the
microSD card slot
7
. Pay attention that the microSD memory
card is aligned correctly. The microSD card slot
7
ensures
correct alignment.
► The microSD memory card latches audibly in place.
Installing the Tuya Smart App
To dene further settings on the camera and a connection to your
home network (wi), follow the instructions provided by the Tuya
Smart app.
1. Download the Tuya Smart app from the App Store or Google
Play Store or scan this QR code.
Pay attention that the camera and your smartphone/tablet
PC are within range of the same home network (wi).
2. Open the Tuya Smart app on the smartphone/tablet PC and
add a new device.
3. Use the Video surveillance area to select the Surveillance
camera device type.
4. Follow the subsequent instructions provided by the app.
► When a connection has been established, you hear an
audible conrmation from the loudspeaker
6
in the
camera.
5. Use the app to align the camera properly and use other func-
tions.
In the case of queries and problems related to the Tuya
Smart app, please contact www.go-europe.com.
Connecting the Camera
The camera only works when the power adapter is connected.
1. Connect the power adapter to the MicroUSB port
4
on the
camera.
2. Connect the power adapter to a properly installed power
socket.
The camera is switched on automatically and is ready to
connect as soon as the corresponding announcement is
issued from the loudspeaker
6
in the camera.
3. Set the camera down on a at, level surface.
4. Align the camera optimally using the Tuya Smart app.
If you will not be using the camera for a longer period, disconnect
it from the power supply. The camera can also be operated by a
powerbank.
Assembling the Camera on a Camera Tripod (Op-
tion)
If so required, you can use the device base
5
to assemble the
camera on a camera tripod (not contained in the package supplied).
1. Screw the camera tripod to the device base
5
of the camera.
2. Optionally, you can use the mounting adapter supplied.
3. Align the camera optimally using the Tuya Smart app.
10
9
1
6
5
2 3
8
7
4
Assembling the Camera on a Wall (Option)
If so required, you can use the device base
5
to assemble the
camera on a wall or ceiling.
Ensure that there is a free and easily accessible power
socket at the installation location or, alternatively, use a
powerbank.
1. Unplug the power adapter from the MicroUSB port
4
on the
camera.
2. Ensure that there are no electric cables, gas or water pipes
near the installation location.
! Risk of fatal injury from electric shock or gas
explosion! During installation, pay attention to the possibil-
ity of electrical cables and gas pipes running in the walls.
Pay attention that you do not damage electric cables or
gas pipes. If in doubt, contact a specialist!
3. Measure the distance between the drill holes on the required
mounting adapter.
4. Mark the drill holes at the distance measured on the wall or
ceiling at the installation location.
5. Drill the two holes.
6. Insert the appropriate dowels contained in the assembly mate-
rial supplied.
We recommend the use of special dowels according to the
properties of the mounting surface.
7. Fix the camera in place with two screws.
8. Align the camera optimally using the Tuya Smart app.
Resetting the Camera
You can reset the camera settings. As a result, the connections to
the wi system and Tuya Smart app are disconnected.
1. Press and hold the Reset
8
button for approx. 5 seconds.
► A corresponding announcement is issued from the loud-
speaker in the camera.
After resetting, the camera is switched on automatically
and is ready to connect as soon as the corresponding
announcement is issued from the loudspeaker
6
in the
camera.
Cleaning and Maintenance
1. Unplug the power adapter from the MicroUSB port
4
on the
camera.
2. Clean the surface with a dry or slightly moistened cloth.
The device does not require any special maintenance. Repairs to
the device may only be completed by technical specialists.
Disposal
The adjacent symbol indicates that electrical and electronic
apparatus and batteries no longer required must be
disposed of separate from domestic waste in accordance
with legal directives.
Dispose of the device at a collection point provided by your
local waste authorities.
Packaging materials must be disposed of according to local
regulations.
The device and packaging materials can be recycled; sort
them for disposal to simplify waste management. The
Triman logo is only relevant for France.
a
c
d
b
The device and the packaging material can be recycled, so
sort them prior to disposal for better waste management.
Contact your local authorities for information on the various
options available to ensure correct disposal. Observe the
following identications of the packaging materials: (a)
numbers, (b) abbreviations and (c) materials which have
the following signicance: 1–7: plastics / 20–22: paper and
cardboard / 80–98: composite materials and (d) type of
packaging. The logo is only applicable to Italy.
Warranty
Dear Customer,
We are delighted that you have decided to purchase this product.
If it does not work as you expect it to or it is defective, please con-
tact the sales outlet from which you purchased the product.
We, GO Europe GmbH, Zum Kraftwerk 1, 45527 Hattin-
gen, DEUTSCHLAND, declare in sole responsibility, that
the product complies with the EU Directives: 2014/53/
EU and 2011/65/EU. The full EU Declaration of Con-
formity is available online at the following website or by
scanning the QR code: http://productip.com/?f=128401
Technical Data
Weight Approx. 161 g
Dimensions (L × W × H) 58 × 60 × 105 mm
Camera angle 110°
Pivoting angle 110° vertical, 360° horizontal
Permissible ambient con-
ditions
+5 °C to +50 °C at 10% - 80% rel.
humidity
Transmission frequency 2.4 GHz (wi)
Transmission power 14.98 dBm
IEEE 802.11 b/g/n
Encryption WEP, WPA, WPA2
Power supply Input voltage:
■ 100 - 240 V
AC
, 50/60 Hz, 0.5 A
Output voltage:
■ 5 V
DC
, 1 A
Camera resolution 1080 p (Full HD)
Infrared sensor Yes, with IR Cut Filter
Memory card MicroSD up to 64 GB
Ports MicroUSB port
Microphone Yes
Loudspeaker Yes
Audio and video Intercom function
App (iOS/Android) Tuya Smart
Manufacturer
GO Europe GmbH
Zum Kraftwerk 1, 45527 Hattingen
Germany
www.go-europe.com
F CAMÉRA IP IC 400YA
Veuillez lire attentivement la notice d’utilisation et res-
pecter les consignes lorsque vous manipulez l’appareil.
Conservez la notice d’utilisation pour une utilisation
ultérieure.
Utilisation conforme à l’usage prévu
La caméra IP IC 400YA (appelée simplement caméra ou appareil
par la suite) est prévue pour la vidéosurveillance en intérieur de jour
et de nuit.
Lorsque vous sélectionnez la zone d’utilisation et installez cette
caméra, assurez-vous que vous ne violez pas les droits personnels
de tiers ni les réglementations et lois locales en vigueur.
L’utilisation conforme à l’usage prévu requiert une installation
appropriée, ainsi que l’observation et le respect des indications
mentionnées dans la présente notice d’utilisation. Toute utilisation
autre que celle décrite au point Utilisation conforme à l’usage prévu
est considérée comme non conforme.
Votre caméra n’est pas prévue pour une utilisation dans des locaux
humides ou des zones à atmosphère explosible.
Sauf autorisation expresse, la surveillance de tiers est interdite et
susceptible de donner lieu à des poursuites judiciaires.
Les modications ou transformations arbitraires sont interdites.
Votre caméra est prévue uniquement pour une utilisation à titre
privé.
Consignes de sécurité
Préservez-vous de dommages corporels et tenez compte des
remarques !
! Risque de choc électrique ! Ne jamais
ouvrir votre appareil ou ses composants ni le(s) réparer
vous-même. Ne jamais toucher des contacts nus sous
tension avec des objets métalliques. Ne jamais brancher
ou débrancher le bloc d’alimentation avec des mains
humides.
! Risque d’étouement ! Les enfants
peuvent avaler des petites pièces, des lms d’emballage
ou de protection. Tenez les enfants à l’écart du produit et
de son emballage !
! Risque de blessures, voire danger de
mort ! Lorsque vous utilisez la caméra pour surveiller un
bébé ou un enfant en bas âge, assurez-vous que l’appa-
reil et le câble soient hors de portée de l’enfant.
! Protégez votre appareil contre l’humidité,
la poussière, les liquides, les produits chimiques, les
vapeurs, les températures élevées et l’ensoleillement
direct. Votre appareil n’est pas étanche ; gardez-le au sec.
! N’utilisez que les accessoires d’origine. Ne
raccordez à la caméra que les accessoires autorisés par
le fabricant.
Contrôlez le contenu du coret de votre caméra avant de la mettre
en service. Veuillez vous adresser à notre service après-vente si
une pièce manque ou est endommagée.
■ Caméra IP IC 400YA
■ Bloc d’alimentation
■ Matériel de montage :
vis, chevilles, support de montage
■ Notice d’utilisation
Prérequis système
Il vous faut un smartphone ou une tablette avec accès Internet et
système d’exploitation Android (à partir de 4.1) ou iOS (à partir de
8) et la version la plus récente de l’appli Tuya Smart.
Lorsque vous utilisez la caméra pour la première fois, vous devez la
connecter à l’appli Tuya Smart et au réseau wi de votre routeur.
Votre caméra et votre smartphone ou votre tablette doivent être
connectés au même réseau wi.
Veuillez tenir compte des points suivants lorsque vous choisissez
l’emplacement de montage.
■ Votre caméra se trouve dans la zone de couverture de votre
réseau domestique sans l (wi).
■ Veuillez impérativement respecter les réglementations et lois
locales.
Caractéristiques
Grâce à ses fonctions de détection visuelle et sonore, votre caméra
vous ore de nombreuses possibilités d’utilisation pour la surveil-
lance ou la communication.
Toutes les fonctions se commandent aussi à distance depuis votre
smartphone ou votre tablette, via l’appli Tuya Smart.
■ Détection de mouvements
Votre caméra détecte les mouvements automatique-
ment. Dès qu’un mouvement est détecté, vous recevez
une notication push sur votre smartphone ou votre
tablette et la caméra prend automatiquement une
photo. Vous pouvez activer et désactiver cette fonction
dans l’appli Tuya Smart.
■ Accès à distance
Connectez-vous à distance à votre caméra via l’appli Tuya Smart.
Regardez l’image en temps réel ou les images enregistrées et
commandez d’autres fonctions. Commandez l’angle de vision de la
caméra (horizontalement et verticalement).
■ Fonction interphone
Écoutez ou parlez directement dans la pièce surveillée via l’appli
Tuya Smart.
■ Accès multiple
Autorisez l’accès à votre caméra via l’appli Tuya Smart pour
laisser des personnes de conance voir l’image en temps réel de la
caméra et en commander les fonctions.
Vue d’ensemble
L’illustration vous montre la caméra en détail.
1
Microphone
6
Haut-parleur
2
Tête de l'appareil
7
Compartiment carte microSD
3
Antenne wi
8
Bouton RESET
4
Prise micro-USB
9
Lentille de la caméra
5
Pied de l'appareil
10
Capteur infrarouge
Insertion d’une carte mémoire microSD (en option)
Si vous souhaitez enregistrer des photos ou des vidéos en local sur
votre caméra, vous pouvez y insérer une carte mémoire microSD
jusqu’à 64 Go (non comprise dans la fourniture).
10
9
1
6
5
2 3
8
7
4
Product Specifications
| Brand: | IOIO |
| Category: | Not categorized |
| Model: | IC 400 YA |
Do you need help?
If you need help with IOIO IC 400 YA, ask a question below and other users will answer you
Not categorized IOIO User Manuals

13 October 2024
13 October 2024
Not categorized User Manuals
- Not categorized Candy
- Not categorized Sony
- Not categorized Electrolux
- Not categorized Samsung
- Not categorized Xiaomi
- Not categorized Casio
- Not categorized LG
- Not categorized Bosch
- Not categorized AEG
- Not categorized IKEA
- Not categorized Huawei
- Not categorized Braun
- Not categorized Brondi
- Not categorized HP
- Not categorized Philips
- Not categorized Panasonic
- Not categorized Bauknecht
- Not categorized BEKO
- Not categorized Delonghi
- Not categorized Daewoo
- Not categorized DeWalt
- Not categorized Epson
- Not categorized Etna
- Not categorized Teka
- Not categorized Apc
- Not categorized Balay
- Not categorized Siemens
- Not categorized Hama
- Not categorized Petsafe
- Not categorized Vorago
- Not categorized Neewer
- Not categorized Danby
- Not categorized Bartscher
- Not categorized Hartke
- Not categorized Bertazzoni
- Not categorized Gigabyte
- Not categorized Smeg
- Not categorized Hisense
- Not categorized Gree
- Not categorized Hoover
- Not categorized EBERLE
- Not categorized Hazet
- Not categorized Fluke
- Not categorized Goobay
- Not categorized Topeak
- Not categorized Antari
- Not categorized Thermex
- Not categorized TCL
- Not categorized Russell Hobbs
- Not categorized Panduit
- Not categorized IFM
- Not categorized Avantree
- Not categorized Royal Catering
- Not categorized Hotpoint
- Not categorized Whirlpool
- Not categorized Schwaiger
- Not categorized Nabo
- Not categorized Arendo
- Not categorized Megger
- Not categorized Balam Rush
- Not categorized Noxon
- Not categorized Sanus
- Not categorized Adidas
- Not categorized Domo
- Not categorized Cayin
- Not categorized Reflexion
- Not categorized TP Link
- Not categorized Inventum
- Not categorized Totolink
- Not categorized Shokz
- Not categorized Gamma
- Not categorized Artusi
- Not categorized Medel
- Not categorized Meris
- Not categorized D-Link
- Not categorized Navitel
- Not categorized Meridian
- Not categorized AeroCool
- Not categorized Kugoo
- Not categorized Rikon
- Not categorized Neff
- Not categorized Garmin
- Not categorized Razer
- Not categorized Teufel
- Not categorized Enermax
- Not categorized Noveen
- Not categorized StarTech.com
- Not categorized Origin Storage
- Not categorized Outwell
- Not categorized Best
- Not categorized Stihl
- Not categorized Kostal
- Not categorized ZOTAC
- Not categorized Comfee
- Not categorized Imarflex
- Not categorized Edgestar
- Not categorized Audient
- Not categorized Kogan
- Not categorized Solis
- Not categorized DJI
- Not categorized Snom
- Not categorized McIntosh
- Not categorized One For All
- Not categorized Caple
- Not categorized SereneLife
- Not categorized Roesle
- Not categorized APSystems
- Not categorized GoGEN
- Not categorized Festo
- Not categorized Create
- Not categorized Furrion
- Not categorized Oreg
- Not categorized Glorious
- Not categorized Pro-Ject
- Not categorized Yamaha
- Not categorized CaviLock
- Not categorized OOONO
- Not categorized Venom
- Not categorized Kichler
- Not categorized SMART Technologies
- Not categorized Neo
- Not categorized Newstar
- Not categorized Legrand
- Not categorized Integral LED
- Not categorized Goodram
- Not categorized Goldtouch
- Not categorized Lutec
- Not categorized Vello
- Not categorized Asus
- Not categorized Cudy
- Not categorized Hayter
- Not categorized BlueBuilt
- Not categorized Eufy
- Not categorized Gys
- Not categorized Conair
- Not categorized Turmix
- Not categorized Franke
- Not categorized Husqvarna
- Not categorized Sauber
- Not categorized Shimano
- Not categorized Axis
- Not categorized Tamron
- Not categorized Liebherr
- Not categorized Carson
- Not categorized Gourmetmaxx
- Not categorized Truelife
- Not categorized Busch-Jaeger
- Not categorized ETA
- Not categorized Voltcraft
- Not categorized Axor
- Not categorized Karran
- Not categorized Elkay
- Not categorized Varaluz
- Not categorized Extron
- Not categorized Lindy
- Not categorized Aputure
- Not categorized Netgear
- Not categorized Honor
- Not categorized XP-PEN
- Not categorized Danfoss
- Not categorized Riccar
- Not categorized Orbegozo
- Not categorized Media-tech
- Not categorized Kuppersbusch
- Not categorized Mebby
- Not categorized Pioneer
- Not categorized TONI&GUY
- Not categorized Summit
- Not categorized Accucold
- Not categorized EarFun
- Not categorized Toolcraft
- Not categorized Gram
- Not categorized Lorex
- Not categorized Catit
- Not categorized NuPrime
- Not categorized Ecler
- Not categorized Roccat
- Not categorized AudioControl
- Not categorized Elsner
- Not categorized Kask
- Not categorized Digitus
- Not categorized Cabasse
- Not categorized Koenic
- Not categorized Haier
- Not categorized Beaphar
- Not categorized Sure Petcare
- Not categorized Livall
- Not categorized Monogram
- Not categorized Sortimo
- Not categorized Unicol
- Not categorized Audio-Technica
- Not categorized Lian Li
- Not categorized JLab
- Not categorized Toa
- Not categorized Marantz
- Not categorized Knog
- Not categorized Rega
- Not categorized Vox
- Not categorized Mars Gaming
- Not categorized Kerbl
- Not categorized Metra
- Not categorized Pyle
- Not categorized Sencor
- Not categorized Hobby
- Not categorized Lenovo
- Not categorized Noctua
- Not categorized Klein Tools
- Not categorized LevelOne
- Not categorized Shure
- Not categorized Michael Todd Beauty
- Not categorized GRAUGEAR
- Not categorized Trixie
- Not categorized Schneider
- Not categorized Lorelli
- Not categorized Roland
- Not categorized OBSBOT
- Not categorized SuperTooth
- Not categorized Kluge
- Not categorized Bobrick
- Not categorized Signature Hardware
- Not categorized Martin
- Not categorized Kanto
- Not categorized Scott
- Not categorized Delta
- Not categorized Kindermann
- Not categorized Robern
- Not categorized Hortus
- Not categorized DeLock
- Not categorized Coyote
- Not categorized Kidde
- Not categorized Anker
- Not categorized Growatt
- Not categorized Nanoleaf
- Not categorized Grundig
- Not categorized Mistral
- Not categorized VMV
- Not categorized S.M.S.L
- Not categorized Privileg
- Not categorized MPM
- Not categorized PeakTech
- Not categorized Niceboy
- Not categorized Engenius
- Not categorized Khind
- Not categorized Amana
- Not categorized EMOS
- Not categorized CyberPower
- Not categorized KitchenAid
- Not categorized RGBlink
- Not categorized Clean Air Optima
- Not categorized Manfrotto
- Not categorized Exquisit
- Not categorized Cosatto
- Not categorized Fluval
- Not categorized Kicker
- Not categorized Gude
- Not categorized Auna
- Not categorized Taurus
- Not categorized Heatit
- Not categorized Midland
- Not categorized Field Optics
- Not categorized Zebra
- Not categorized Yealink
- Not categorized FIMI
- Not categorized Optex
- Not categorized Frigidaire
- Not categorized Levoit
- Not categorized Maytag
- Not categorized Deye
- Not categorized Nibe
- Not categorized Ryobi
- Not categorized Dremel
- Not categorized Breville
- Not categorized Kodak
- Not categorized Velleman
- Not categorized Sharkoon
- Not categorized RIDGID
- Not categorized Laserliner
- Not categorized Segway
- Not categorized Power Dynamics
- Not categorized DataVideo
- Not categorized RGV
- Not categorized Hendi
- Not categorized Gamdias
- Not categorized Concept
- Not categorized BeamZ
- Not categorized Livoo
- Not categorized Nexa
- Not categorized Guzzanti
- Not categorized XO
- Not categorized Steinel
- Not categorized Bluesound
- Not categorized Flex
- Not categorized Chauvin Arnoux
- Not categorized Blackstar
- Not categorized Caso
- Not categorized Kenwood
- Not categorized Cambridge
- Not categorized Nobo
- Not categorized Dell
- Not categorized Ciarra
- Not categorized Brandson
- Not categorized Mybeo
- Not categorized Aplic
- Not categorized CSL
- Not categorized Zoom
- Not categorized Tru Components
- Not categorized Bearware
- Not categorized Moen
- Not categorized Viewsonic
- Not categorized B-tech
- Not categorized IMM Photonics
- Not categorized Maginon
- Not categorized Speco Technologies
- Not categorized Nec
- Not categorized IFi Audio
- Not categorized Tripp Lite
- Not categorized Nevir
- Not categorized Infiniton
- Not categorized Ag Neovo
- Not categorized Henry Engineering
- Not categorized Taco Tuesday
- Not categorized Wire Technologies
- Not categorized GPO
- Not categorized Block
- Not categorized Maxi-Cosi
- Not categorized Ufesa
- Not categorized Milwaukee
- Not categorized Smart-AVI
- Not categorized CAME-TV
- Not categorized A-Designs
- Not categorized EchoMaster
- Not categorized Crimson
- Not categorized Elgato
- Not categorized Corsair
- Not categorized Generac
- Not categorized EVE
- Not categorized Dahua Technology
- Not categorized Cambium Networks
- Not categorized Safety 1st
- Not categorized Scarlett
- Not categorized Axxess
- Not categorized Advance
- Not categorized Indesit
- Not categorized Daikin
- Not categorized Shoprider
- Not categorized Canon
- Not categorized VAIS Technology
- Not categorized Maxsa
- Not categorized Lincoln Electric
- Not categorized BRIO
- Not categorized AXESS
- Not categorized DAB
- Not categorized Be Cool
- Not categorized Jocel
- Not categorized Bluetti
- Not categorized Blaupunkt
- Not categorized ORNO
- Not categorized Thermaltake
- Not categorized Artsound
- Not categorized Simrad
- Not categorized Volcano
- Not categorized Nordic Winter
- Not categorized TechBite
- Not categorized NEP
- Not categorized Catlink
- Not categorized Cablexpert
- Not categorized Ansmann
- Not categorized Røde
- Not categorized Makita
- Not categorized Einhell
- Not categorized Avidsen
- Not categorized Elac
- Not categorized Lewitt
- Not categorized Anova
- Not categorized Posiflex
- Not categorized Planet
- Not categorized Biostar
- Not categorized Mitsubishi
- Not categorized HeadRush
- Not categorized Showtec
- Not categorized PCE
- Not categorized Hikvision
- Not categorized Sitecom
- Not categorized Navman
- Not categorized JIMMY
- Not categorized Laica
- Not categorized Equip
- Not categorized Conceptronic
- Not categorized Sirius
- Not categorized Noyafa
- Not categorized Yorkville
- Not categorized Toro
- Not categorized Intermatic
- Not categorized Spear & Jackson
- Not categorized Tower
- Not categorized Hubble Connected
- Not categorized McGregor
- Not categorized Habitat
- Not categorized MSR
- Not categorized Entes
- Not categorized V-Tac
- Not categorized Salton
- Not categorized Novation
- Not categorized Chipolino
- Not categorized Alphatronics
- Not categorized Fezz
- Not categorized Eden
- Not categorized Fuxtec
- Not categorized Megasat
- Not categorized SolaX Power
- Not categorized Valcom
- Not categorized Mikrotik
- Not categorized Yale
- Not categorized Mosconi
- Not categorized Tristar
- Not categorized Mophie
- Not categorized Kohler
- Not categorized Envertec
- Not categorized Celly
- Not categorized Metabo
- Not categorized Jabra
- Not categorized Alphacool
- Not categorized Cuisinart
- Not categorized Doepke
- Not categorized Lupine
- Not categorized Anton/Bauer
- Not categorized Dometic
- Not categorized JBL
- Not categorized Rigol
- Not categorized Joy-it
- Not categorized Body Solid
- Not categorized DeepCool
- Not categorized Kali Audio
- Not categorized Chief
- Not categorized Majority
- Not categorized Cybex
- Not categorized Iiyama
- Not categorized Nedis
- Not categorized Sharp
- Not categorized Crock-Pot
- Not categorized Helix
- Not categorized Genesis
- Not categorized Dyson
- Not categorized Elation
- Not categorized Magmatic
- Not categorized Supermicro
- Not categorized Zendure
- Not categorized Logilink
- Not categorized Majestic
- Not categorized Basetech
- Not categorized Leviton
- Not categorized Soundstream
- Not categorized PAC
- Not categorized Xaoc
- Not categorized Eldom
- Not categorized Fisher And Paykel
- Not categorized Hohner
- Not categorized Britax
- Not categorized Elba
- Not categorized Steiner
- Not categorized Vonroc
- Not categorized Worx
- Not categorized Brentwood
- Not categorized Philco
- Not categorized Bellari
- Not categorized Rolls
- Not categorized MSI
- Not categorized Chauvet
- Not categorized Ordo
- Not categorized Ground Zero
- Not categorized OnePlus
- Not categorized V7
- Not categorized Jenn-Air
- Not categorized CRUX
- Not categorized Karma
- Not categorized Ridem
- Not categorized Glemm
- Not categorized StarIink
- Not categorized HomeCraft
- Not categorized Nostalgia
- Not categorized GameDay
- Not categorized X-Lite
- Not categorized Söll
- Not categorized Sparkle
- Not categorized Edouard Rousseau
- Not categorized Caberg
- Not categorized Exped
- Not categorized Igloo
- Not categorized Heusinkveld
- Not categorized KED
- Not categorized EPEVER
- Not categorized Grothe
- Not categorized Cane Creek
- Not categorized Swiss Eye
- Not categorized SilverStone
- Not categorized Goodis
- Not categorized TFA
- Not categorized X Rocker
- Not categorized Dreame
- Not categorized Foreo
- Not categorized Tesla
- Not categorized Aquael
- Not categorized Klarstein
- Not categorized Lauten Audio
- Not categorized Toddy
- Not categorized Lexivon
- Not categorized Icy Dock
- Not categorized Elta
- Not categorized ASI
- Not categorized Gurari
- Not categorized Varia
- Not categorized SPL
- Not categorized I-Tec
- Not categorized Xigmatek
- Not categorized Storcube
- Not categorized Tracer
- Not categorized Shark
- Not categorized REMKO
- Not categorized Phanteks
- Not categorized EnOcean
- Not categorized EK Water Blocks
- Not categorized Hoymiles
- Not categorized Envertech
- Not categorized Cougar
- Not categorized Asrock
- Not categorized Audiotec Fischer
- Not categorized Furman
- Not categorized Abac
- Not categorized Cata
- Not categorized Vivax
- Not categorized Black Diamond
- Not categorized Stanley
- Not categorized QSC
- Not categorized Bitspower
- Not categorized Black And Decker
- Not categorized Weston
- Not categorized Dobot
- Not categorized WHD
- Not categorized Schuberth
- Not categorized Q Acoustics
- Not categorized Scotsman
- Not categorized Radial Engineering
- Not categorized Karcher
- Not categorized Orion
- Not categorized A-NeuVideo
- Not categorized Beem
- Not categorized Logitech
- Not categorized Boneco
- Not categorized Atlona
- Not categorized EZ Dupe
- Not categorized Becken
- Not categorized DVDO
- Not categorized GoXtreme
- Not categorized Primacoustic
- Not categorized Avanti
- Not categorized Acros
- Not categorized Phil And Teds
- Not categorized Jotul
- Not categorized Thermarest
- Not categorized Dedra
- Not categorized Powerplus
- Not categorized Vivanco
- Not categorized TC Electronic
- Not categorized Suzuki
- Not categorized Bionaire
- Not categorized Huslog
- Not categorized Glem Gas
- Not categorized Apogee
- Not categorized Atomos
- Not categorized IOptron
- Not categorized Trevi
- Not categorized Palmer
- Not categorized R-Go Tools
- Not categorized Drayton
- Not categorized Spektrum
- Not categorized Jung
- Not categorized Götze & Jensen
- Not categorized Native Instruments
- Not categorized Homedics
- Not categorized Xvive
- Not categorized AMX
- Not categorized Perlick
- Not categorized Peavey
- Not categorized BenQ
- Not categorized Princess
- Not categorized FOX ESS
- Not categorized Waterstone
- Not categorized Mr Steam
- Not categorized Fresh N Rebel
- Not categorized DuroStar
- Not categorized Duromax
- Not categorized Owon
- Not categorized REVITIVE
- Not categorized Fosi Audio
- Not categorized Europalms
- Not categorized Sven
- Not categorized Global Water
- Not categorized Hamilton Beach
- Not categorized Extech
- Not categorized Tunturi
- Not categorized Craftsman
- Not categorized Gastronoma
- Not categorized Lumens
- Not categorized Brizo
- Not categorized Xinfrared
- Not categorized Getac
- Not categorized ProLights
- Not categorized Phonak
- Not categorized Cherub
- Not categorized Thor
- Not categorized Laurastar
- Not categorized Ambiano
- Not categorized Bissell
- Not categorized Antelope Audio
- Not categorized ESYLUX
- Not categorized Austral
- Not categorized LiveU
- Not categorized RF-Links
- Not categorized Fortinge
- Not categorized Mercury
- Not categorized Vaddio
- Not categorized InFocus
- Not categorized Stinger
- Not categorized NEXTO DI
- Not categorized Abus
- Not categorized AV Tool
- Not categorized Bauhn
- Not categorized Adventure Kings
- Not categorized EQ Acoustics
- Not categorized Michigan
- Not categorized Vent-A-Hood
- Not categorized Audix
- Not categorized Vizio
- Not categorized Livarno Lux
- Not categorized Grillmeister
- Not categorized Ernesto
- Not categorized Neno
- Not categorized Rommelsbacher
- Not categorized One Control
- Not categorized Bome
- Not categorized Redback Technologies
- Not categorized ESX
- Not categorized City Theatrical
- Not categorized Omnitronic
- Not categorized Reber
- Not categorized Kaiser Nienhaus
- Not categorized Crestron
- Not categorized Eurolite
- Not categorized Manhattan
- Not categorized Xavax
- Not categorized MOZA
- Not categorized Rocstor
- Not categorized Cruz
- Not categorized Newland
- Not categorized Edimax
- Not categorized Dragonshock
- Not categorized Russound
- Not categorized Adj
- Not categorized Olivetti
- Not categorized EVOLVEO
- Not categorized Stadler Form
- Not categorized Wolfcraft
- Not categorized Monacor
- Not categorized Heinner
- Not categorized Minolta
- Not categorized Sena
- Not categorized Innoliving
- Not categorized Aqara
- Not categorized POGS
- Not categorized Beghelli
- Not categorized BodyCraft
- Not categorized Superrollo
- Not categorized Mx Onda
- Not categorized Bixolon
- Not categorized Maruyama
- Not categorized Bravilor Bonamat
- Not categorized Hilti
- Not categorized D-Jix
- Not categorized Black Hydra
- Not categorized I.safe Mobile
- Not categorized Nimbus
- Not categorized Lowrance
- Not categorized Roxio
- Not categorized Accsoon
- Not categorized Inspire
- Not categorized Sebo
- Not categorized Boss
- Not categorized Tannoy
- Not categorized Prompter People
- Not categorized JL Audio
- Not categorized Edesa
- Not categorized Genexis
- Not categorized Buzz Rack
- Not categorized ZKTeco
- Not categorized Giordani
- Not categorized Cadel
- Not categorized Dualit
- Not categorized Atlas Sound
- Not categorized Solo
- Not categorized Wagner
- Not categorized Bluestork
- Not categorized Davis
- Not categorized Comica
- Not categorized AddLiving
- Not categorized Melitta
- Not categorized Lowell
- Not categorized INOGENI
- Not categorized Nearity
- Not categorized Kiloview
- Not categorized Middle Atlantic
- Not categorized Mount-It!
- Not categorized Morley
- Not categorized Ampeg
- Not categorized Apantac
- Not categorized Carry-on
- Not categorized Liftmaster
- Not categorized GVision
- Not categorized IPGARD
- Not categorized Murideo
- Not categorized TK Audio
- Not categorized Rosco
- Not categorized Proaim
- Not categorized Cisco
- Not categorized CGV
- Not categorized Vacmaster
- Not categorized Elmo
- Not categorized Libec
- Not categorized Point Source Audio
- Not categorized Macally
- Not categorized Ade
- Not categorized MooreCo
- Not categorized Di4
- Not categorized Mellerware
- Not categorized Zenec
- Not categorized Silver Cross
- Not categorized American DJ
- Not categorized AJA
- Not categorized Postium
- Not categorized RME
- Not categorized SurgeX
- Not categorized Alcon
- Not categorized Vantec
- Not categorized Silverline
- Not categorized VAVA
- Not categorized Vicoustic
- Not categorized LERAN
- Not categorized Doffler
- Not categorized Profoto
- Not categorized TensCare
- Not categorized Scanstrut
- Not categorized Industrial Music Electronics
- Not categorized Source Audio
- Not categorized Black Lion Audio
- Not categorized Wiha
- Not categorized Puls Dimension
- Not categorized Wasp
- Not categorized Gamewright
- Not categorized ISDT
- Not categorized Ilve
- Not categorized Reolink
- Not categorized Bebob
- Not categorized Ashly
- Not categorized Claypaky
- Not categorized Premier Mounts
- Not categorized MuxLab
- Not categorized Icy Box
- Not categorized Holosun
- Not categorized Seagate
- Not categorized Holzmann
- Not categorized Blackmagic Design
- Not categorized Audiolab
- Not categorized Modbap Modular
- Not categorized Genius
- Not categorized Rommer
- Not categorized Traeger
- Not categorized Memphis Audio
- Not categorized Focal
- Not categorized Belkin
- Not categorized BDI
- Not categorized Alpine
- Not categorized Ring
- Not categorized TomTom
- Not categorized XGIMI
- Not categorized Omron
- Not categorized Starlink
- Not categorized Celestron
- Not categorized Gymform
- Not categorized Glide Gear
- Not categorized Oppo
- Not categorized Chicco
- Not categorized AVM
- Not categorized Impact
- Not categorized Pelco
- Not categorized FoxFury
- Not categorized Mammut
- Not categorized Heritage Audio
- Not categorized Safco
- Not categorized Monoprice
- Not categorized Stabila
- Not categorized CTA Digital
- Not categorized Olight
- Not categorized Primo
- Not categorized HammerSmith
- Not categorized Cyrus
- Not categorized Roadinger
- Not categorized Steelbody
- Not categorized Ventev
- Not categorized Elektrobock
- Not categorized Triton
- Not categorized Trisa
- Not categorized Corberó
- Not categorized Korg
- Not categorized Atosa
- Not categorized STANDIVARIUS
- Not categorized Avteq
- Not categorized Izzy
- Not categorized PureLink
- Not categorized UNYKAch
- Not categorized Al-ko
- Not categorized ADATA
- Not categorized Mobotix
- Not categorized Kramer
- Not categorized ATen
- Not categorized Blustream
- Not categorized Laserworld
- Not categorized Kunft
- Not categorized Milesight
- Not categorized Spanninga
- Not categorized Bialetti
- Not categorized Xlyne
- Not categorized Plant Craft
- Not categorized Sungrow
- Not categorized Grundfos
- Not categorized Bazooka
- Not categorized Carlsbro
- Not categorized MoFi
- Not categorized Blackburn
- Not categorized Bang And Olufsen
- Not categorized Sole Fitness
- Not categorized Cowon
- Not categorized Bebe Confort
- Not categorized WHALE
- Not categorized Stalco
- Not categorized Horizon Fitness
- Not categorized Sonel
- Not categorized Jilong
- Not categorized Tenda
- Not categorized Maytronics
- Not categorized Tempmate
- Not categorized Idec
- Not categorized Analog Way
- Not categorized Gamesir
- Not categorized ZyXEL
- Not categorized Vogue
- Not categorized Frilec
- Not categorized Yaesu
- Not categorized Concept2
- Not categorized Musical Fidelity
- Not categorized Flir
- Not categorized Rademacher
- Not categorized NGS
- Not categorized CTOUCH
- Not categorized RCF
- Not categorized Microchip
- Not categorized Homematic IP
- Not categorized Tektronix
- Not categorized WilTec
- Not categorized Thomson
- Not categorized Easypix
- Not categorized LC-Power
- Not categorized SVS
- Not categorized 8BitDo
- Not categorized Pardini
- Not categorized Audeze
- Not categorized Everdure
- Not categorized Insta360
- Not categorized Fieldmann
- Not categorized Alpen Kreuzer
- Not categorized Xplora
- Not categorized H.Koenig
- Not categorized Aiwa
- Not categorized Wimberley
- Not categorized Insignia
- Not categorized Playtive
- Not categorized Vimar
- Not categorized Osprey
- Not categorized Hosa
- Not categorized Havis
- Not categorized Emerson
- Not categorized Weasy
- Not categorized Biltema
- Not categorized Bogen
- Not categorized Electro Harmonix
- Not categorized Vocopro
- Not categorized Chrome-Q
- Not categorized Galaxy Audio
- Not categorized Altman
- Not categorized Aiphone
- Not categorized Atlas
- Not categorized Graco
- Not categorized Manta
- Not categorized MARTOR
- Not categorized Mean Well
- Not categorized HMS Premium
- Not categorized Exelpet
- Not categorized Trendnet
- Not categorized G-Technology
- Not categorized CubuSynth
- Not categorized Simpson
- Not categorized Infasecure
- Not categorized SecureSafe
- Not categorized Intellinet
- Not categorized Hikoki
- Not categorized Solac
- Not categorized Emerio
- Not categorized Butler
- Not categorized AVer
- Not categorized IK Multimedia
- Not categorized Vankyo
- Not categorized Murr Elektronik
- Not categorized TDK-Lambda
- Not categorized Vitek
- Not categorized Quantum
- Not categorized Texas
- Not categorized ProfiCook
- Not categorized Arovec
- Not categorized Acti
- Not categorized GMB Gaming
- Not categorized Cadac
- Not categorized Olympia
- Not categorized Osram
- Not categorized Patching Panda
- Not categorized Consul
- Not categorized Manitowoc
- Not categorized Joranalogue
- Not categorized Klavis
- Not categorized HyperX
- Not categorized Zhiyun
- Not categorized ChamSys
- Not categorized OneTouch
- Not categorized Kospel
- Not categorized Crosscall
- Not categorized Dynacord
- Not categorized Rapoo
- Not categorized Suunto
- Not categorized Roidmi
- Not categorized Aconatic
- Not categorized IOGEAR
- Not categorized Ferguson
- Not categorized DAP Audio
- Not categorized Artecta
- Not categorized IBEAM
- Not categorized Mattel
- Not categorized Baby Jogger
- Not categorized Healthy Choice
- Not categorized Yato
- Not categorized Porter-Cable
- Not categorized Christmas Time
- Not categorized Barazza
- Not categorized Chacon
- Not categorized Marmitek
- Not categorized Dehner
- Not categorized Seaward
- Not categorized Eliminator Lighting
- Not categorized NordicTrack
- Not categorized Microboards
- Not categorized CEDAR
- Not categorized JoeCo
- Not categorized BZBGear
- Not categorized Fiilex
- Not categorized Gen Energy
- Not categorized DEERSYNC
- Not categorized Cranborne Audio
- Not categorized ChyTV
- Not categorized Bresser
- Not categorized Arkon
- Not categorized Apollo Design
- Not categorized Tactical Fiber Systems
- Not categorized Telmax
- Not categorized Sonifex
- Not categorized Blanco
- Not categorized ARC
- Not categorized Cardo
- Not categorized President
- Not categorized Galcon
- Not categorized K&M
- Not categorized Xcellon
- Not categorized Trijicon
- Not categorized Vortex
- Not categorized Vertex
- Not categorized PTZ Optics
- Not categorized Sescom
- Not categorized Robus
- Not categorized Revic
- Not categorized Panamax
- Not categorized Kahayan
- Not categorized Nureva
- Not categorized Pawa
- Not categorized MSW
- Not categorized Ulsonix
- Not categorized Stamony
- Not categorized Fujifilm
- Not categorized ColorKey
- Not categorized Stamina
- Not categorized Lemair
- Not categorized Leica
- Not categorized Soundsphere
- Not categorized Core SWX
- Not categorized DBX
- Not categorized Titanwolf
- Not categorized Perfect Christmas
- Not categorized Medicinalis
- Not categorized Uplink
- Not categorized Rupert Neve Designs
- Not categorized GPX
- Not categorized Flama
- Not categorized Thorens
- Not categorized Microair
- Not categorized XCell
- Not categorized Tepro
- Not categorized Traco Power
- Not categorized Yellow Garden Line
- Not categorized Vogels
- Not categorized Microsoft
- Not categorized Newline
- Not categorized Liam&Daan
- Not categorized Primewire
- Not categorized Rittal
- Not categorized Snow Joe
- Not categorized Phoenix Gold
- Not categorized Universal Audio
- Not categorized Soundmaster
- Not categorized Casa Deco
- Not categorized Adventuridge
- Not categorized Antec
- Not categorized Nutrichef
- Not categorized Parkside
- Not categorized Inverx
- Not categorized Ugreen
- Not categorized Haeger
- Not categorized Cleanmaxx
- Not categorized Victrola
- Not categorized Google
- Not categorized Gloria
- Not categorized Steinberg
- Not categorized EAT
- Not categorized Vincent
- Not categorized Ernitec
- Not categorized Jinbei
- Not categorized Interstuhl
- Not categorized Wachendorff
- Not categorized Geneva
- Not categorized Alfatron
- Not categorized Rockford Fosgate
- Not categorized Sumiko
- Not categorized Chamberlain
- Not categorized Walrus Audio
- Not categorized Govee
- Not categorized Foscam
- Not categorized Ambient Weather
- Not categorized Anybus
- Not categorized Gra-Vue
- Not categorized Enhance
- Not categorized Digitalinx
- Not categorized Easyrig
- Not categorized Bolt
- Not categorized Comprehensive
- Not categorized Ocean Way Audio
- Not categorized Ocean Matrix
- Not categorized Peerless-AV
- Not categorized Blomberg
- Not categorized MAK
- Not categorized Deaf Bonce
- Not categorized Easymaxx
- Not categorized Christmaxx
- Not categorized Fiio
- Not categorized Multibrackets
- Not categorized Hanseatic
- Not categorized Evenflo
- Not categorized ADDAC System
- Not categorized Primera
- Not categorized Hecate
- Not categorized Alutruss
- Not categorized LightZone
- Not categorized Peak Design
- Not categorized Blizzard
- Not categorized Drawmer
- Not categorized EOTech
- Not categorized Edelkrone
- Not categorized Ergotools Pattfield
- Not categorized ESE
- Not categorized OKAY
- Not categorized Uniropa
- Not categorized JMAZ Lighting
- Not categorized AEA
- Not categorized NightStick
- Not categorized Aguilar
- Not categorized JK Audio
- Not categorized Sabrent
- Not categorized MIOPS
- Not categorized Hawke
- Not categorized Rotatrim
- Not categorized Defender
- Not categorized Enttec
- Not categorized Robinhood
- Not categorized GVM
- Not categorized Feelworld
- Not categorized Eller
- Not categorized Arthur Martin
- Not categorized Theben
- Not categorized Soundcraft
- Not categorized Martin Logan
- Not categorized Andover
- Not categorized Fortinet
- Not categorized Prestigio
- Not categorized Deity
- Not categorized Watson
- Not categorized Grimm Audio
- Not categorized AVMATRIX
- Not categorized Grunkel
- Not categorized CMI
- Not categorized Synco
- Not categorized Betty Bossi
- Not categorized Lanaform
- Not categorized CAD Audio
- Not categorized Moulinex
- Not categorized Kubo
- Not categorized Merging
- Not categorized Livington
- Not categorized Hurricane
- Not categorized Akai
- Not categorized AirTurn
- Not categorized New Pol
- Not categorized Expressive E
- Not categorized Amazfit
- Not categorized ILive
- Not categorized Giardino
- Not categorized Flycam
- Not categorized Digigram
- Not categorized Mutec
- Not categorized Senal
- Not categorized Ipevo
- Not categorized Tempo
- Not categorized Proviel
- Not categorized Xblitz
- Not categorized Kathrein
- Not categorized Mafell
- Not categorized Aspes
- Not categorized Tineco
- Not categorized Zelmer
- Not categorized Autel
- Not categorized Mercusys
- Not categorized Velbus
- Not categorized Connection
- Not categorized HuddleCamHD
- Not categorized Technical Pro
- Not categorized Solplanet
- Not categorized JOBY
- Not categorized Raya
- Not categorized Hammond
- Not categorized DOD
- Not categorized Marshall Electronics
- Not categorized Videotel Digital
- Not categorized Avenview
- Not categorized Bretford
- Not categorized Badiona
- Not categorized Dangerous Music
- Not categorized Smith-Victor
- Not categorized Zylight
- Not categorized Blind Spot
- Not categorized BIOS Living
- Not categorized Burris
- Not categorized Kemo
- Not categorized MBM
- Not categorized TAURUS Titanium
- Not categorized Gardenline
- Not categorized Millennia
- Not categorized Suntec
- Not categorized PCE Instruments
- Not categorized AREXX
- Not categorized Blue Sky
- Not categorized 3M
- Not categorized Rocktrail
- Not categorized BeSafe
- Not categorized American International
- Not categorized T-Rex
- Not categorized Computherm
- Not categorized Babysense
- Not categorized Bora
- Not categorized Hayward
- Not categorized Thinkware
- Not categorized Cloud
- Not categorized Apricorn
- Not categorized Lucide
- Not categorized Foster
- Not categorized Mulex
- Not categorized Comfortisse
- Not categorized Intertechno
- Not categorized EQ-3
- Not categorized Yphix
- Not categorized Magliner
- Not categorized Em-Trak
- Not categorized Black Box
- Not categorized Albert Heijn
- Not categorized Infantino
- Not categorized Bestgreen
- Not categorized Lenoxx
- Not categorized Empress Effects
- Not categorized Hacienda
- Not categorized Dali
- Not categorized Cooler Master
- Not categorized Enbrighten
- Not categorized Audison
- Not categorized Flame
- Not categorized UDG Gear
- Not categorized Lastolite
- Not categorized Weidmüller
- Not categorized NANO Modules
- Not categorized Scala
- Not categorized EA Elektro Automatik
- Not categorized Minox
- Not categorized Gustard
- Not categorized Technaxx
- Not categorized Bahr
- Not categorized Grand Effects
- Not categorized Franklin
- Not categorized Sodapop
- Not categorized Absco
- Not categorized Bestway
- Not categorized 4ms
- Not categorized Arturia
- Not categorized Vivolink
- Not categorized Victor Technology
- Not categorized Lowepro
- Not categorized Pitsos
- Not categorized Celexon
- Not categorized Neumärker
- Not categorized SunPower
- Not categorized Black Line
- Not categorized RCBS
- Not categorized Hensel
- Not categorized Ultimate
- Not categorized Westland
- Not categorized Casablanca
- Not categorized For_Q
- Not categorized Pro-User
- Not categorized Flavel
- Not categorized Sekonic
- Not categorized Deltaco Gaming
- Not categorized Bluebird
- Not categorized Babybjörn
- Not categorized Dunlop
- Not categorized Starlyf
- Not categorized WEG
- Not categorized Cotek
- Not categorized Deditec
- Not categorized Forza
- Not categorized Yamazen
- Not categorized Lantus
- Not categorized Edwards
- Not categorized FireAngel
- Not categorized Instant
- Not categorized Truetone
- Not categorized Carlo Gavazzi
- Not categorized PurAthletics
- Not categorized Jane
- Not categorized OLLO
- Not categorized Yuer
- Not categorized Gustavsberg
- Not categorized The Joy Factory
- Not categorized Kwantum
- Not categorized Teia
- Not categorized MyPOS
- Not categorized Altrad
- Not categorized Gator Frameworks
- Not categorized KNEKT
- Not categorized Durvet
- Not categorized Favero
- Not categorized HDFury
- Not categorized LEDs-ON
- Not categorized Schatten Design
- Not categorized Statron
- Not categorized Baninni
- Not categorized GW Instek
- Not categorized Aim TTi
- Not categorized Ketron
- Not categorized Bbf
- Not categorized AURALiC
- Not categorized Code
- Not categorized Mivar
- Not categorized Pressalit
- Not categorized IStarUSA
- Not categorized Dreamgear
- Not categorized Vitalmaxx
- Not categorized Saramonic
- Not categorized SHX
- Not categorized Televés
- Not categorized Applico
- Not categorized Hegel
- Not categorized TOGU
- Not categorized Dash
- Not categorized Futurelight
- Not categorized JANDY
- Not categorized ResMed
- Not categorized Jungle Gym
- Not categorized Baby Lock
- Not categorized Sheeran Looper
- Not categorized Akasa
- Not categorized Bavaria By Einhell
- Not categorized Oregon Scientific
- Not categorized Glyph
- Not categorized Enphase
- Not categorized Gem Toys
- Not categorized Plasma Cloud
- Not categorized Mega
- Not categorized Viomi
- Not categorized United Office
Latest Not categorized User Manuals
27 October 2024
27 October 2024
27 October 2024
27 October 2024
27 October 2024
27 October 2024
27 October 2024
27 October 2024
27 October 2024
27 October 2024