LG TCC-2610 Manual
Read below 📖 the manual in Italian for LG TCC-2610 (2 pages) in the Speaker category. This guide has been helpful for 20 people and has been rated 4.5 stars on average by 2 users
Page 1/2

Take
time
to
read
this
OWNER
S
MANUAL
thoroughly.
Familiarity
with
installation
and
operating
procedures
will
help
you
obtain
the
best
performance
from
your
CAR
Receiver.
Detachable
Front
Panel
Car
Receiver
OWNER
S
MANUAL
MODEL:TCC-2610
P/N:3828R-F005J
Main
connector
Connect
the
main
connector
to
the
female
connector
on
the
back
of
the
unit.
Antenna
Connection
Insert
the
plug
of
the
car
antenna
cable
into
the
jack
at
the
rear
of
the
unit.
Ground
Connection(Black)
Connect
the
ground
lead
(black)
to
a
metal
part
of
the
vehicle
and
secure
it
using
the
screw
provided
on
the
vehicle
for this
purpose.
If
this
connection
is
loose,
or
if
the
cord
is
connected
to
something
other
than
a
metal
part
of
the
car,
noise
or
malfunction
may
result.
Power
Supply
Lead
(Red)
Connect
the
red
power
supply
wire
to
the
12V
+
terminal
controlled
by
the
car
ignition
switch.
Memory
Back-up
Lead
(Yellow)
Connect
the
yellow
memory
power
supply
wire
to
a
12V
+
terminal
that
is
always
supplied
with
power
regardless
of
the
vehicle
s
ignition
switch
position.
If
this
connection
is
made
incorrectly
or
is
not
made
at
all,
the
unit
will
not
work.
Line
Out
Jacks(Optional)
Connect
to
the
Line-in
RCA
jacks
of
the
power
amplifier.
Power
Antenna
Lead/External
Amplifier
Remote
Turn-on
Lead
Your
will
find
a
separate
lead,
blue
with
a
male
terminal
suitable
to
many
automatic
antenna.
This
lead
is
not
to
be
used
with
non-
automatic
antenna.
If
an
automatic
car
antenna
is
used,
when
connecting
the
lead,
the
antenna
will
be
automatically
extened
when
the
main
switch
is
turned
on.
This
can
also
be
used
as
a
remote
turn-
on
wire
connection
for
amplifiers
that
have
a
remote
sensing
lead.
Using
this
connection
will
allow
simultaneous
turning
on/off
of
the
radio
and
an
external
amplifier.
Connections
Precautions
Do
not
bring
the
connecting
cords
near
parts
whose
temperature
will
rise
when
the
vehicle
is
driven.
Secure
the
connectors
securely
so
that
they
are
locked
into
position.
Improper
can
result
in
noise
or
hamper
operation.
This
car
receiver
is
not
desingned
to
utilize
the
vehicle
s
chassis
as
the
electrical
return
path
from
the
speaker
to
the
radio.
Always
use
two
condutor
wire
between each
speaker
and
your
stereo
unit.
4-Speakers
connection
Use
4~8
Ohm
impedance
speakers.
Refer
to
the
following
connections
diagram.
Antenna
Jack
Line
Out
Jack
(Optional)
Antenna
Signal
Installations
Precautions:
Be
careful
not
to
touch
the
rear
side
panel
of
the
unit
when
removing
the
unit
from
the
installation
sleeve,
since
it
may
be
hot.
On
this
side
the
cooling
ribs
are
located.
The
unit
is
designed
to
operate
only
on
12
volt
DC
negative
ground
electrical
system.
When
you
replace
the
fuse,
be
sure
to
use
a
fuse
of
specified
amperage
for
each
wire
as
mentioned
in
chapter
Connections
.
Using
a
fuse
of
higher
amperage
may
cause
serious
damage
to
the
unit.
Mounting
the
unit
Note:
Periodically
wipe
the
contacts
on
the
back
of
the
front
panel
with
a
cotton
swap
moistened
with
alcohol.
Use
only
the
parts
included
with
the
unit
to
ensure
proper
installation.
The
use
of
unauthorized
arts
can
cause
malfunctions.
Consult
with
your
nearest
car
audio
dealer
if
installation
requires
the
drilling
of
holes
or
other
modifications
of
the
vehicle.
Do
not
use
the
front
panel
as
a
way
of
gripping
the
unit
during
installation
and
wiring.
The
front
panel
may
come
away
and
the
unit
may
drop
on
the
floor.
When
removing
the
unit
from
the
installation
sleeve
If
you
need
to
remove
the
unit
from
the
installation
sleeve,
proceed
as
follows.
Remove
the
rear
supporter
from
the
unit.
Remove
the
front
panel
from
the
unit.
Insert
the
lever
into
hole
on
one
side
of
the
unit,
and
pull
the
lever
toward
you.
Do
the
same
operation
on
the
other
side
and
pull
out
the
unit
from
the
installation
sleeve.
A
A
A
Dashboard
Installation
sleeve
Bend
the
claws
according
to
the
thickness
of
the
dashboard.
Detachable
Front
Panel
The
front
panel
of
this
unit
can
be
detached
to
prevent
theft.
Detaching
the
Front
Panel
Press
the
RELEASE
button
(
)to
release
the
extractable
front
panel.
Hold
the
right
part
of
the
front
panel
and
pull
it
towards
you
gently.
Note:
Take
care
not
to
put
pressure
on
the
display
or
control
buttons,
or
drop
the
front
panel.
Place
the
Front
Panel
in
the
supplied
protective
case.
Attaching
the
Front
Panel
Push
the
front
panel
against
the
main
unit
to
reattach
it.
Notes:
When
replacing
the
front
panel,
do
not
put
pressure
on
the
display
or
control
buttons.
The
control
buttons
may
not
work
properly
if
the
front
panel
is
not
attached
properly.
If
this
occurs,
gently
press
the
front
panel.
Do
not
leave
the
front
panel
in
any
area
exposed
to
high
temperatures
or
direct
sunlight.
Do
not
drop
the
front
panel
or
otherwise
subject
it
to
strong
impact.
Do
not
allow
such
volatile
agents
as
benzine,
thinner,
or
insecticides
to
come
into
contact
with
the
surface
of
the
front
panel.
Never
try
to
disassemble
the
front
panel.
RELEASE
Button
Front
Panel
Protective
Case
Front
Panel
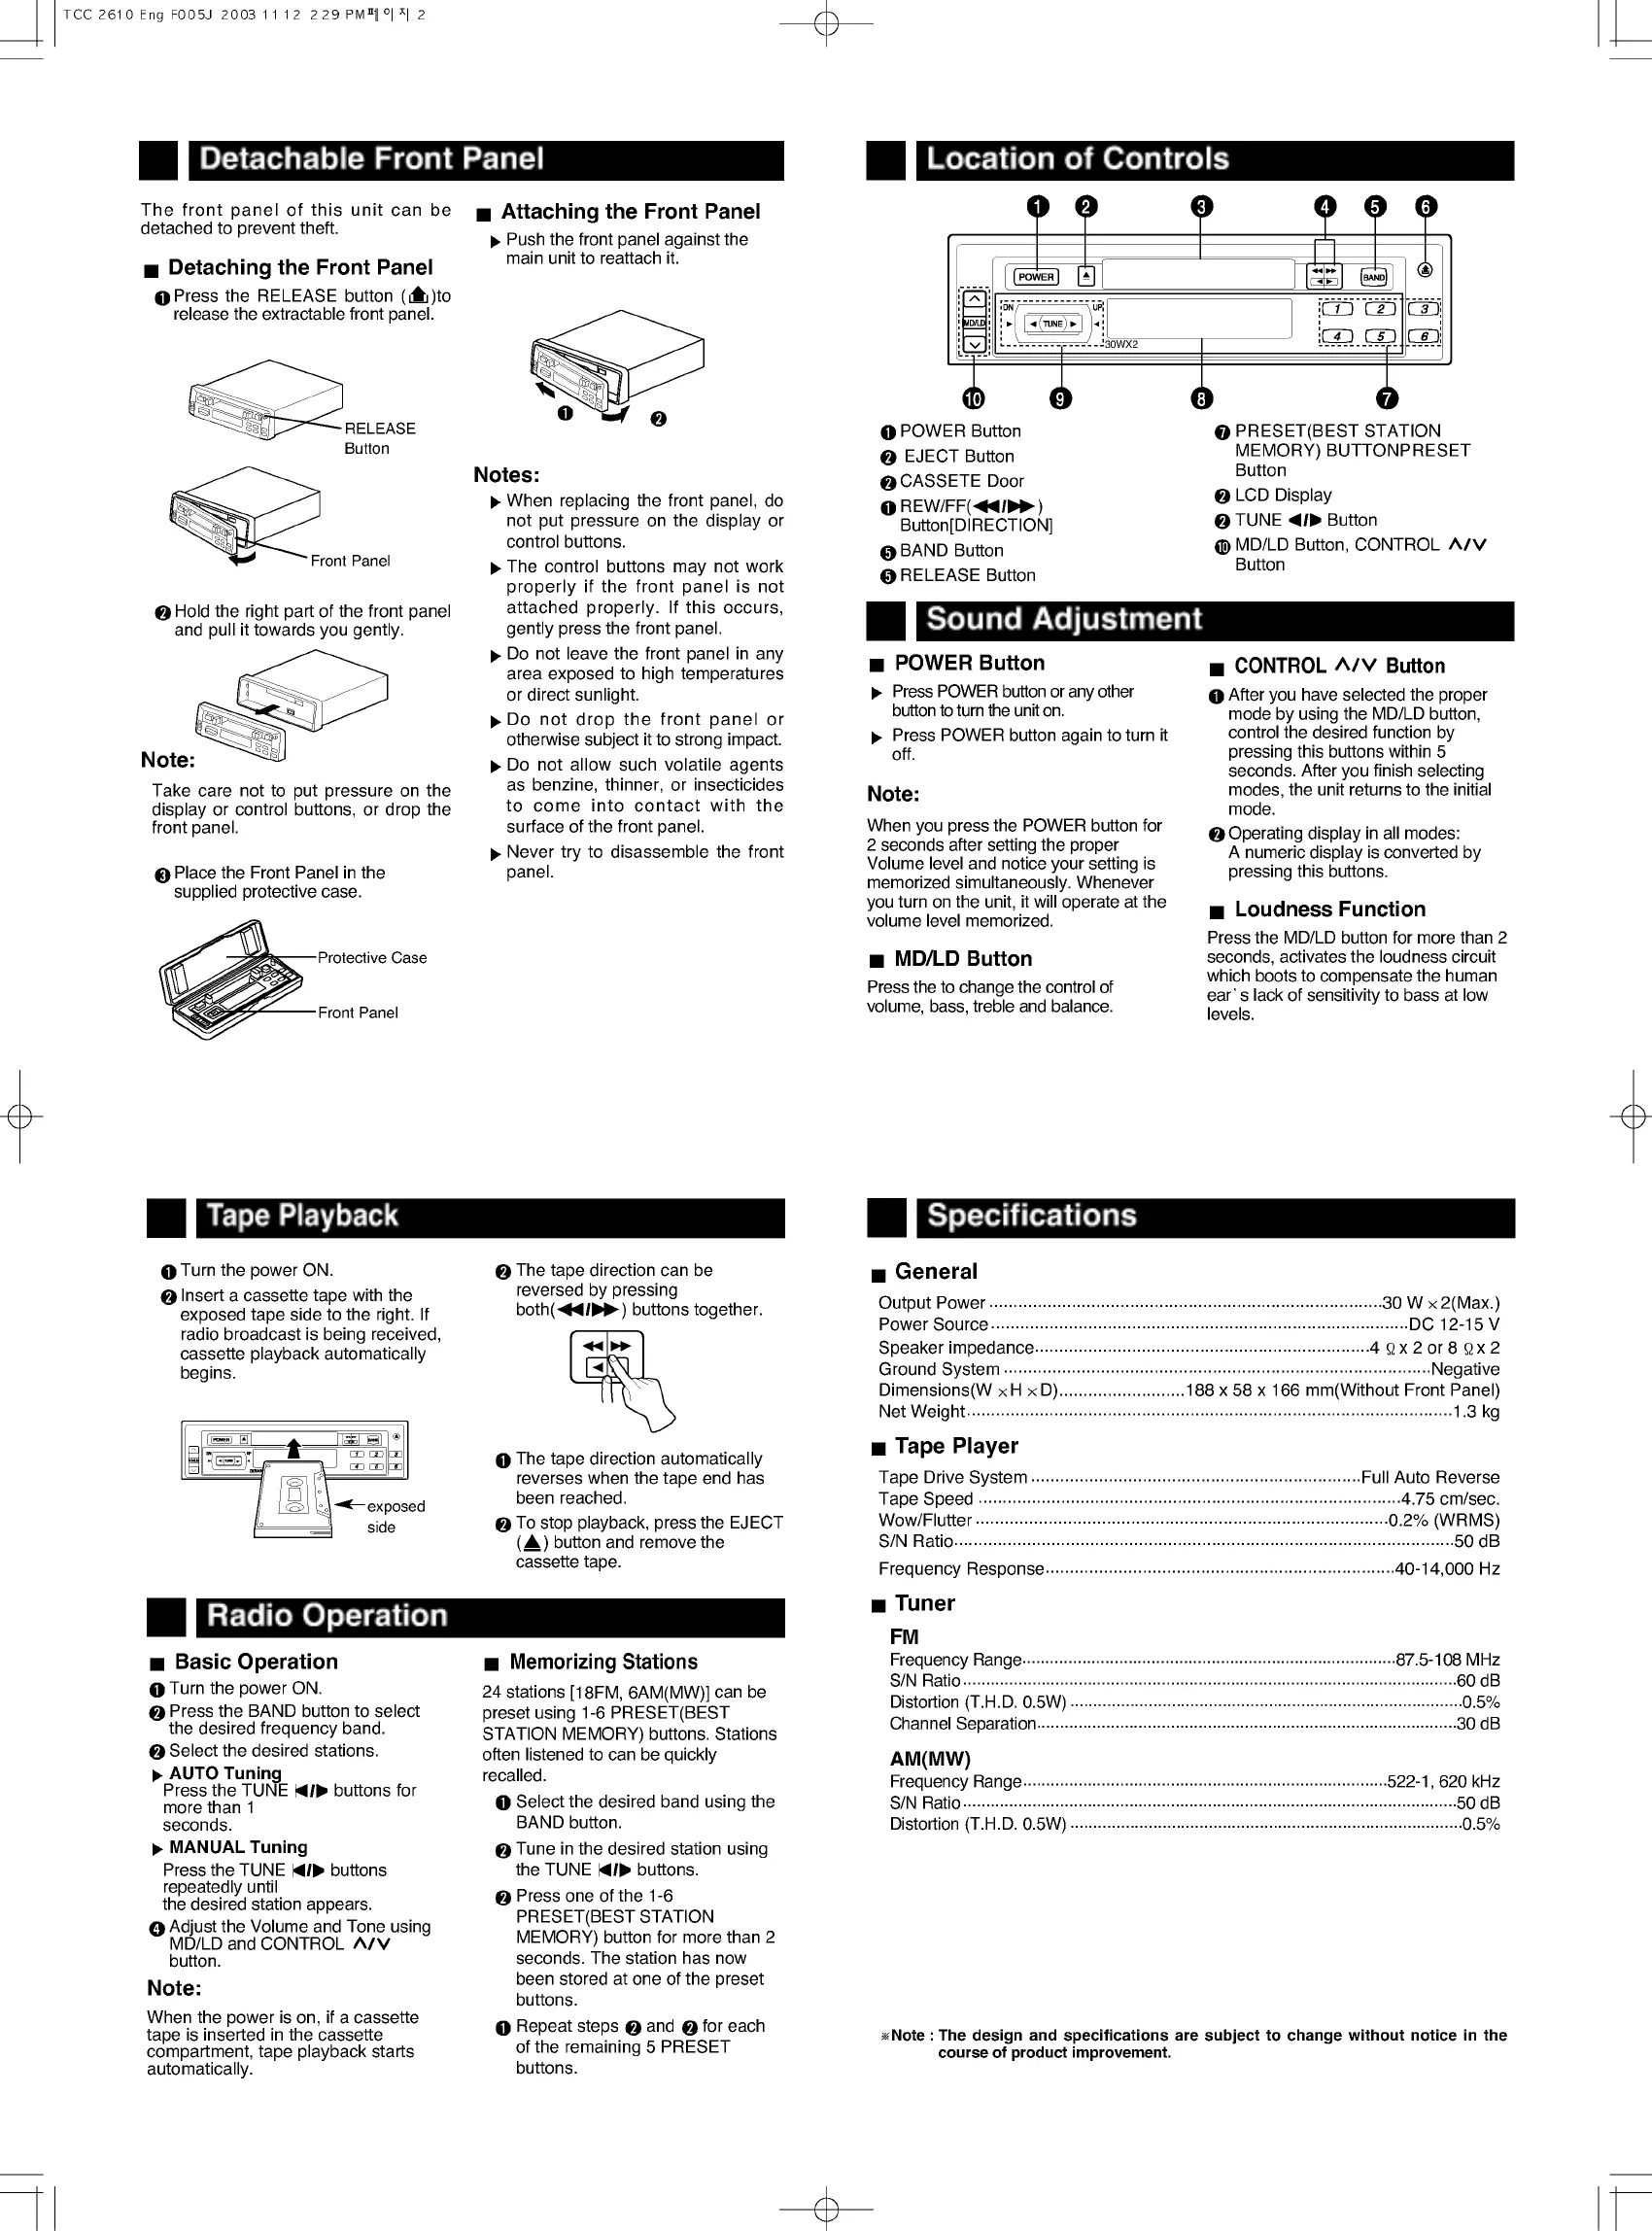
Location
of
Controls
POWER
Button
EJECT
Button
CASSETE
Door
REW/FF(
)
Button[DIRECTION]
BAND
Button
RELEASE
Button
PRESET(BEST
STATION
MEMORY)
BUTTONPRESET
Button
LCD
Display
TUNE
Button
MD/LD
Button,
CONTROL
Button
30WX2
Sound
Adjustment
POWER
Button
Press
POWER
button
or
any
other
button
to
turn
the
unit
on.
Press
POWER
button
again
to
turn
it
off.
Note:
When
you
press
the
POWER
button
for
2
seconds
after
setting
the
proper
Volume
level
and
notice
your
setting
is
memorized
simultaneously.
Whenever
you
turn
on
the
unit,
it
will
operate
at
the
volume
level
memorized.
MD/LD
Button
Press
the
to
change
the
control
of
volume,
bass,
treble
and
balance.
CONTROL
Button
After
you
have
selected
the
proper
mode
by
using
the
MD/LD
button,
control
the
desired
function
by
pressing
this
buttons
within
5
seconds.
After
you
finish
selecting
modes,
the
unit
returns
to
the
initial
mode.
Operating
display
in
all
modes:
A
numeric
display
is
converted
by
pressing
this
buttons.
Loudness
Function
Press
the
MD/LD
button
for
more
than
2
seconds,
activates
the
loudness
circuit
which
boots
to
compensate
the
human
ear
s
lack
of
sensitivity
to
bass
at
low
levels.
Tape
Playback
Radio
Operation
Turn
the
power
ON.
Insert
a
cassette
tape
with
the
exposed
tape
side
to
the
right.
If
radio
broadcast
is
being
received,
cassette
playback
automatically
begins.
The
tape
direction
can
be
reversed
by
pressing
both(
)
buttons
together.
The
tape
direction
automatically
reverses
when
the
tape
end
has
been
reached.
To
stop
playback,
press
the
EJECT
(
)
button
and
remove
the
cassette
tape.
exposed
side
Basic
Operation
Turn
the
power
ON.
Press
the
BAND
button
to
select
the
desired
frequency
band.
Select
the
desired
stations.
AUTO
Tuning
Press
the
TUNE
buttons
for
more
than
1
seconds.
MANUAL
Tuning
Press
the
TUNE
buttons
repeatedly
until
the
desired
station
appears.
Adjust
the
Volume
and
Tone
using
MD/LD
and
CONTROL
button.
Note:
When
the
power
is
on,
if
a
cassette
tape
is
inserted
in
the
cassette
compartment,
tape
playback
starts
automatically.
Memorizing
Stations
24
stations
[18FM,
6AM(MW)]
can
be
preset
using
1-6
PRESET(BEST
STATION
MEMORY)
buttons.
Stations
often
listened
to
can
be
quickly
recalled.
Select
the
desired
band
using
the
BAND
button.
Tune
in
the
desired
station
using
the
TUNE
buttons.
Press
one
of
the
1-6
PRESET(BEST
STATION
MEMORY)
button
for
more
than
2
seconds.
The
station
has
now
been
stored
at
one
of
the
preset
buttons.
Repeat
steps
and
for
each
of
the
remaining
5
PRESET
buttons.
Specifications
General
Output
Power
.................................................................................30
W
2(Max.)
Power
Source
......................................................................................DC
12-15
V
Speaker
impedance.....................................................................4
x
2
or
8
x
2
Ground
System
........................................................................................Negative
Dimensions(W
H
D)..........................188
x
58
x
166
mm(Without
Front
Panel)
Net
Weight
....................................................................................................1.3
kg
Tape
Player
Tape
Drive
System
....................................................................Full
Auto
Reverse
Tape
Speed
.......................................................................................4.75
cm/sec.
Wow/Flutter
.....................................................................................0.2%
(WRMS)
S/N
Ratio.......................................................................................................50
dB
Frequency
Response........................................................................40-14,000
Hz
Tuner
FM
Frequency
Range.................................................................................87.5-108
MHz
S/N
Ratio
...........................................................................................................60
dB
Distortion
(T.H.D.
0.5W)
.....................................................................................0.5%
Channel
Separation...........................................................................................30
dB
AM(MW)
Frequency
Range...............................................................................522-1,
620
kHz
S/N
Ratio
...........................................................................................................50
dB
Distortion
(T.H.D.
0.5W)
.....................................................................................0.5%
Note
:
The
design
and
specifications
are
subject
to
change
without
notice
in
the
course
of
product
improvement.
Product Specifications
| Brand: | LG |
| Category: | Speaker |
| Model: | TCC-2610 |
Do you need help?
If you need help with LG TCC-2610, ask a question below and other users will answer you
Speaker LG User Manuals

18 October 2024
15 October 2024
15 October 2024
15 October 2024
13 October 2024
13 October 2024
13 October 2024
13 October 2024
13 October 2024
13 October 2024
Speaker User Manuals
- Speaker Sony
- Speaker Xiaomi
- Speaker Bosch
- Speaker IKEA
- Speaker HP
- Speaker Philips
- Speaker Panasonic
- Speaker Hama
- Speaker Vorago
- Speaker Jensen
- Speaker Avantree
- Speaker Edifier
- Speaker Reflexion
- Speaker Meridian
- Speaker Teufel
- Speaker Kogan
- Speaker Soundcore
- Speaker Turbosound
- Speaker GoGEN
- Speaker Pro-Ject
- Speaker Yamaha
- Speaker Morel
- Speaker Axis
- Speaker Extron
- Speaker Media-tech
- Speaker Pioneer
- Speaker EarFun
- Speaker Ecler
- Speaker Audac
- Speaker Woxter
- Speaker KEF
- Speaker Audio-Technica
- Speaker Toa
- Speaker Metra
- Speaker Pyle
- Speaker Sencor
- Speaker Bose
- Speaker Orava
- Speaker Grundig
- Speaker JVC
- Speaker Kicker
- Speaker Auna
- Speaker Midland
- Speaker OSD Audio
- Speaker Power Dynamics
- Speaker Fenton
- Speaker Vonyx
- Speaker Bluesound
- Speaker Hertz
- Speaker Kenwood
- Speaker MB Quart
- Speaker Bigben
- Speaker Aplic
- Speaker CSL
- Speaker Bearware
- Speaker NUVO
- Speaker Maginon
- Speaker Infiniton
- Speaker Roku
- Speaker GPO
- Speaker Advance
- Speaker Sonance
- Speaker AXESS
- Speaker Be Cool
- Speaker Artsound
- Speaker Denon
- Speaker Ion
- Speaker Marshall
- Speaker Yorkville
- Speaker V-Tac
- Speaker MyDJ
- Speaker Valcom
- Speaker Celly
- Speaker JBL
- Speaker Infinity
- Speaker Majority
- Speaker Nedis
- Speaker Sharp
- Speaker Helix
- Speaker Genesis
- Speaker Klipsch
- Speaker Worx
- Speaker Muse
- Speaker Ground Zero
- Speaker Karma
- Speaker Glemm
- Speaker Match
- Speaker Speed-Link
- Speaker Renkforce
- Speaker Definitive Technology
- Speaker QSC
- Speaker WHD
- Speaker Q Acoustics
- Speaker Karcher
- Speaker GoldenEar
- Speaker Pyramid
- Speaker FoneStar
- Speaker Trevi
- Speaker Monitor Audio
- Speaker Canton
- Speaker Fresh N Rebel
- Speaker Energy Sistem
- Speaker Bauhn
- Speaker PSB
- Speaker Vizio
- Speaker Polk
- Speaker ESX
- Speaker Omnitronic
- Speaker MEE Audio
- Speaker Monacor
- Speaker ModeCom
- Speaker Hercules
- Speaker Black Hydra
- Speaker Electro-Voice
- Speaker Wharfedale
- Speaker Boss
- Speaker Tannoy
- Speaker Mount-It!
- Speaker GMB Audio
- Speaker Mad Dog
- Speaker Ashly
- Speaker Memphis Audio
- Speaker Focal
- Speaker Alpine
- Speaker ATen
- Speaker Genelec
- Speaker Bazooka
- Speaker Lamax
- Speaker NGS
- Speaker Aiaiai
- Speaker RCF
- Speaker SVS
- Speaker Aiwa
- Speaker N-Gear
- Speaker Atlas
- Speaker PowerBass
- Speaker Prime3
- Speaker Harman Kardon
- Speaker Lexibook
- Speaker Ibiza Sound
- Speaker Creative
- Speaker Aconatic
- Speaker DAP Audio
- Speaker REL Acoustics
- Speaker Sonus Faber
- Speaker Xcellon
- Speaker OWI
- Speaker Titanwolf
- Speaker Weather X
- Speaker HK Audio
- Speaker Phoenix Gold
- Speaker Krüger And Matz
- Speaker Indiana Line
- Speaker Blue Tees
- Speaker BASSBOSS
- Speaker Polsen
- Speaker Deaf Bonce
- Speaker Tangent
- Speaker FBT
- Speaker Transparent
- Speaker IHome
- Speaker Martin Logan
- Speaker Andover
- Speaker ILive
- Speaker Moonki
- Speaker BlueAnt
- Speaker HuddleCamHD
- Speaker X JUMP
- Speaker PulseAudio
- Speaker Urban Revolt
- Speaker Audison
- Speaker Boynq
- Speaker Dynaudio
- Speaker Clarity
- Speaker VIETA PRO
- Speaker Potter
- Speaker Sonoro
- Speaker Yamazen
- Speaker OTTO
- Speaker Soen
- Speaker Miller & Kreisel
- Speaker Qian
- Speaker Iriver
- Speaker Standard Horizon
- Speaker The Box
- Speaker August
Latest Speaker User Manuals

27 October 2024
27 October 2024
27 October 2024
27 October 2024
27 October 2024
27 October 2024
27 October 2024
27 October 2024
27 October 2024
27 October 2024