Vizio XRU9M Manual
Vizio
Remote control
XRU9M
Read below 📖 the manual in Italian for Vizio XRU9M (9 pages) in the Remote control category. This guide has been helpful for 18 people and has been rated 4.5 stars on average by 2 users
Page 1/9

XRU9M OM 2-6-10.indd 1
XRU9M OM 2-6-10.indd 1
XRU9M OM 2-6-10.indd 1
XRU9M OM 2-6-10.indd 1XRU9M OM 2-6-10.indd 1 2/6/2010 1:51:35 PM
2/6/2010 1:51:35 PM
2/6/2010 1:51:35 PM
2/6/2010 1:51:35 PM2/6/2010 1:51:35 PM

2 3
Table of Contents
Regulatory Cautions .................................3
Button Descriptions ..................................4
Initial Setup ...............................................6
Battery Insertion ...................................6
Precautionary tips for batteries ............6
Battery Saver .......................................6
Code Saver ..........................................6
Code Setup...............................................7
Setup for DVD ......................................7
Setup for AUDIO ..................................8
Setup for CABLE ..................................9
Setup for TV .......................................10
Searching for codes ...........................11
Remote Control Range ...........................12
Remote Control Precautions ..................13
Warranty .................................................15
Congratulations on your purchase of
this Universal Remote Control. With
this Universal Remote, juggling multiple
remote controls is a thing of the past!
Your new remote controls up to 4 devices,
including the most popular brands of TV,
DVD, DVR, Cable, and more.
Note: Some functions from your original
remote may not be controlled by this
remote. Use the original remote, if
available, to control such functions.
Sometimes buttons other than described
in these instructions may actually perform
the function. For example, the CHAN and
VOL buttons might be used to navigate
through menu choices. We recommend
you experiment with the remote to
identify if such situations pertain to your
equipment.
Your new remote is easy to use, easy to
program, and it gives you total control—at
the touch of your fi ngertips!
Regulatory Cautions
FCC Caution
THIS DEVICE COMPLIES WITH PART 15 OF THE
FCC RULES. OPERATION IS SUBJECT TO THE
FOLLOWING TWO CONDITIONS:
(1) THIS DEVICE MAY NOT CAUSE HARMFUL
INTERFERENCE, AND (2) THIS DEVICE MUST
ACCEPT ANY INTERFERENCE RECEIVED,
INCLUDING INTERFERENCE THAT MAY CAUSE
UNDESIRED OPERATION.
NOTE: This equipment has been tested and
found to comply with the limits for a Class B digital
device, pursuant to part 15 of the FCC Rules.
These limits are designed to provide reasonable
protection against harmful interference in a
residential installation.
This equipment generates, uses and can radiate
radio frequency energy and, if not installed
and used in accordance with the instructions,
may cause harmful interference to radio
communications. However, there is no guarantee
that interference will not occur in a particular
installation. If this equipment does cause harmful
interference to radio or television reception, which
can be determined by turning the equipment o
and on, the user is encouraged to try to correct
the interference by one or more of the following
measures:
• Reorient or relocate the receiving antenna.
• Increase the separation between the equipment
and receiver.
• Connect the equipment into an outlet on a
circuit dierent from that to which the receiver is
connected.
• Consult the dealer or an experienced radio/TV
technician for help.
NOTE: Modifi cations to this product will void the
user’s authority to operate this equipment.
Canadian Notice
This Class B digital apparatus complies with limits
for radio noise emissions specifi ed in ICES-003 of
the Department of Communications. This device
complies with RSS-210 of Industry and Science
Canada Operation is subject to the following
two conditions: (1) this device may not cause
interference, and (2) this device must accept any
interference, including interference that may cause
undesired operation of the device.
XRU9M OM 2-6-10.indd 2-3
XRU9M OM 2-6-10.indd 2-3
XRU9M OM 2-6-10.indd 2-3
XRU9M OM 2-6-10.indd 2-3XRU9M OM 2-6-10.indd 2-3 2/6/2010 1:51:43 PM
2/6/2010 1:51:43 PM
2/6/2010 1:51:43 PM
2/6/2010 1:51:43 PM2/6/2010 1:51:43 PM
4 5
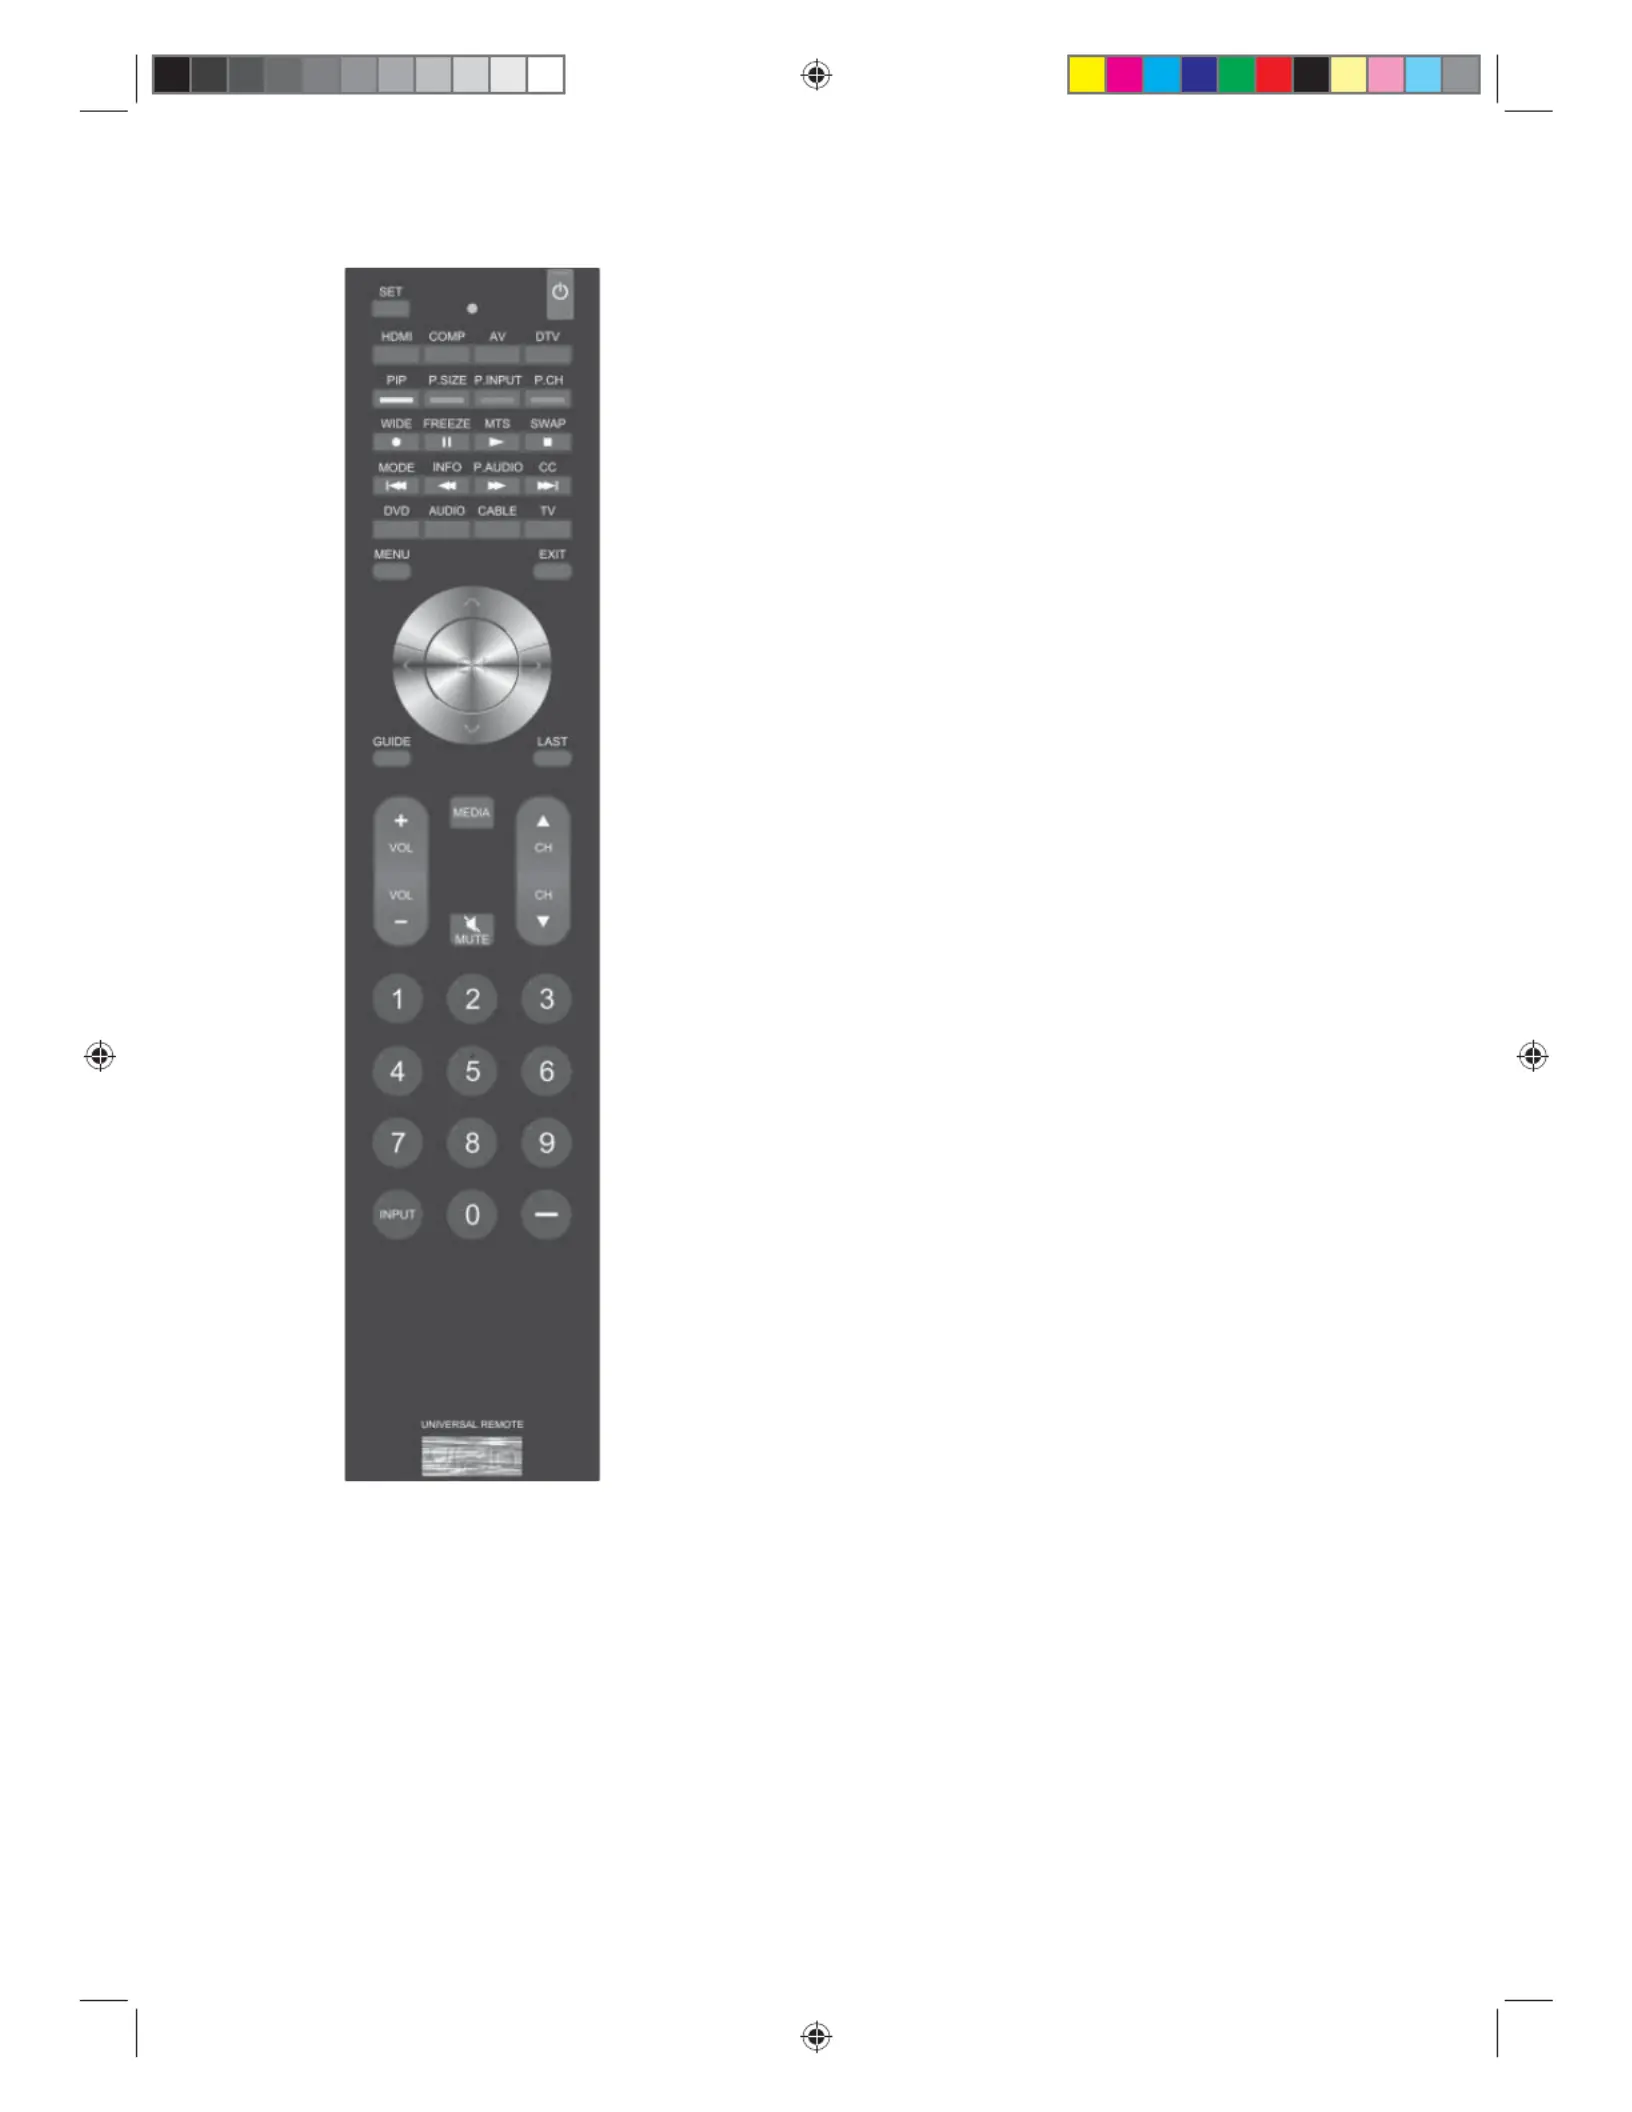
POWER – Press this button to turn the component on or
o.
SET – This button starts all programming of the Remote
Control.
HDMI – Press this button to select the HDMI input. By
pressing it repeatedly you will go through all HDMI inputs
in sequence.
COMP – Press this button to select Component input.
AV – Press this button to select AV (either Composite or
S-Video) input.
DTV – Press this button to select TV input.
PIP – Pressing this button will activate the picture-in-
picture feature.
P.SIZE – Repeatedly press this button to set the size of
the PIP screen to small, medium, or large.
P.INPUT – Press the button to choose the input source
for the PIP screen.
P.CH – Press this button to change the channels in the
PIP screen when TV is selected as PIP input.
WIDE – This button cycles through the available screen
formats.
FREEZE – Press this button to “Freeze-Frame” the
current screen. Press this button again to continue.
MTS – This button will select the MTS options of Stereo,
SAP, Mono or alternate audio channels, where available.
SWAP – While in PIP mode; pressing SWAP will switch
the displays from the main screen to the sub-screen or
vice versa.
MODE – Use this button to change the picture.
INFO – This button displays the image and system
information display.
P.AUDIO – Press this button to switch the audio from the
main screen to the sub-screen while in PIP mode.
CC – This button will select the Closed Caption mode.
DVD – This button selects a programmed DVD player.
AUDIO – This button selects a programmed Audio
Receiver/Amp/Home Theater System.
CABLE – This button selects a programmed cable TV
set-top box or a satellite TV set-top box.
TV – This button selects a programmed TV.
Note: the remote is pre-programmed to operate VIZIO
TVs by default.
MENU – Use this button for the on-screen menu.
EXIT – Press this button to exit from the on-screen
menu.
OK – Use this button for the on-screen menu. Press it to
confi rm or choose a highlighted menu selection.
Up, Down, Left, Right – These buttons are used to
navigate the on-screen menu.
GUIDE – This button displays program guide
information.
LAST – This button recalls the previously viewed
channel.
MEDIA – Press this button to view pictures, listen to
music, or watch movies on a USB drive connected to the
Multi Media port on the side of a VIZIO HDTV.
VOL +/- – This button turns the volume up or down.
CH +/- – This button changes the channels up or down.
MUTE – This button turns the sound on and off.
NUMBER BUTTON PAD – Use these buttons to select
a channel.
INPUT – This button allows the user to cycle through the
available source inputs.
- (DASH) – When selecting a digital channel directly,
use this button between the main and sub-channels. For
example, channel 28-2 would be selected by the button
sequence 2, 8, DASH, 2.
Button Descriptions Button Descriptions, cont.
XRU9M OM 2-6-10.indd 4-5
XRU9M OM 2-6-10.indd 4-5
XRU9M OM 2-6-10.indd 4-5
XRU9M OM 2-6-10.indd 4-5XRU9M OM 2-6-10.indd 4-5 2/6/2010 1:51:43 PM
2/6/2010 1:51:43 PM
2/6/2010 1:51:43 PM
2/6/2010 1:51:43 PM2/6/2010 1:51:43 PM
Product Specifications
| Brand: | Vizio |
| Category: | Remote control |
| Model: | XRU9M |
Do you need help?
If you need help with Vizio XRU9M, ask a question below and other users will answer you
Remote control Vizio User Manuals

13 October 2024
Remote control User Manuals
- Remote control Sony
- Remote control Xiaomi
- Remote control Philips
- Remote control Panasonic
- Remote control Hama
- Remote control Neewer
- Remote control Schwaiger
- Remote control One For All
- Remote control Vello
- Remote control Extron
- Remote control Danfoss
- Remote control PeakTech
- Remote control Aplic
- Remote control CSL
- Remote control Zalman
- Remote control Canon
- Remote control ORNO
- Remote control Mosconi
- Remote control Logilink
- Remote control Ridem
- Remote control Antelope Audio
- Remote control CGV
- Remote control Libec
- Remote control Profoto
- Remote control PDP
- Remote control Insignia
- Remote control Vimar
- Remote control Ferguson
- Remote control Compustar
- Remote control Ruwido
- Remote control Magnus
- Remote control Multibrackets
- Remote control MIOPS
- Remote control Geemarc
- Remote control Control4
- Remote control Hegel
Latest Remote control User Manuals
27 October 2024
27 October 2024
26 October 2024
26 October 2024

24 October 2024
24 October 2024
24 October 2024
22 October 2024
21 October 2024
19 October 2024