Whirlpool W7 OM4 4S1 C Manual
Read below 📖 the manual in Italian for Whirlpool W7 OM4 4S1 C (17 pages) in the Oven category. This guide has been helpful for 14 people and has been rated 4.5 stars on average by 2 users
Page 1/17

1
EN
DAILY REFERENCE
GUIDE
THANK YOU FOR PURCHASING A
WHIRLPOOL PRODUCT
To receive more comprehensive help and
support, please register your product at
www . whirlpool . eu/ register
WWW
You can download the Safety Instructions
and the Use and Care Guide by visiting our
website docs . whirlpool . eu and following the
instructions on the back of this booklet.
Before using the appliance carefully read the Health and Safety guide.
PRODUCT DESCRIPTION
1. Control panel
2. Fan
3. Circular heating element
(not visible)
4. Shelf guides
(the level is indicated on the front
of the oven)
5. Door
6. Upper heating element/grill
7. Lamp
8. Identification plate
(do not remove)
9. Lower heating element
(not visible)
CONTROL PANEL DESCRIPTION
1
2
3 4 5 76 8 9
1. ON / OFF
For switching the oven on and off
and for stopping an active function.
2. FUNCTIONS DIRECT ACCESS
For quick access to the functions
and menu.
3. NAVIGATION BUTTON MINUS
For scrolling through a menu and
decreasing the settings or values of
a function.
4. BACK
For returning to the previous screen.
During cooking, allows settings to
be changed.
5. DISPLAY
6. CONFIRM
For confirming a selected function
or a set value.
7. NAVIGATION BUTTON PLUS
For scrolling through a menu and
increasing the settings or values of a
function.
8. OPTIONS / FUNCTIONS DIRECT
ACCESS
For quick access to the functions,
duration, settings and favorites.
9. START
For starting a function using the
specified or basic settings.
5
4
3
2
1
5
4
3
2
1
1
2
3
4
5
8
9
7
6
2
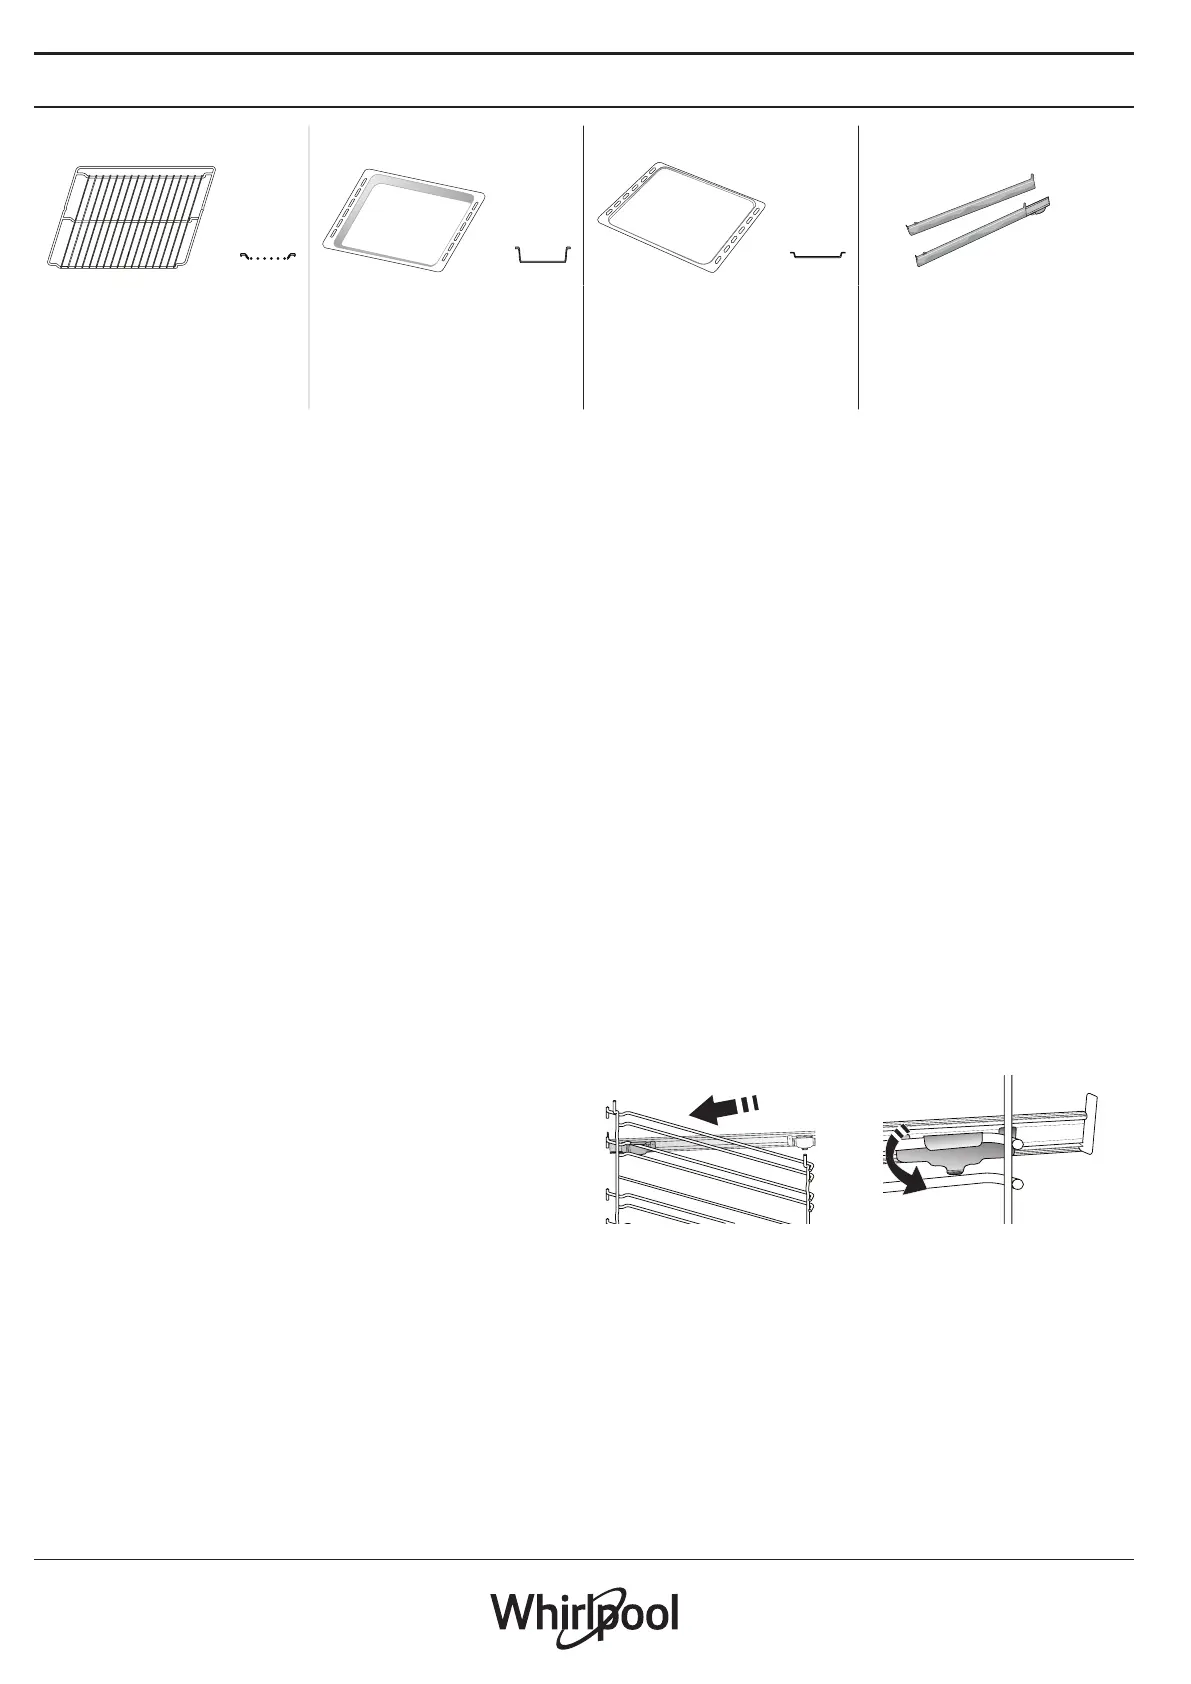
ACCESSORIES
WIRE SHELF DRIP TRAY BAKING TRAY SLIDING RUNNERS *
Use to cook food or as a
support for pans, cake tins
and other ovenproof items of
cookware
Use as an oven tray for
cooking meat, sh,
vegetables, focaccia, etc. or
position underneath the wire
shelf to collect cooking juices.
Use for cooking all bread and
pastry products, but also for
roasts, sh en papillotte, etc.
To facilitate inserting or
removing accessories.
* Available only on certain models
The number and the type of accessories may vary depending on which model is purchased.
Other accessories can be purchased separately from the After-sales Service.
INSERTING THE WIRE SHELF AND OTHER
ACCESSORIES
Insert the wire shelf horizontally by sliding it across the
shelf guides, making sure that the side with the raised
edge is facing upwards.
Other accessories, such as the drip tray and the baking
tray, are inserted horizontally in the same way as the
wire shelf.
REMOVING AND REFITTING THE SHELF GUIDES
• To remove the shelf guides, lift the guides up and
then gently pull the lower part out of its seating: The
shelf guides can now be removed.
• To refit the shelf guides, first fit them back into their
upper seating. Keeping them held up, slide them
into the cooking compartment, then lower them into
position in the lower seating.
FITTING THE SLIDING RUNNERS (IF PRESENT)
Remove the shelf guides from the oven and remove the
protective plastic from the sliding runners.
Fasten the upper clip of the runner to the shelf guide
and slide it along as far as it will go. Lower the other
clip into position. To secure the guide, press the lower
portion of the clip firmly against the shelf guide. Make
sure that the runners can move freely. Repeat these
steps on the other shelf guide on the same level.
Please note: The sliding runners can be tted on any level.

3
EN
FUNCTIONS
6
th
SENSE
These allow a fully automatic cooking for all
types of food (Lasagna, Meat, Fish, Vegetables, Cakes &
Pastries, Salt cakes, Bread, Pizza).
To get the best from this function, follow the indications
on the relative cooking table.
COOK 4 FUNCTIONS
For cooking different foods that require the same
cooking temperature on four levels at the same time.
This function can be used to cook cookies, cakes, round
pizzas (also frozen) and to prepare a complete meal.
Follow the cooking table to obtain the best results.
FORCED AIR
For cooking different foods that require the same
cooking temperature on several shelves (maximum
three) at the same time. This function can be used to
cook different foods without odours being transferred
from one food to another.
TRADITIONAL FUNCTIONS
• CONVECT BAKE
For cooking meat, baking cakes with fillings on one
shelf only.
• TURBO GRILL
For roasting large joints of meat (legs, roast beef,
chicken). We recommend using a drip tray to collect
the cooking juices: Position the pan on any of
the levels below the wire shelf and add 500 ml of
drinking water.
• FROZEN BAKE
The function automatically selects the ideal cooking
temperature and mode for 5 different types of
ready frozen food. The oven does not have to be
preheated.
• SPECIAL FUNCTIONS
» MAXI COOKING
For cooking large joints of meat (above 2.5 kg).
It is advisable to turn the meat over during
cooking, to obtain even browning on both sides.
It is best to baste the meat every now and again
to prevent it from drying out.
» DEFROST
To speed up defrosting of food. Place food on
the middle shelf. Leave food in its packaging to
prevent it from drying out on the outside.
» KEEP WARM
For keeping just-cooked food hot and crisp.
» ECO FORCED AIR
For cooking stuffed roasting joints and fillets of
meat on a single shelf. Food is prevented from
drying out excessively by gentle, intermittent air
circulation. When this ECO function is in use, the
light will remain switched off during cooking. To
use the ECO cycle and therefore optimise power
consumption, the oven door should not be
opened until the food is completely cooked.
CONVENTIONAL
For cooking any kind of dish on one shelf only.
GRILL
For grilling steaks, kebabs and sausages, cooking
vegetables au gratin or toasting bread. When grilling
meat, we recommend using a drip tray to collect the
cooking juices: Position the tray on any of the levels
below the wire shelf and add 500 ml of drinking water.
FAST PREHEAT
For preheating the oven quickly.
TIMERS
For editing function time values.
MINUTEMINDER
For keeping time without activating a function.
RISING
For optimal proving of sweet or savoury dough.
To maintain the quality of proving, do not activate the
function if the oven is still hot following a cooking cycle.
FAVORITE
For retrieving the list of 10 favorite functions.
SETTINGS
For adjusting the oven settings.
When “ECO” mode is active the brightness of the display will
be reduced to save energy and lamp switches o after 1
minute. It will be reactivated automatically whenever any of
the buttons are pressed.
When “DEMO” is “On” all commands are active and menus
available but the oven doesn’t heat up. To deactivate this
mode, access “DEMO” from “SETTINGS” menu and select “O”.
By selecting “FACTORY RESET”, the product switches o and
then it returns to rst switch on. All settings will be deleted.
Product Specifications
| Brand: | Whirlpool |
| Category: | Oven |
| Model: | W7 OM4 4S1 C |
Do you need help?
If you need help with Whirlpool W7 OM4 4S1 C, ask a question below and other users will answer you
Oven Whirlpool User Manuals

24 October 2024
19 October 2024
15 October 2024
15 October 2024
15 October 2024
15 October 2024
15 October 2024
15 October 2024
15 October 2024
15 October 2024
Oven User Manuals
- Oven Candy
- Oven Electrolux
- Oven Samsung
- Oven ATAG
- Oven LG
- Oven Bosch
- Oven AEG
- Oven IKEA
- Oven Panasonic
- Oven Bauknecht
- Oven BEKO
- Oven Delonghi
- Oven Etna
- Oven Teka
- Oven Café
- Oven Balay
- Oven Miele
- Oven Siemens
- Oven Arcelik
- Oven Danby
- Oven Bartscher
- Oven Bertazzoni
- Oven Smeg
- Oven Steba
- Oven Hisense
- Oven Hoover
- Oven Thermex
- Oven Russell Hobbs
- Oven Royal Catering
- Oven Hotpoint
- Oven Amica
- Oven Rosieres
- Oven Artusi
- Oven Cecotec
- Oven Neff
- Oven Imarflex
- Oven Kogan
- Oven Caple
- Oven PKM
- Oven Faber
- Oven Midea
- Oven Franke
- Oven Sauber
- Oven Liebherr
- Oven Viking
- Oven CDA
- Oven Kuppersbusch
- Oven Gorenje
- Oven Summit
- Oven Brandt
- Oven Gram
- Oven Gemini
- Oven Haier
- Oven Master Kitchen
- Oven Monogram
- Oven Vox
- Oven Westinghouse
- Oven Sencor
- Oven Aroma
- Oven Orava
- Oven Kluge
- Oven DCG
- Oven Coyote
- Oven Grundig
- Oven Mistral
- Oven MPM
- Oven Cosmo
- Oven Khind
- Oven Amana
- Oven KitchenAid
- Oven Exquisit
- Oven Euro Appliances
- Oven Frigidaire
- Oven Maytag
- Oven Breville
- Oven Turbotronic
- Oven Bimar
- Oven Defy
- Oven Euromaid
- Oven Hendi
- Oven GE
- Oven Concept
- Oven Guzzanti
- Oven XO
- Oven Edilkamin
- Oven Omega
- Oven Fulgor Milano
- Oven Hyundai
- Oven Infiniton
- Oven Boretti
- Oven Jocel
- Oven Blaupunkt
- Oven Lamona
- Oven Falmec
- Oven Sirius
- Oven MSR
- Oven Dacor
- Oven Salton
- Oven Cylinda
- Oven Tristar
- Oven Respekta
- Oven Opera
- Oven Dometic
- Oven Sharp
- Oven La Cornue
- Oven Eldom
- Oven Fisher And Paykel
- Oven Elba
- Oven Brentwood
- Oven Philco
- Oven Jenn-Air
- Oven ECG
- Oven HomeCraft
- Oven Jata
- Oven Proctor Silex
- Oven Becken
- Oven Element
- Oven Acros
- Oven Kucht
- Oven Glem Gas
- Oven Hamilton Beach
- Oven Technika
- Oven Hansa
- Oven Thor
- Oven Rommelsbacher
- Oven V-Zug
- Oven Capital
- Oven Mx Onda
- Oven Meireles
- Oven Fagor
- Oven Edesa
- Oven Ronco
- Oven Gaggenau
- Oven KKT Kolbe
- Oven Mellerware
- Oven Tisira
- Oven Wolf
- Oven Porter & Charles
- Oven LERAN
- Oven Zerowatt
- Oven Baumatic
- Oven Iberna
- Oven Ilve
- Oven Wolkenstein
- Oven Traeger
- Oven Atosa
- Oven Izzy
- Oven Mora
- Oven Zenith
- Oven Rangemaster
- Oven Lofra
- Oven Mayer
- Oven Insignia
- Oven Emerio
- Oven Chef
- Oven ARC
- Oven Nestor Martin-Electrolux
- Oven Freggia
- Oven Pelgrim
- Oven Goldbrunn
- Oven DPM
- Oven JennAir
- Oven Wiggo
- Oven Emilia
- Oven Creda
- Oven Blomberg
- Oven Cookology
- Oven De Dietrich
- Oven Comelec
- Oven Ariston Thermo
- Oven Belling
- Oven Zanussi
- Oven Signature
- Oven Orima
- Oven Mach
- Oven Rex
- Oven Pitsos
- Oven Yamazen
- Oven Mestic
- Oven Instant
- Oven ZLine
- Oven New World
- Oven Classique
- Oven Essentiel B
- Oven Ferrari
- Oven Pando
Latest Oven User Manuals

27 October 2024
27 October 2024
27 October 2024
27 October 2024
27 October 2024
27 October 2024
27 October 2024
27 October 2024
27 October 2024
27 October 2024