X Rocker CXR3 LED Manual
Read below 📖 the manual in Italian for X Rocker CXR3 LED (16 pages) in the Gamestoel category. This guide has been helpful for 19 people and has been rated 4.5 stars on average by 2 users
Page 1/16
CONSOLE CONNECTION: CONTROLLER CONNECTION METHOD (PS4™/PS5™, XBOX™ ONE/SERIES, SWITCH™)
PS4
TM
DUALSHOCK 4
TM
CONNECTION GUIDE*
1. Connect the B1 cable to the bottom of the PS4
TM
controller via the headset socket.
2. Connect the other end of the B1 cable to the chair via the green input port.
3. With the PS4
TM
turned on, go to the main menu (or locate the main menu screen). Press and
hold the PS button on the PS4
TM
controller until the quick menu appears on screen.
4. In this menu select [Adjust sound and devices].
5. Then select [Output to Headphones].
6. Change the setting from [Chat Only] to [All Audio].
7. Make sure the volume in the previous menu is set to the maximum.
1. Connect the B1 cable to the bottom of the PS5
TM
Dual sense controller via the headset socket.
2. Connect the other end of the B1 cable to the chair via the green input port.
3. Press the PlayStation
TM
button on the controller once to bring up the control center.
4. Select [Sound] > [Output Device] > [Headset (controller)].
5. Ensure that [Output to Headphones] is correctly set to [All Audio].
6. You can check this by going to [Settings] > [Sound] > [Audio Output] > [Output to headphones]
> [All Audio].
PS5
TM
DUALSENSE
TM
CONNECTION GUIDE*
1. Connect the B1 cable to the bottom of the Xbox
TM
controller via the headset socket.**
2. Connect the other end of the B1 cable to the chair via the green input port.
3. The Xbox
TM
will automatically recognize the connection and pass through to the chair.
4. To increase volume, press the guide button, navigate to the speaker icon and increase the
headset volume setting.
XBOX ONE
TM
TM
1. Connect the B1 cable to the bottom of the Switch
TM
via the headphone socket.***
2. Connect the other end of the B1 cable to the chair via the green input port.
SWITCH
TM
CONNECTION GUIDE
CTIA compliant headset. If you use an OMTP compliant headset, then you may experience issues with chat and audio functionality.
** You may need an Xbox One
TM
headset adapter if a headset socket is not available on your controller. These are available separately through any gaming retailer.
*** Voice-Chat compatibility for Switch
TM
may rely on a third-party mobile phone app rather than direct console connection for certain games, please check the game developer’s information if you encounter any
compatibility issues.
B1
B2
B4
B5
VIEW LATEST INSTRUCTIONS ONLINE:
XROCKERUK.COM
XROCKERGAMING.COM
Missing parts?
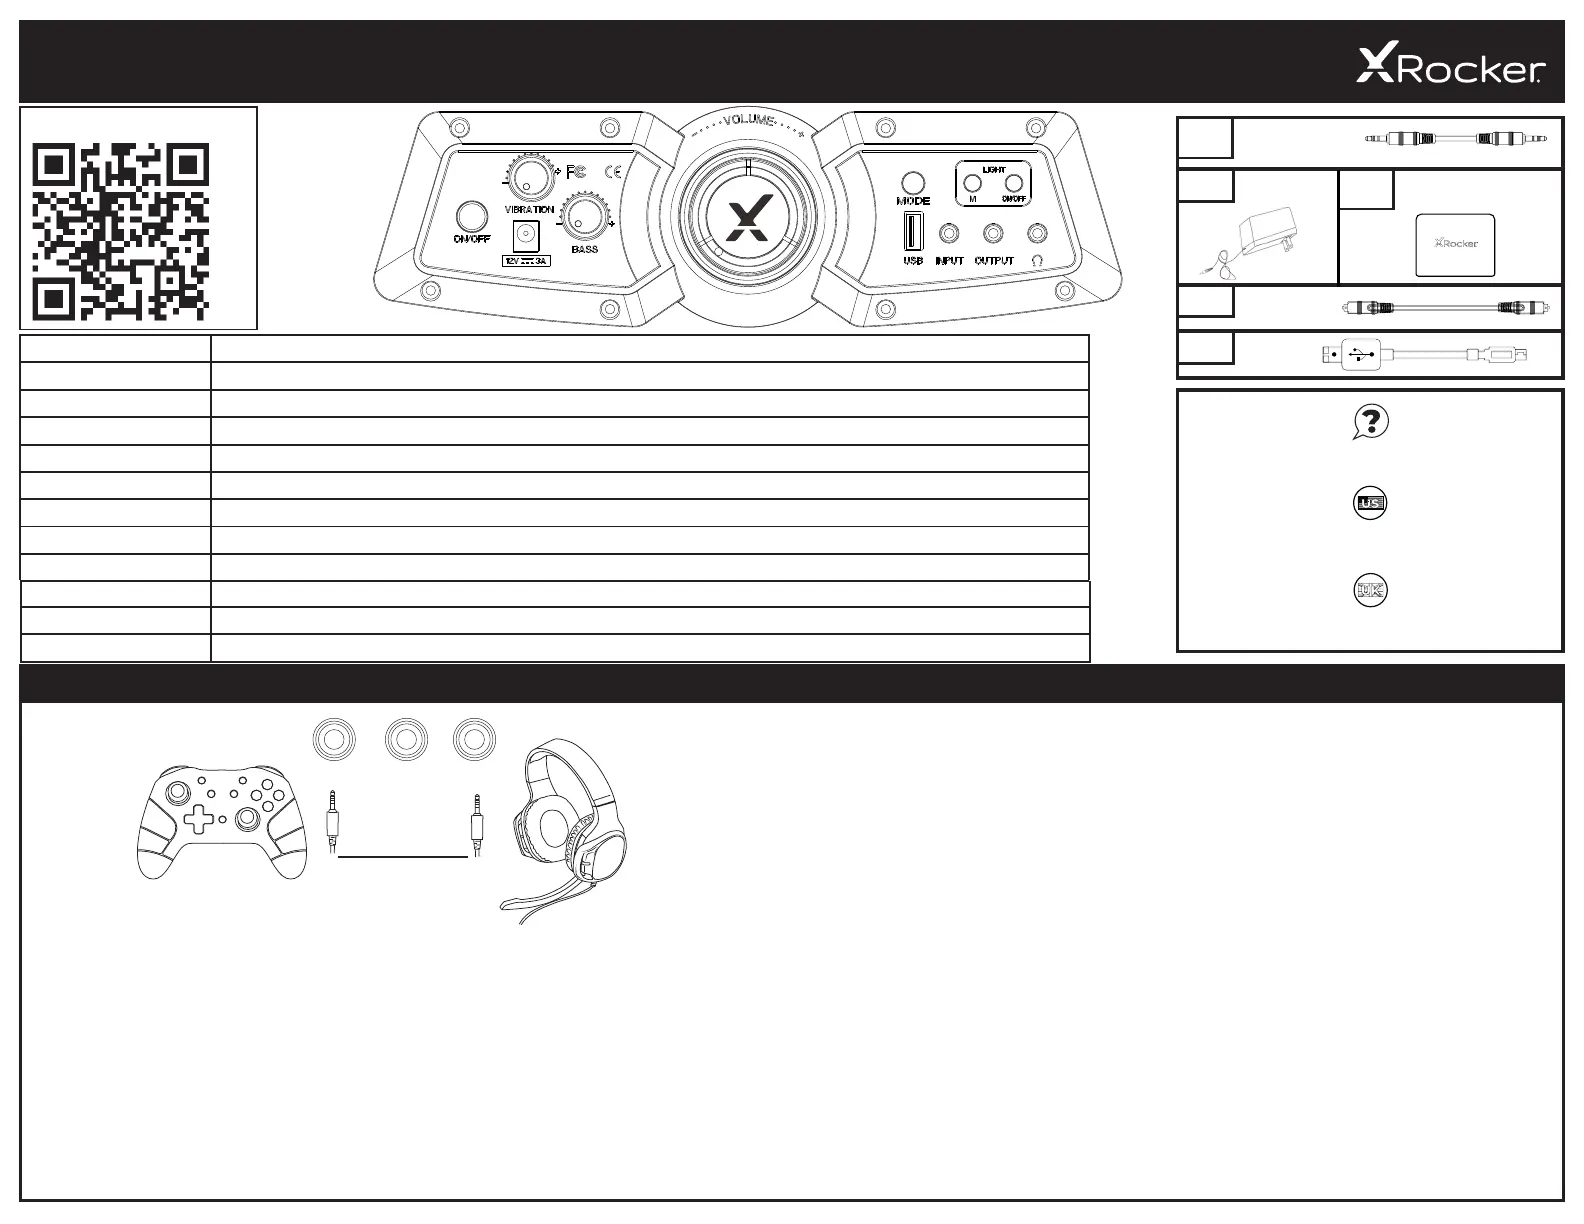
USER MANUAL ICONS
USER MANUAL ICONS
2. Power Input Plug your power supply into this socket
3. Vibration
4. Bass
5. Volume
6. USB Used to charge devices such as mobile phones. (5V/1A Output)
7. Input Plug the 3.5mm cable into here for audio from your TV or your controller
8. Output Allows you to connect multiple chairs for audio
9. Headphone Socket Plug your headphones or gaming headset in here to play quietly. Perfect for night-time play.
3M 3.5MM
AUDIO CABLE
1M OPTICAL
TOSLINK AUDIO
CABLE
MICRO USB
CABLE
POWER
SUPPLY
WIRELESS DAC
TRANSMITTER
B3
TER
DAC TRANSMIT
OUTPUT HEADPHONEINPUT
XROCKERGAMING.COM
XROCKERGAMING.COM/PAGES/SUPPORT
USER MANUAL ICONS
1
1
2
4
5
6
8
10. Mode Button
11. Light mode Button
12. Light On/Off
Press to toggle LED on/off
Use this to switch between wired,Bluetooth or wireless audio
Press this button to toggle between 10+ different color modes
2.1 DUAL
WITH LED
WITH
VIBRATION
- ENGLISH
3
12
11
9
10
7
OPTICAL CONNECTION GUIDE PS4™ AND PS4 PRO™
1. Make sure that the PS4™ system is switched OFF. Insert the micro-USB cable into the X Rocker DAC converter and the other end into one of the front USB ports on the PS4™ system.
Remove the clear plastic covers from both ends of the optical cable. Input one end of the optical cable into the X Rocker Wireless DAC (Slot titled SPDIF) and the other into the Optical
SPDIF connector on the PS4™ system.
2. Turn the PS4™ system back on. Select one of the wireless bands (1,2,3) on the wireless DAC and then switch to the corresponding band on the chair.
3. On the main PS4™ menu screen Select (Settings) > [Sound and Screen] > [Audio Output Settings] > [Primary Output Port] Change this to [Digitial Optical]
SPDIF
INPUT
USB 5v
Mode
1 2 3
Aux • 1 • 2 • 3
Control Panel DAC
CONNECT TO TV (WIRED)
Ocelot
Gaming Desk
Ocelot
Gaming Desk
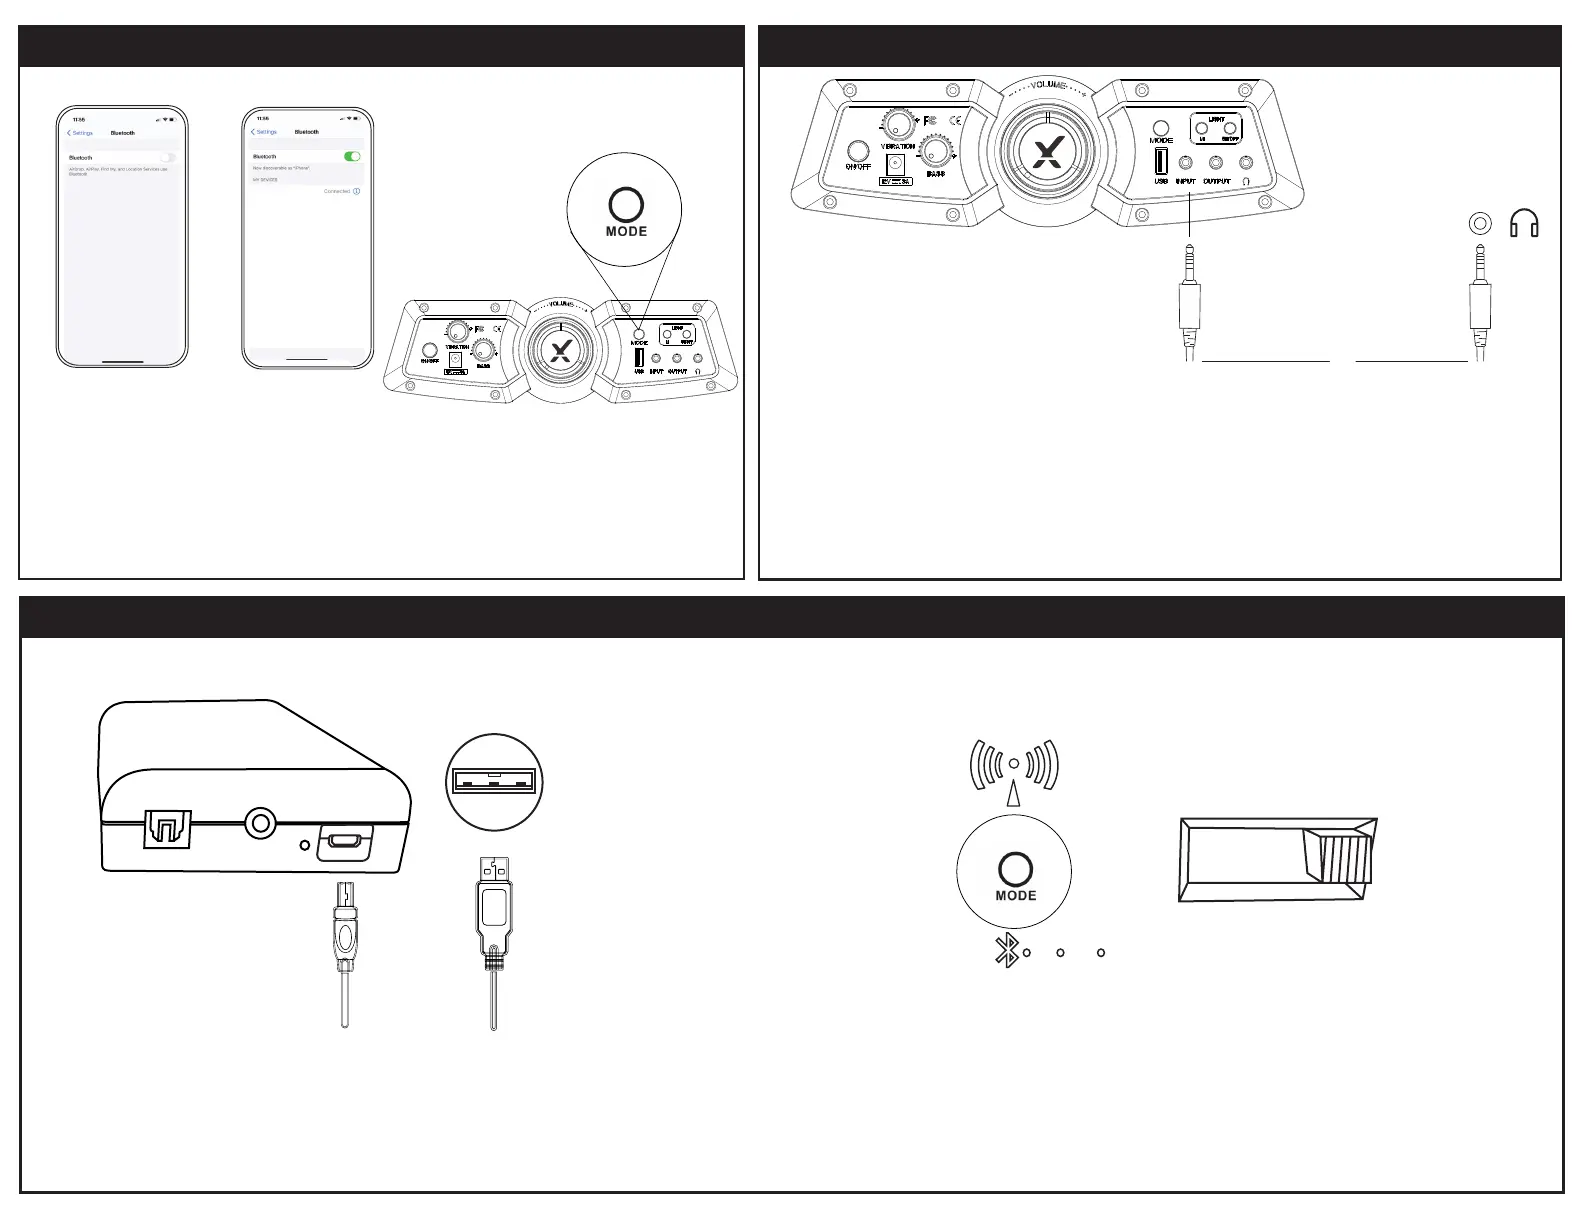
BLUETOOTH CONNECTION
WIRED CONNECTION
TV & Tablets (ALL CONSOLES)
CONNECT BY CONTROLLER
PS4 SYSTEMS ONLY
1. Connect B1 Cable to X Rocker control panel
3.5mm INPUT socket.
2. Connect other end of the B1 cable to the TV
headphone socket.
3. Once connected to your TV, increase volume to
50% of the maximum for the best sound level.**
*If your TV does not feature a headphone socket then
you may need to purchase an additional TOSlink
adapter to get connected directly to a console for
audio.
**Depending on your TV you may need to increase
the headphone volume separately in the TV sound
settings.
1. Connect B1 Cable to the bottom of the PS4
controller via the headset socket.
2. Connect the other end of the B1 cable to the chair
via the green port.
3. With the PS4 turned on and in the main menu,
press and hold the black PS button until the quick
menu appears.
4. In this menu select [Adjust Sound and Devices]
5. Then select [Output to Headphones]
6. Change the setting from [Chat Only] to [All Audio]
7. Make sure the volume in the previous menu is set to
the maximum.
1.
On the audio output device, go into the
on already, and search for Gaming Chair. Upon
finding this, select the Gaming Chair option. If a
passcode is required, the four digit code will be
‘0000’.
2. Once you’re connected, the Bluetooth indicator
on the panel will light up.
2.1 BLUETOOTH
®
USER MANUAL - ENGLISH
FEMALE TO FEMALE RCA ADAPTERS
3M 3.5MM TO 3.5MM AUDIO CABLE
B1
B3
B2
B4
POWER SUPPLY CORD
3M 3.5MM TO RCA FEMALE AUDIO CABLE
NEED HELP?
EMAIL: SUPPORT@XROCKERGAMING.COM
WWW.XROCKERGAMING.COM
IMPORTANT: You must keep your original retail receipt as proof of purchase.
B1
B1
No power going to control panel
No Sound
Sound is faint
My audio cables broke accidentally
My TV doesn’t have a headphone socket
• Make sure that the cable is connected correctly.
• Make sure that the power supply at the power source is working correctly.
• With the chair turned ON, wiggle the cable in the port. If lights flicker, contact support.
TROUBLESHOOTING TIPS
• Connect a phone using the TV connection guide to test the chair for sound
• Confirm that the device/system is correctly configured
• Make sure that you indeed have a headphone socket on your TV.
• Make sure the volume of the source device is at a higher level to strengthen the signal.
• Please contact X Rocker Support
• You may need to purchase a TOSlink Adapter. If you’re unsure which one, contact support.
• Don’t let X Rocker come in contact with liquids
• Consult Support before unscrewing any electrical components
• Be mindful of cables laying between X Rocker and Power Source
• Be mindful of cables when moving/swivelling in the X Rocker
• Note that broken cables may present a choking risk. Replace
broken cables through Support.
• Do not stand on X Rocker or exceed 250lbs
• Do not lean back on the chair to the point that the pedestal lifts
• Do not use arms as support for getting in and out of chair.
• Playing audio for long periods at loud volumes may contribute to
difficulties in hearing.
HEALTH & SAFETY
X ROCKER
ON/OFF
GAMING CHAIR
9V ═ 1A
VOLUME
BASS
INPUT OUTPUT
ON/OFF
GAMING CHAIR
9V ═ 1A
VOLUME
BASS
INPUT OUTPUT
ON/OFF
GAMING CHAIR
9V ═ 1A
VOLUME
BASS
INPUT OUTPUT
1. Switch the Bluetooth button to the on position
2. On the audio output device, go into the Bluetooth settings, turn Bluetooth on if it is not
on already, and search for X ROCKER. Upon nding this, select the X ROCKER option.
If a password is required, the four digit code will be ‘0000’
2
1. Connect the B1 cable to X Rocker control panel INPUT socket.
2. Connect other end of the B1 3.5mm end into the headphone socket of your television.*
3.
Once connected to your TV, increase volume to 50% of the maximum for the best sound level.**
*If your TV does not feature a headphone socket then you may need to purchase an additional
TOSlink adapter to get connected directly to a console for audio.
**Depending on your TV, you may need to increase the headphone volume separately in the TV
sound settings.
B1
5V 1A
TV/Mobile/Tablet
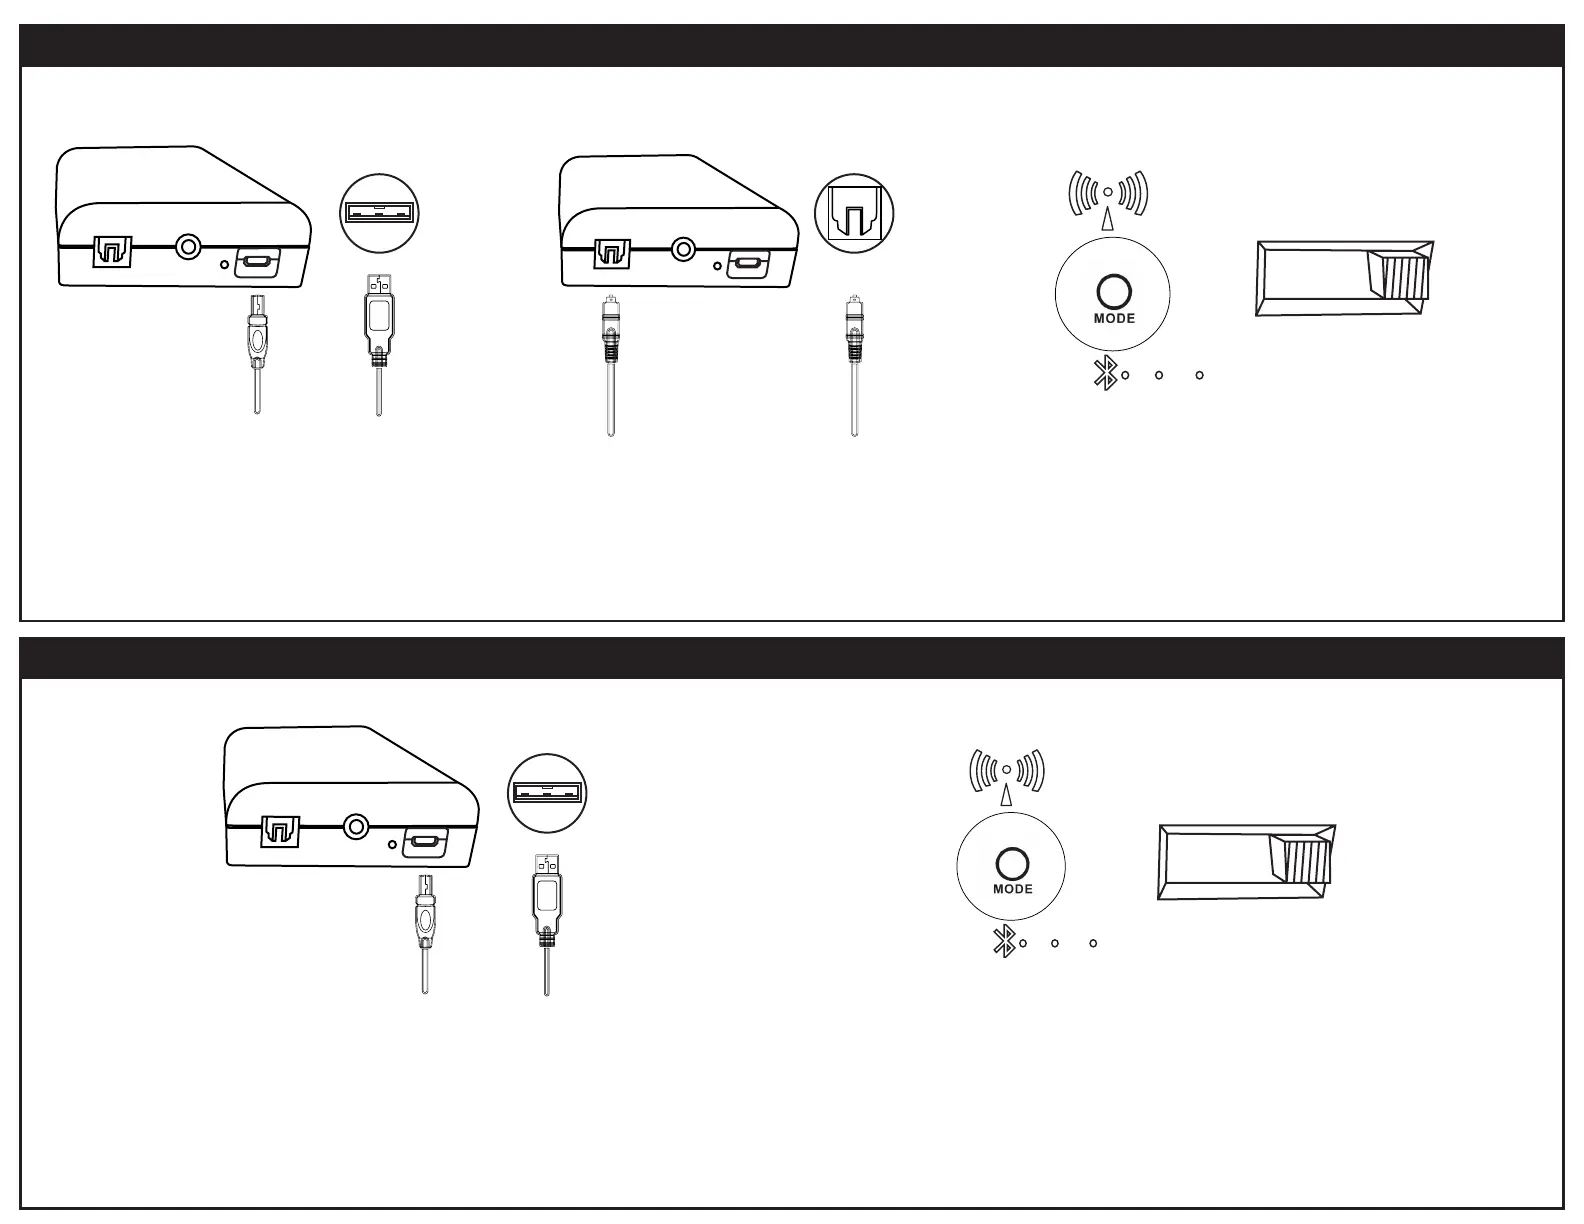
OPTICAL CONNECTION GUIDE XBOX™ ONE
USB CONNECTION FOR PS4 ™ & PS5 ™
1. Make sure that the Xbox One™ system is switched OFF. Insert the micro USB cable into the X Rocker DAC converter and the other end into one of the back USB ports on the Xbox One™
system. Remove the clear plastic covers from both ends of the optical cable. Input one end of the optical cable into the X Rocker Wireless DAC Slot (labelled SPDIF) and another into the
Optical SPDIF connector on the Xbox One™ system.
2. Turn the Xbox One™ system back on. Select one of the wireless bands (1,2,3) on the wireless DAC and then switch to the corresponding band on the chair.
3. On the Xbox One™ menu screen, Select [Settings] > [General]> [Volume and Audio Output] > [Audio Output] > under [Digital Audio], select [Optical Audio] and set it to
[Stereo Uncompressed]
1. Insert the micro USB cable into the X Rocker DAC transmitter and the other end into one of the front USB ports on any PS4, PS5.
2. Select one of the wireless bands (1,2,3) on the wireless DAC and then switch to the corresponding band on the chair.
3. FOR PS4™ On the PS4™ menu screen select [Settings] > [Devices] > [Audio Devices] > [Output Device].
3. FOR PS5™ From the menu screen, go to [Settings] > [Sound] > [Output Device]
4. Select [USB headphones] and change the setting in [Output to headphones] from [Chat audio] to [All Audio].
SPDIF
INPUT
USB 5v
SPDIF
INPUT
USB 5v
SPDIF
INPUT
USB 5v
Aux • 1 • 2 • 3
Aux • 1 • 2 • 3
Control Panel DAC
Control Panel DAC
3
Mode
1 2 3
Mode
1 2 3
Product Specifications
| Brand: | X Rocker |
| Category: | Gamestoel |
| Model: | CXR3 LED |
Do you need help?
If you need help with X Rocker CXR3 LED, ask a question below and other users will answer you
Gamestoel X Rocker User Manuals

13 October 2024
13 October 2024
13 October 2024
Gamestoel User Manuals
- Gamestoel Vorago
- Gamestoel AeroCool
- Gamestoel Woxter
- Gamestoel Gamdias
- Gamestoel Genesis
- Gamestoel Speed-Link
- Gamestoel Mad Dog
- Gamestoel Drift
- Gamestoel Arozzi
- Gamestoel Overdrive
Latest Gamestoel User Manuals

26 October 2024
26 October 2024
26 October 2024
15 October 2024
15 October 2024
15 October 2024
13 October 2024
13 October 2024
13 October 2024
13 October 2024