Café CGS750P4MW2 Manual
Read below 📖 the manual in Italian for Café CGS750P4MW2 (49 pages) in the Oven category. This guide has been helpful for 26 people and has been rated 4.5 stars on average by 2 users
Page 1/49
PROPANE (LP) CONVERSION INSTRUCTIONS
31-11086 Rev. 2 06-19 GEA
CGS750M, CGS995, add CGS750P
BURNER OUTPUT RATINGS: BTU/HR
Propane (LP) Gas 10” W.C.P.
BURNER
BTU
RATE
ORIFICE
SIZE (mm) COLOR MARKING
LF 18,000
LF1 N/A 0.027 None 69L
LF2 N/A 0.027 None 69L
LF3 N/A 0.027 None 69L
LFC N/A 0.016 None 40L
LR 5,000 0.026 Red/Yellow 66L
CF 9,500 0.0365 Orange/Light Blue 92L
CR 9,500 0.0365 Orange/Light Blue 92L
RF 15,000 0.045 Orange/Silver 114L
RR 12,000 0.039 Blue/Magenta 99L
Upper Bake 7,000 0.031 Brown 031L
Broil 13,500 0.042 Grey 042L
Lower Bake 13,500 0.043 Green 043L
To adjust your range for use with propane (LP) gas, follow
these instructions:
1. Disconnect all electrical power, at the main circuit breaker or
fuse box.
6KXWRႇWKHJDVVXSSO\WRWKHUDQJHE\FORVLQJWKHPDQXDO
VKXWRႇYDOYH
CONVERTING THE PRESSURE REGULATOR
CONVERTING THE COOKTOP BURNERS
A. Remove the top grates, burner caps and burner heads.
B. Using a 7 mm or 9/32” nut driver, remove the top burner
RUL¿FHV7KHVHPD\EHDFFHVVHGWKURXJKWKHEXUQHU
opening in the base.
&5HPRYHWKHSURSDQH/3RUL¿FHVIURPWKHER[SURYLGHG
7KHSURSDQH/3RUL¿FHVKDYHWKHOHWWHU³/´RQWKHWRS
To aid in identifying the proper location for the propane (LP)
RUL¿FHVGXULQJFRQYHUVLRQIURP1DWXUDO*DVWR3URSDQH/3
Gas, color codes have been added to the side or top of the
RUL¿FH6HHWKHFKDUWEHORZ(DFKRUL¿FHPD\DOVRVKRZD
series of engraved marks (I, II, III . . .) located on the top.
1. Use an adjustable wrench to unscrew the hex-nut cap from
the pressure regulator.
&RPSOHWHO\UHPRYHWKHSURWHFWLYHSODVWLFFDSRႇWKH
threaded metal cap.
3. Turn the metal cap so the type of gas being converted to is
displayed and replace the protective plastic cover.
4. Screw the hex-nut cap back into the regulator.
(Do not over tighten)
TOOLS REQUIRED:
• Adjustable wrench
• Socket wrench with
1/2” socket and extension
• Phillips head screwdriver
• Flat bladed screwdriver
(blade approximately
3/32” across)
• Nut drivers: 1/4”, 9/32”
or 7mm
PROPANE (LP) CONVERSION INSTRUCTIONS
PROPANE
NAT
Rotate cap counter-
clockwise to loosen
Cap assembly
NOTICE:
6DYHWKHVHRUL¿FHVIRUIXWXUHFRQYHUVLRQEDFNWRQDWXUDOJDV
WARNING
Do not operate the cooktop or oven
burners of this range when using propane (LP) (bottled) gas
EHIRUHFRQYHUWLQJWKHSUHVVXUHUHJXODWRUDQGEXUQHURUL¿FHV
for propane (LP) gas use. Failure to do so could cause high
ÀDPHVDQGWR[LFIXPHVZKLFKFDQUHVXOWLQVHULRXVLQMXU\
7KHSUHVVXUHUHJXODWRUDQGWKHEXUQHURUL¿FHVDUHVHWIRU
natural gas. To use propane (LP) gas, the regulator and burner
RUL¿FHVPXVWEHFRQYHUWHG
7KHSURSDQH/3RUL¿FHVIRUWKHFRRNWRSEXUQHUVDUHVKLSSHG
on the back of the range in the location shown.
',QVWDOOWKHSURSDQH/3RUL¿FHVLQWKHLUSUHFLVHORFDWLRQV
7RSUHYHQWOHDNDJHPDNHVXUHWKHRUL¿FHVSXGVDUHVHFXUHO\
screwed into the gas supply tubes.
(,QVWDOOWKHROGRUL¿FHVSXGVLQWRWKHPHWDOER[RUEUDFNHW
along with these instructions, and replace onto the back of the
range for possible future conversion.
LR
LF2LF1
LFC
LF3
LF
RR
RF
CR
CF
Propane
Red/Yellow
Propane
Blue/Magenta
Propane
Orange/Light Blue
Propane
None
Propane
None
Propane
None
Propane
None
Propane
Orange/Silver
Propane
Orange/Light Blue
Multi-ring Round burner
Burner cap
Burner cap
Burner cap
Burner head
Burner head
Base
Base
2UL¿FHORFDWHG
through this
opening
Pressure
Regulator
Location
Rear of Range
Propane (LP)
Conversion Kit
CHECK SURFACE BURNERS
3XVKDQGWXUQDNQREWRWKH/,7(SRVLWLRQ$FOLFNLQJVRXQG
indicates proper operation of the ignition system. When lighting
DQ\EXUQHUVSDUNVZLOODSSHDUDWDOOEXUQHUVEXWJDVÀRZV
from only the one selected. Once air is purged from the supply
line, burner should light within 4 seconds. After burner lights,
URWDWHWKHNQRERXWRIWKH/,7(SRVLWLRQ7U\HDFKEXUQHULQ
succession until all burners have been checked.
Quality of Flames
'HWHUPLQHWKHTXDOLW\RIÀDPHVYLVXDOO\1RUPDOEXUQHUÀDPHV
should look like (A) or (B).
/RQJEULJKW\HOORZÀDPHVDUHQRWQRUPDO1RUPDOÀDPHVPD\
show signs of an orange tint when well heated or signs of
ÀLFNHULQJRUDQJHGXHWRSDUWLFOHVLQWKHJDVRUDLU
95
III
Denotes 0.95mm Orifice size opening
Denotes LP (Propane)
WARNING
Explosion Hazard
Death or serious injury can result from failure to follow
these instructions.
• Service by a qualified service technician only.
• Shut off gas supply and disconnect power before servicing.
• Reconnect all grounding devices after service.
• Replace all parts and panels before operating.
(A) Soft blue flames—
Normal for natural gas
(B) Yellow tips on
outer cones—
Normal for propane (LP) gas

ADDITIONAL INFORMATION
ADJUSTING AIR SHUTTER SETTINGS
FOR OVEN BURNERS
ADJUSTING LOW FLAME SETTING
ON COOKTOP BURNERS
2YHQEXUQHUÀDPHPXVWEHREVHUYHGZLWKWKHGRRUFORVHG
WRSURSHUO\FKHFNÀDPHFKDUDFWHULVWLFV
&KHFNLQJWKHÀDPHVL]H
It should be approximately
1/2” to 3/4” long for the bake
and broil burners.
The combustion quality of
WKHEXUQHUÀDPHVQHHGVWR
be determined visually.
SPECIAL NOTE:
To convert the oven back to natural gas, reverse the
instructions given in making propane (LP) adjustments.
PROPANE (LP) CONVERSION INSTRUCTIONS
31-11086 Rev. 2 06-19 GEA
CGS750M, CGS995, add CGS750P
NOTICE:
2QFHWKHFRQYHUVLRQLVFRPSOHWHDQGFRQ¿UPHG¿OORXWWKH
SURSDQH/3VWLFNHUDQGLQFOXGH\RXUQDPHRUJDQL]DWLRQ
and date conversion was made. Apply the sticker to the
range near the regulator to alert others in the future that
this appliance has been converted to propane (LP). If
converting back to natural gas from propane (LP), please
remove the sticker so others know the appliance is set to
use natural gas.
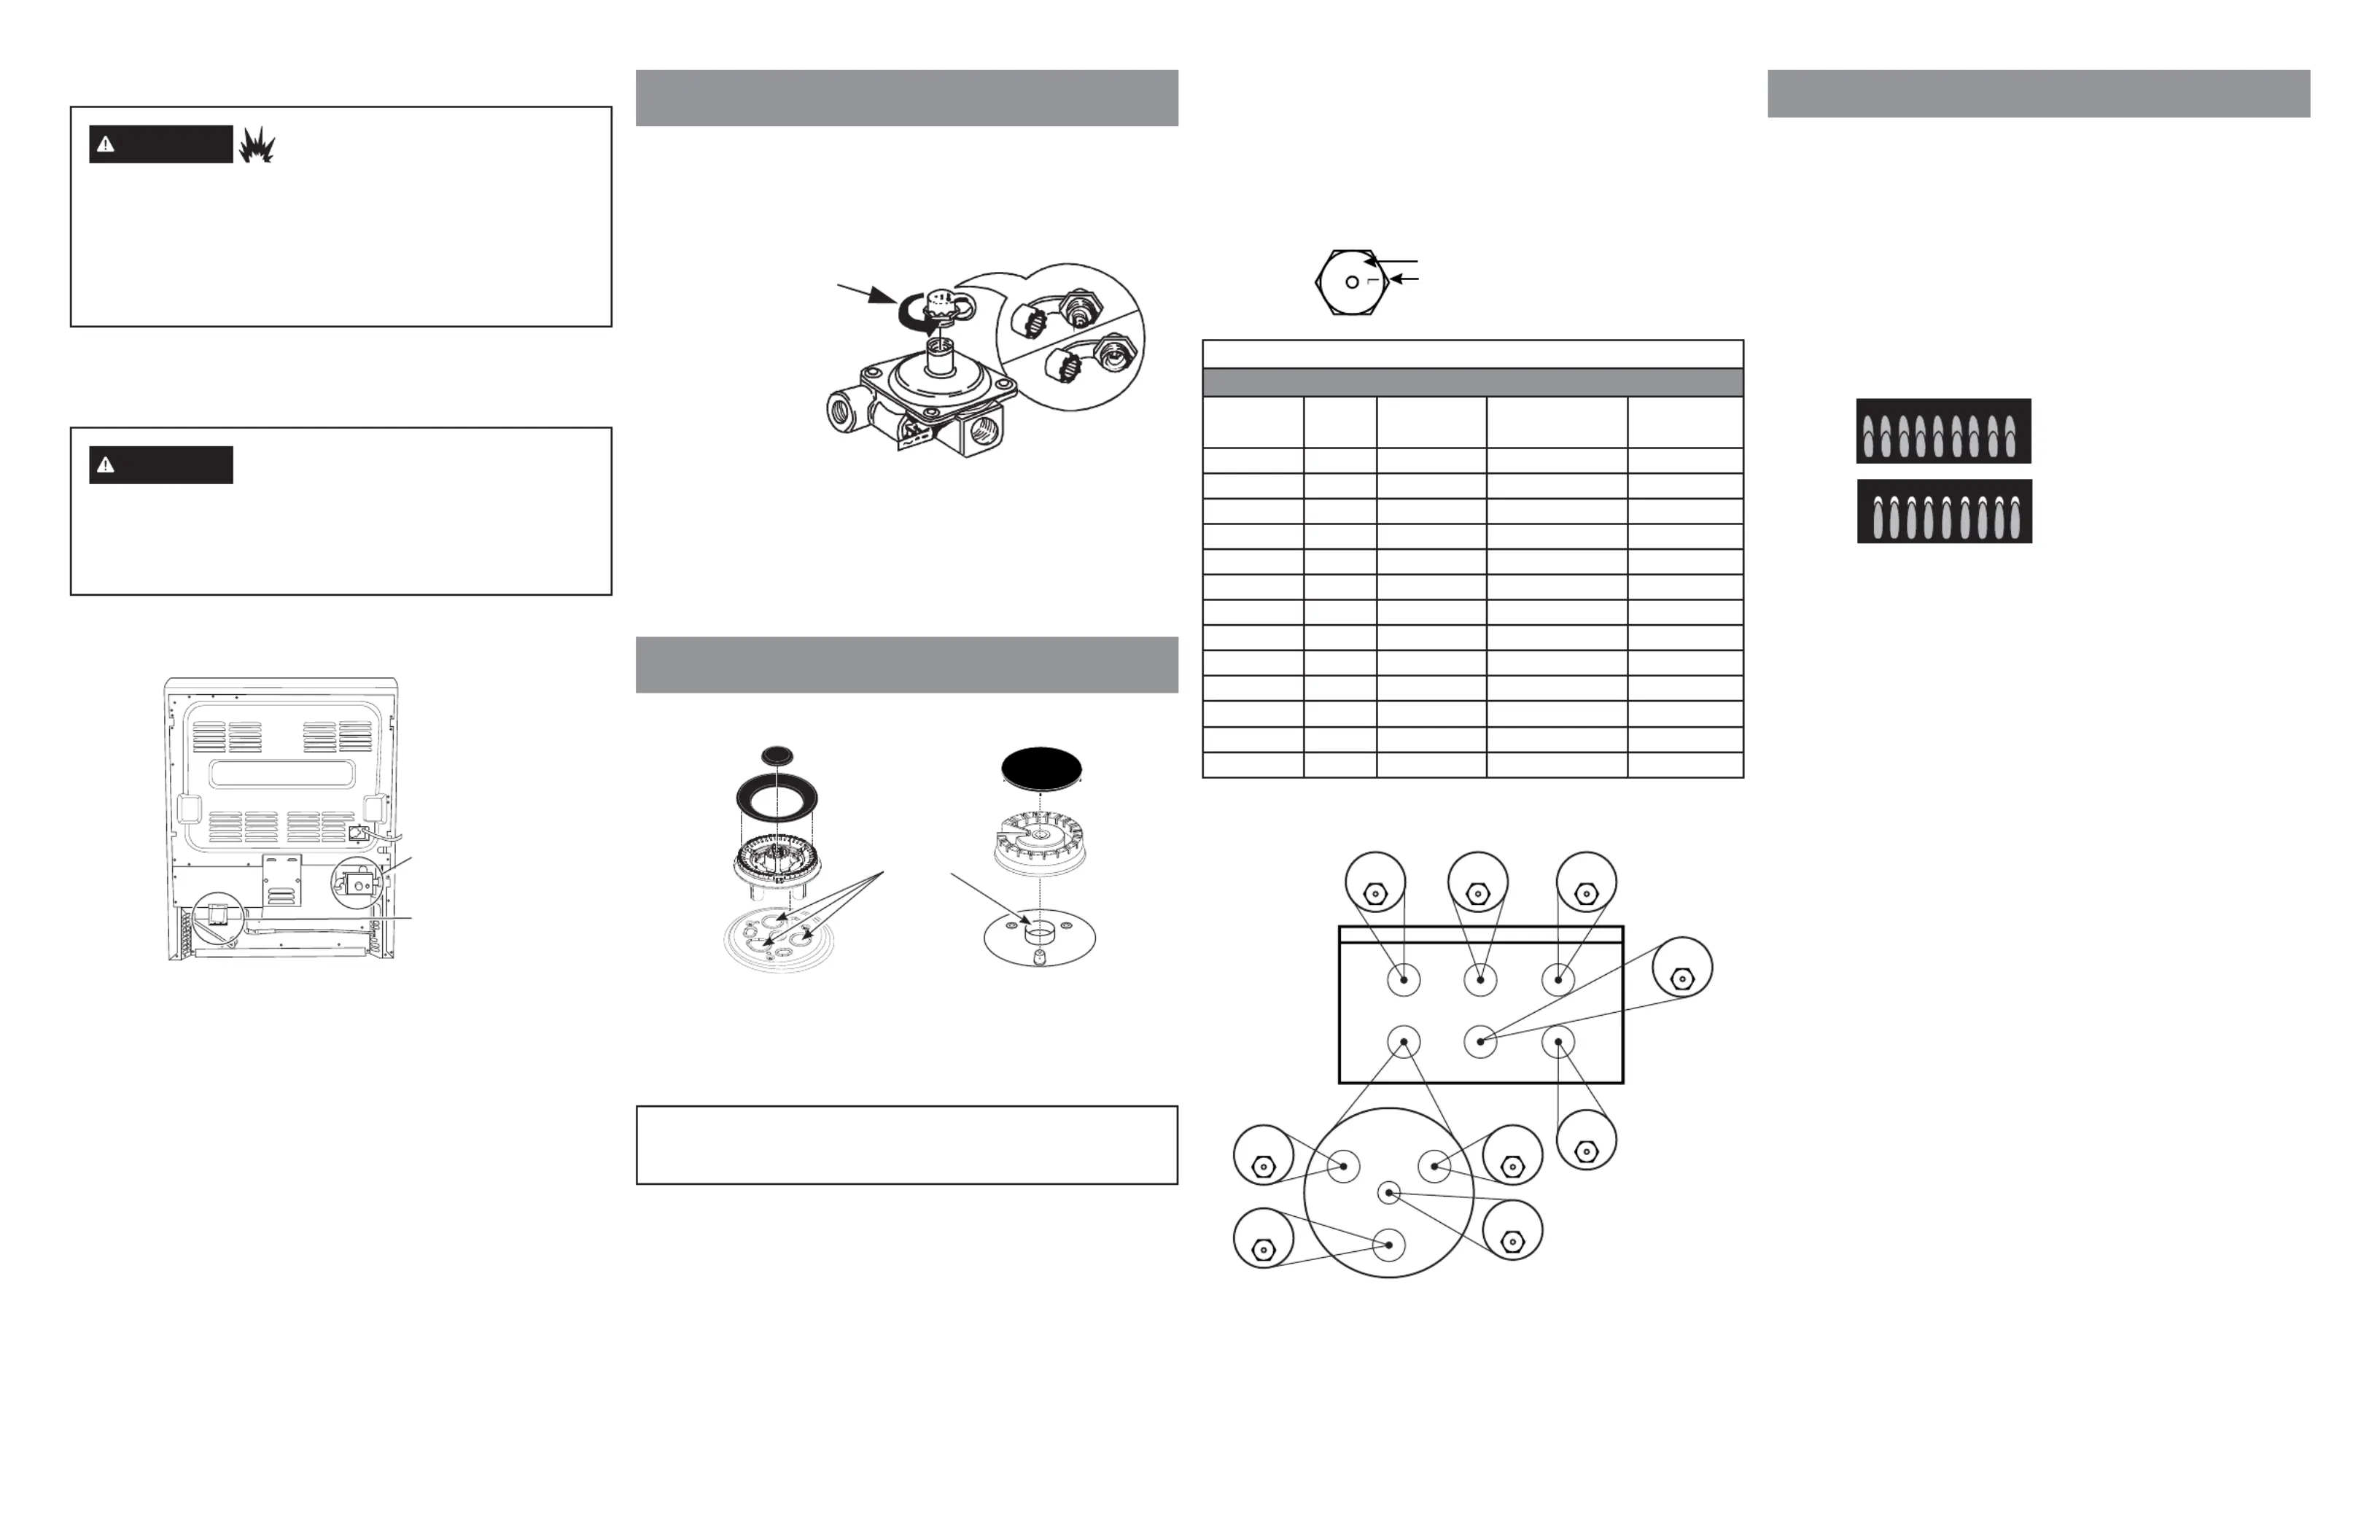
BURNER OUTPUT RATINGS: BTU/HR
NG (Natural) Gas 5” W.C.P.
BURNER
BTU
RATE
ORIFICE
SIZE (mm) COLOR MARKING
LF 21,000
LF1 N/A 0.045 None 114N
LF2 N/A 0.045 None 114N
LF3 N/A 0.045 None 114N
LFC N/A 0.025 None 63N
LR 5,000 0.040 White/Purple 101N
CF 9,500 0.0555 Yellow 141N
CR 9,500 0.0555 Yellow 141N
RF 15,000 0.070 Brown 178N
RR 12,000 0.061 Red 155N
Upper Bake 7,000 0.046 Yellow 046N
Broil 16,500 0.071 Black/Blue 071N
Lower Bake 14,000 0.066 Red 066N
Center adjustment screw
only for all other burners.
Adjustment screws for
multi-ring burner only
Adjustment screw for outer ring
Adjustment screw
for center ring
NOTICE:
6DYHWKHVHRUL¿FHVIRUIXWXUHFRQYHUVLRQEDFNWRQDWXUDOJDV
The air shutters should be turned to the marked settings NG or
propane (LP) or set according to the following table.
With a Phillips head screwdriver, loosen the screws securing
the air shutters on the burners and adjust the air shutters
according to chart above.
%DNHDQGEURLOÀDPHVPXVWEHFKHFNHGZLWKWKHRYHQ
GRRUVFORVHGWRSURSHUO\FKHFNÀDPHFKDUDFWHULVWLFV
1. Turn on the gas.
2. Turn on the electricity.
3. Reinstall the lower oven door. Close both doors.
4. Turn on both bake burners.
5. For each burner, observe the following through the oven
door windows.
D,IWKHÀDPHVDUH\HOORZRSHQWKHDLUVKXWWHUPRUH
E,IWKHÀDPHVEORZDZD\RUÀXWWHUIURPWKHEXUQHUFORVH
the air shutter slightly, but not by more than 1/8”.
7XUQEDNHEXUQHURႇDQGUHSHDWZLWKEURLOEXUQHU
Air Shutter
Setting
Air shutter
Phillips Screw
BURNER
AIR SHUTTER SETTING
FOR PROPANE (LP)
AIR SHUTTER
SETTING FOR NG
Lower Oven
Broil
Burner
0.690 0.690
Upper Oven
Bake
Burner
0.750 0.750
Lower Oven
Bake
Burner
Full Open Full Open
Low setting adjustments must be made with other burners in
operation on a medium setting. This procedure prevents the
ORZÀDPHIURPEHLQJVHWWRRORZUHVXOWLQJLQWKHÀDPHEHLQJ
extinguished when other burners are turned on.
A. Turn on all surface burners to medium setting.
% 7XUQWKHNQRERQWKHEXUQHUEHLQJDGMXVWHGWR³/2´
&5HPRYHWKHNQREDQGLQVHUWDVPDOOÀDWEODGHVFUHZGULYHU
into the valve shaft and/or side adjustment screw(s) as
shown and turn clockwise to fully tighten down the bypass
screw(s). Repeat for all valves.
' ,IÀDPHDSSHDUVWRRORZRUXQVWDEOHVORZO\WXUQE\SDVVVFUHZ
FRXQWHUFORFNZLVHXQWLODVWDEOHÀDPHH[LVWVIRUHDFKEXUQHU
Remember, other burners must be turned on to medium.
SPECIALTY BURNERS
Multi-Ring Burner – The outer ring
RIÀDPHVVKRXOGEHDGMXVWHGZLWKWKH
NQREDWWKH0('E\DGMXVWLQJWKHVHW
screw in the center valve shaft. The
ÀDPHVVKRXOGEHDGMXVWHGVRWKDWWKH\
barely curl over the top edge of the
EXUQHUFDS7KHFHQWHUULQJRIÀDPHV
should be adjusted with the knob at the
LO setting by adjusting the set screw to
the right of the valve shaft.
( $GGLWLRQDOO\IRUHDFKEXUQHUEHLQJDGMXVWHGTXLFNO\RSHQ
DQGFORVHWKHRYHQGRRUZKLOHREVHUYLQJÀDPH,IÀDPHLV
extinguished, continue adjusting bypass screw for a larger
ÀDPH5HSHDWGRRURSHQLQJVXQWLOÀDPHLVVWDEOH
Flames
Burner Cap
198
III
Denotes 1.98mm Orifice size opening
Denotes Natural Gas
N
CONVERTING THE OVEN BURNERS
UPPER AND LOWER OVEN BAKE BURNER
ORIFICES
1. Remove the lower oven door from the unit
5HPRYHRYHQUDFNVRYHQERWWRPVDQGÀDPHVSUHDGHUV
from both ovens. In the lower oven, remove the enclosure
around the rear of the bake burner held in place by three
Phillips screws.
3. Remove all 1/4” hex
screws securing the bake
burners. Gently slide
each bake burner to the
left to remove it from the
RUL¿FHDQGDOORZEXUQHUV
to rest on the bottom of
their respective ovens.
:LWKD´ZUHQFKORRVHQHDFKRUL¿FHE\WXUQLQJFRXQWHU
clockwise and remove.
6HOHFWWKHDSSURSULDWHEDNHRUL¿FHIRUHDFKRYHQIURPWKH
NLWDQGLQVWDOORQWKHWKUHDGHG¿WWLQJV7LJKWHQZLWKZUHQFK
until snug.
*HQWO\UHSODFHWKHEDNHEXUQHUVRYHUWKHLUUHVSHFWLYHRUL¿FHV
and replace all 1/4” hex screws securing the burners.
BROIL BURNER ORIFICE
1. Remove the 1/4” hex
screw securing the
broil burner and allow
it to hang down free of
WKHEURLORUL¿FH
2. Apply a 1/2” wrench
to the hex base of the
RUL¿FH/RRVHQWKH
RUL¿FHE\WXUQLQJFRXQWHUFORFNZLVHDQGUHPRYH
6HOHFWWKHSURSDQH/3EURLORUL¿FHIURPWKHNLWDQGLQVWDOOLW
on the broil elbow. Tighten until snug.
5HSODFHWKHEURLOEXUQHURYHUWKHRUL¿FHDQGUHSODFHWKH
screw securing the burner.
NOTICE:
This product cannot be converted to propane (LP) by
DGMXVWLQJWKHRYHQRUL¿FHV7KHRUL¿FHVPXVWEHUHSODFHG
for propane (LP).
NOTICE:
6DYHWKHVHRUL¿FHVIRUIXWXUHFRQYHUVLRQEDFNWRQDWXUDOJDV
Broil
2UL¿FH
Oven
Light
127(,IEXUQHUÀDPHVORRNOLNH$IXUWKHUDLUVKXWWHU
adjustment to the bake buner is required. Normal
EXUQHUÀDPHVVKRXOGORRNOLNH%RU&GHSHQGLQJRQ
the type of gas you use. With propane (LP) gas, some
yellow tipping on the outer cones is normal.
)RUHLJQSDUWLFOHVLQWKHJDVOLQHPD\FDXVHDQRUDQJHÀDPHDW
¿UVWEXWWKLVZLOOVRRQGLVDSSHDU
8.
Retighten the air shutter screws.
9.
When all adjustments are made and the results are
satisfactory:
a. Replace the enclosure around the rear of the bake
burner in the lower oven.
E5HSODFHWKHÀDPHVSUHDGHUV
c. Replace the oven bottoms and oven racks.
F. Replace the knob.
WARNING
If you attempt to measure the inner cone
RIWKHÀDPHSOHDVHXVHFDXWLRQEXUQVFRXOGUHVXOW
(A) Yellow flames:
Further Adjustment
Required
(B) Yellow tips on
outer cones:
Normal for Propane (LP) Gas
(C) Soft blue flames:
Normal for Natural Gas
Product Specifications
| Brand: | Café |
| Category: | Oven |
| Model: | CGS750P4MW2 |
Do you need help?
If you need help with Café CGS750P4MW2, ask a question below and other users will answer you
Oven Café User Manuals

21 October 2024
19 October 2024
17 October 2024
17 October 2024
17 October 2024
17 October 2024
17 October 2024
17 October 2024
17 October 2024
17 October 2024
Oven User Manuals
- Oven Candy
- Oven Electrolux
- Oven Samsung
- Oven ATAG
- Oven LG
- Oven Bosch
- Oven AEG
- Oven IKEA
- Oven Panasonic
- Oven Bauknecht
- Oven BEKO
- Oven Delonghi
- Oven Etna
- Oven Teka
- Oven Balay
- Oven Miele
- Oven Siemens
- Oven Arcelik
- Oven Danby
- Oven Bartscher
- Oven Bertazzoni
- Oven Smeg
- Oven Steba
- Oven Hisense
- Oven Hoover
- Oven Thermex
- Oven Russell Hobbs
- Oven Royal Catering
- Oven Hotpoint
- Oven Whirlpool
- Oven Amica
- Oven Rosieres
- Oven Artusi
- Oven Cecotec
- Oven Neff
- Oven Imarflex
- Oven Kogan
- Oven Caple
- Oven PKM
- Oven Faber
- Oven Midea
- Oven Franke
- Oven Sauber
- Oven Liebherr
- Oven Viking
- Oven CDA
- Oven Kuppersbusch
- Oven Gorenje
- Oven Summit
- Oven Brandt
- Oven Gram
- Oven Gemini
- Oven Haier
- Oven Master Kitchen
- Oven Monogram
- Oven Vox
- Oven Westinghouse
- Oven Sencor
- Oven Aroma
- Oven Orava
- Oven Kluge
- Oven DCG
- Oven Coyote
- Oven Grundig
- Oven Mistral
- Oven MPM
- Oven Cosmo
- Oven Khind
- Oven Amana
- Oven KitchenAid
- Oven Exquisit
- Oven Euro Appliances
- Oven Frigidaire
- Oven Maytag
- Oven Breville
- Oven Turbotronic
- Oven Bimar
- Oven Defy
- Oven Euromaid
- Oven Hendi
- Oven GE
- Oven Concept
- Oven Guzzanti
- Oven XO
- Oven Edilkamin
- Oven Omega
- Oven Fulgor Milano
- Oven Hyundai
- Oven Infiniton
- Oven Boretti
- Oven Jocel
- Oven Blaupunkt
- Oven Lamona
- Oven Falmec
- Oven Sirius
- Oven MSR
- Oven Dacor
- Oven Salton
- Oven Cylinda
- Oven Tristar
- Oven Respekta
- Oven Opera
- Oven Dometic
- Oven Sharp
- Oven La Cornue
- Oven Eldom
- Oven Fisher And Paykel
- Oven Elba
- Oven Brentwood
- Oven Philco
- Oven Jenn-Air
- Oven ECG
- Oven HomeCraft
- Oven Jata
- Oven Proctor Silex
- Oven Becken
- Oven Element
- Oven Acros
- Oven Kucht
- Oven Glem Gas
- Oven Hamilton Beach
- Oven Technika
- Oven Hansa
- Oven Thor
- Oven Rommelsbacher
- Oven V-Zug
- Oven Capital
- Oven Mx Onda
- Oven Meireles
- Oven Fagor
- Oven Edesa
- Oven Ronco
- Oven Gaggenau
- Oven KKT Kolbe
- Oven Mellerware
- Oven Tisira
- Oven Wolf
- Oven Porter & Charles
- Oven LERAN
- Oven Zerowatt
- Oven Baumatic
- Oven Iberna
- Oven Ilve
- Oven Wolkenstein
- Oven Traeger
- Oven Atosa
- Oven Izzy
- Oven Mora
- Oven Zenith
- Oven Rangemaster
- Oven Lofra
- Oven Mayer
- Oven Insignia
- Oven Emerio
- Oven Chef
- Oven ARC
- Oven Nestor Martin-Electrolux
- Oven Freggia
- Oven Pelgrim
- Oven Goldbrunn
- Oven DPM
- Oven JennAir
- Oven Wiggo
- Oven Emilia
- Oven Creda
- Oven Blomberg
- Oven Cookology
- Oven De Dietrich
- Oven Comelec
- Oven Ariston Thermo
- Oven Belling
- Oven Zanussi
- Oven Signature
- Oven Orima
- Oven Mach
- Oven Rex
- Oven Pitsos
- Oven Yamazen
- Oven Mestic
- Oven Instant
- Oven ZLine
- Oven New World
- Oven Classique
- Oven Essentiel B
- Oven Ferrari
- Oven Pando
Latest Oven User Manuals
27 October 2024
27 October 2024
27 October 2024
27 October 2024
27 October 2024
27 October 2024
27 October 2024
27 October 2024
27 October 2024
27 October 2024