Khind RCM18SS Manual
Khind
Rice cooker
RCM18SS
Read below 📖 the manual in Italian for Khind RCM18SS (24 pages) in the Rice cooker category. This guide has been helpful for 24 people and has been rated 4.5 stars on average by 2 users
Page 1/24

KHIND CARE Mobile App
1-800-88-0032
khind.com.my
Download to register for
E-Warranty & enjoy hassle-
free after-sales services.
DIGITAL
RICE
COOKER
RCM18SS
U S E R M A N U A L
Please read this manual carefully before operating this product.
Keep this manual handy for further reference.
IMPORTANT
P/N: 40-51813-00

1. Read the following instructions before using the appliance.
2. Check if the voltage indicated on the appliance corresponds to the local voltage before
you connect to the appliance.
3. Do not use this appliance if the cord or plug is damaged, or if this unit is malfunctioned or
damaged in any way.
4. This appliance is not intended for use by persons (including children) with reduced
physical, sensory or mental capabilities, or lack of experience and knowledge, unless they
have been given supervision or instruction concerning use of the appliance by a person
responsible for their safety.
Children should be supervised to ensure that they do not play with the appliance.
5. If the supply cord is damaged, it must be replaced by the manufacturer, service agent or
similarly qualified persons in order to avoid a hazard.
6. The heating plate’s surface is subject to residual heat after use. Do not touch the heated
pot of the appliance during operation or immediately after use.
7. This appliance is intended for household use only.
8. Do not immerse the appliance into water or other liquids EXCEPT the inner pot.
9. WARNING! Avoid spillage on the power connector.
10. WARNING! Misuse of this appliance may cause injury.
11. Beware of hot steam from the appliance during operation when lid is opened. Keep
yourself away from the appliance to avoid steam.
12. Always place the rice cooker on flat and stable surface. Do not expose rice cooker to
water, humid conditions or heat sources. Do not expose Inner Pot to direct flame.
13. While Inner Pot is not being placed into the rice cooker (when rice cooker is empty) never
try to operate the rice cooker.
Note: Do not place anything in between inner pot and the heating plate to avoid
any damages.
14. The appliance is not intended to be operated by any external timer or separate
remote-control system.
Safety Precaution Information
1
Safety & Warning Information
2
Inner pot is caught
on ledge above
heating element
Inner pot is caught
on ledge of body
WRONG
Foreign
matter
Heating
element
WRONG
Important Information
1. The presence of either “minerals” or “hard water” in the water piping system, may cause
brown or white spots and mineral scale which appear on the surface of the Stainless
Steel Inner Pot, could visually resemble rust spots. As these spots are not rust, it is
harmless and safe to consume water or food from the inner pot.
2. These spots can be removed by boiling Citric Acid Crystal Solution (Food Grade) to
remove them. For tough stains, you may need to use a good metal cleaner to remove
the stubborn stains and then wash off with soup solution before using.
Cleaning & Maintenance
1. Always switch off the appliance, unplug from main switch and let appliance cool down
under below situation under below situation:
a) When the appliance is not in use or;
b) Before cleaning the appliance or;
c) Before putting on or taking off parts from appliance.
2. Use a damp cloth to clean / wipe the outer body. Remove the Inner Pot and the Inner Lid,
clean with dishwashing detergent and a soft sponge. Do not use abrasive material or
corrosive chemical detergent on the appliance.
3. Do not use wire brush or hard brush to clean, it may scratch and cause damage to
the surface.
4. Dry the rice cooker by using a soft cloth.
5. Grains of rice and other residues may stick onto the heating plate. These stains must be
cleaned using by a soft damp cloth. It can maintain and improve the cooking performance.
6. Do not immerse the appliance into water or other liquids except the inner pot.
Parts Identification
1. Detachable Inner Lid
2. Seal Ring
3. Handle
4. Bubble Breaker
5. Stainless Steel Inner Pot
6. Plastic Steam Tray
7. Steam Vent
8. Control Panel
9. Cover Lid
10. Open Button
11. Power Cord
1
7
8
9
10
11
2
3
4
6
5
*Pictures are for illustration purposes only.
Steaming basket
(1pc)
Measuring Cup
(1pc) about 180ml
Rice Scoop
(1pc)
Soup Scoop
(1pc)
Accessories
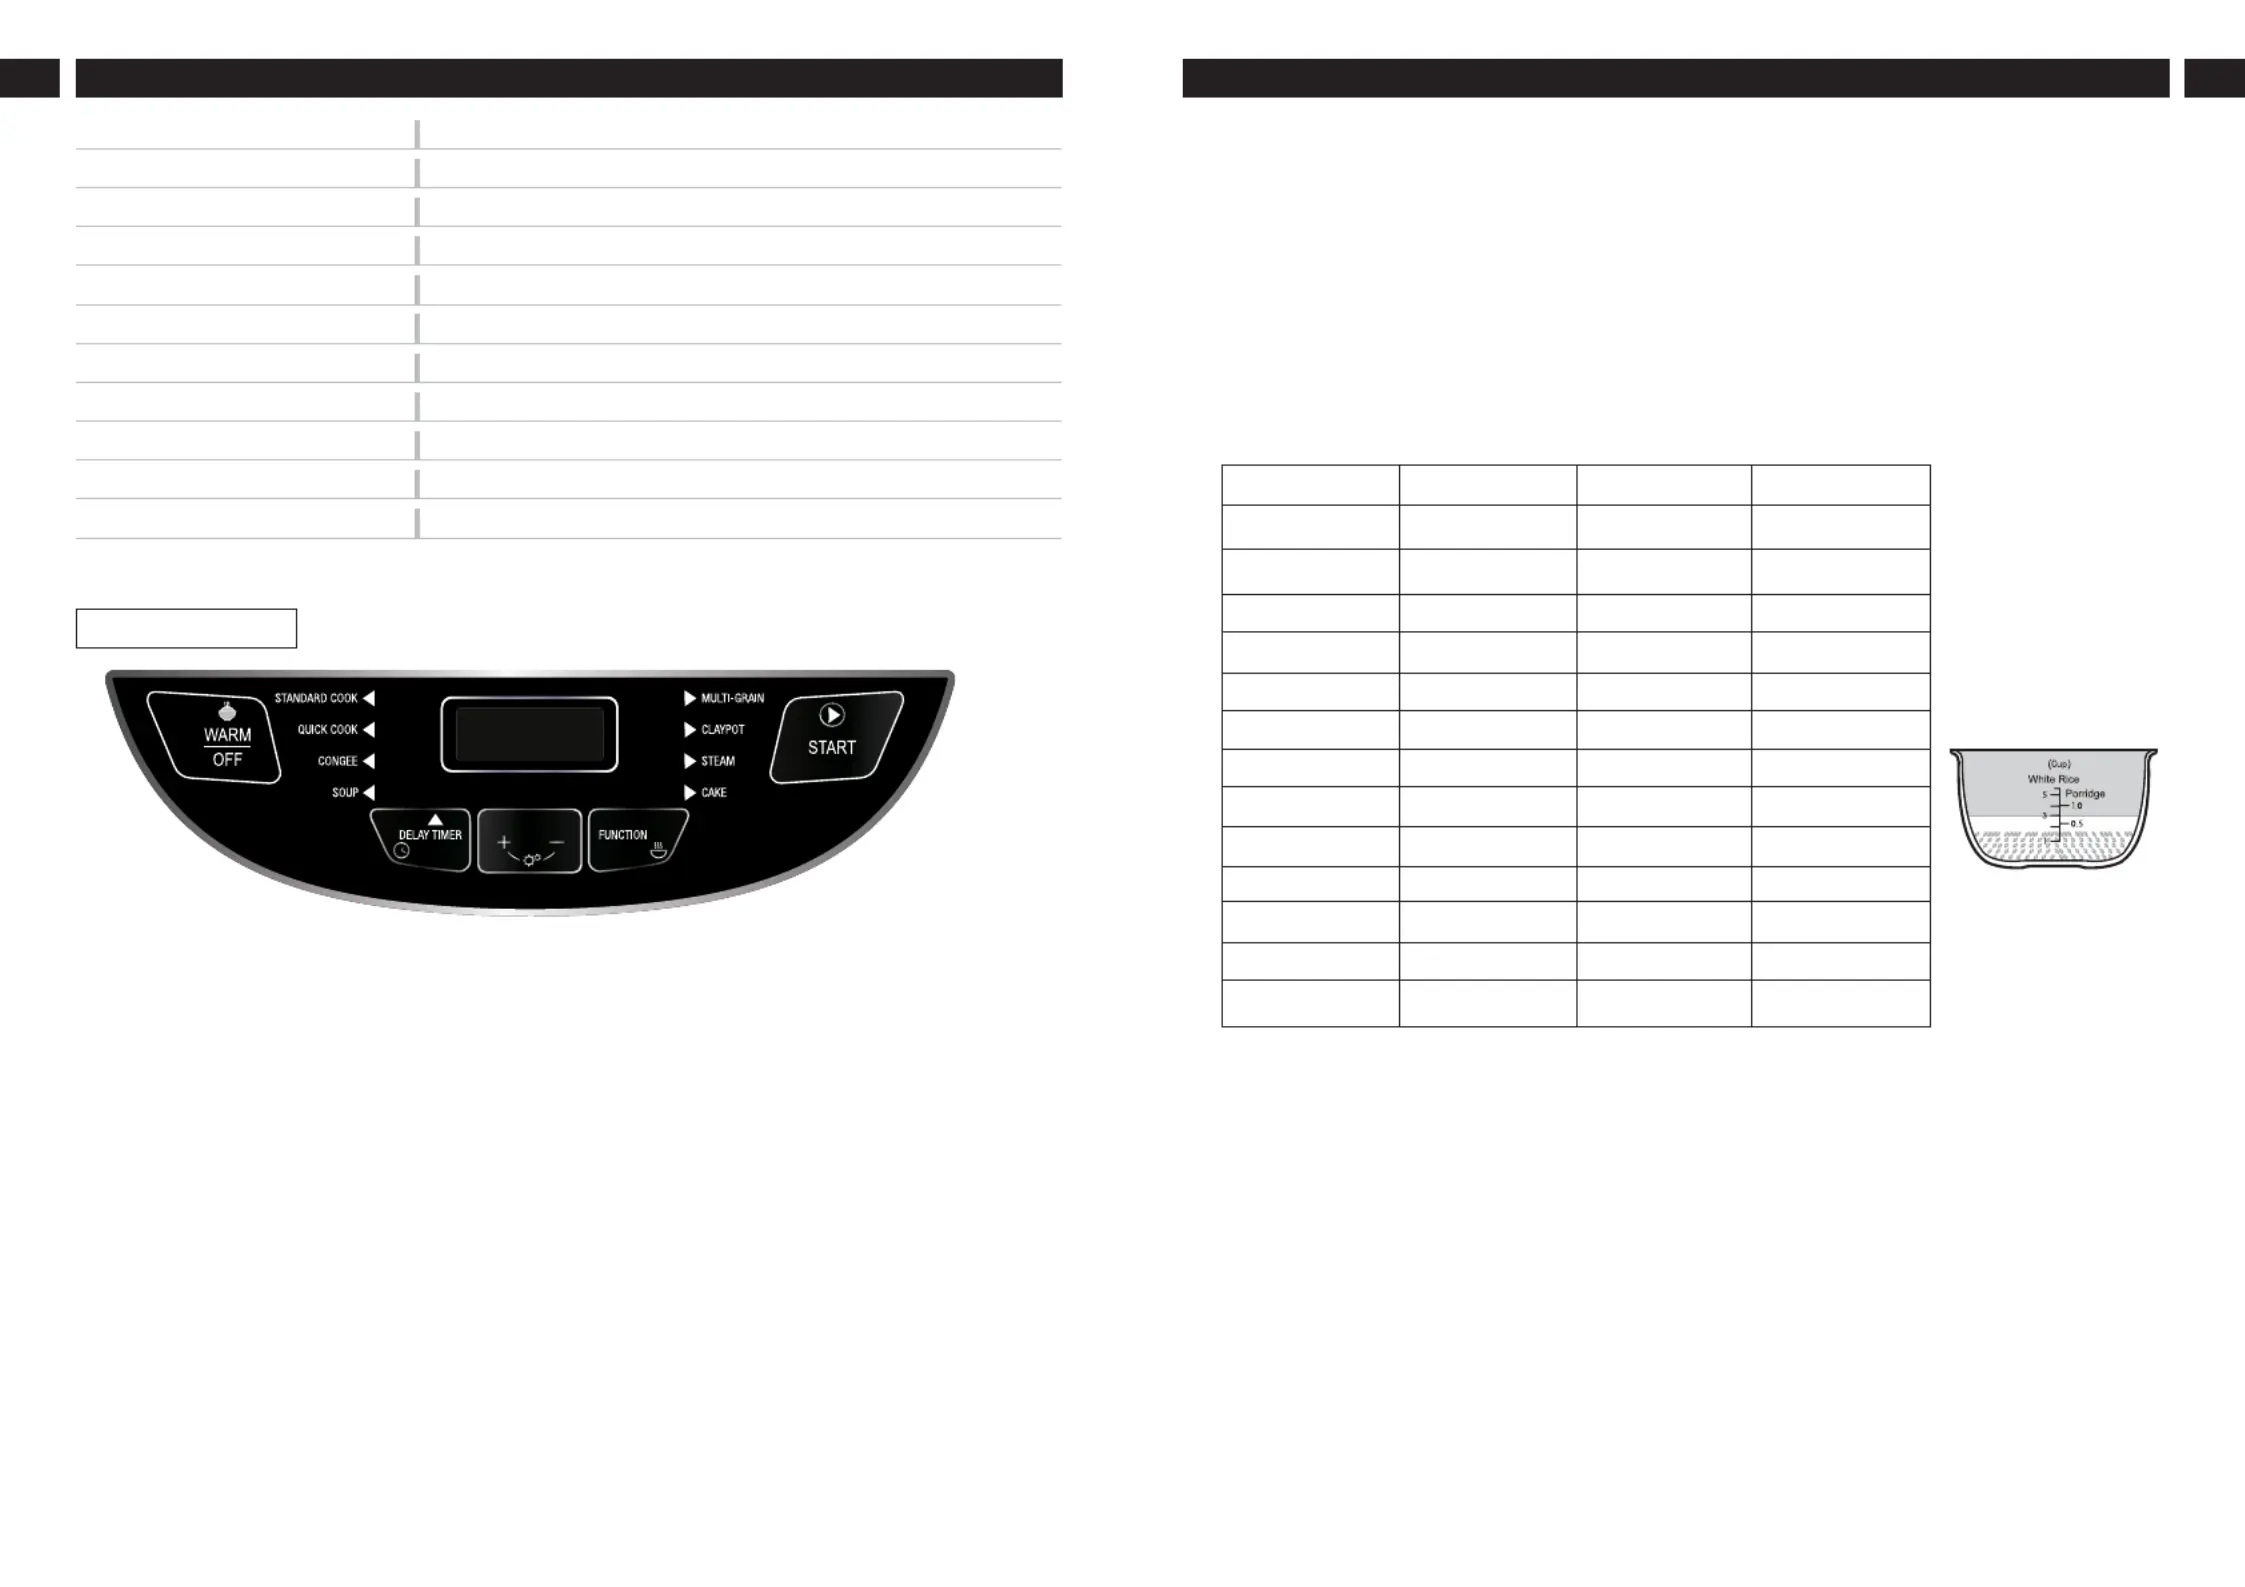
a) Display Screen
- LED Screen, Time, and Indicator are displayed.
b) Start Button
- Press to start cooking programs
c) Function Button
- Press to choose 8 preset cooking functions in Standard Cook, Quick Cook, Congee,
Soup, Multi-grain, Claypot, Steam & Cake.
d) + / - Button
- Press + / - Button to adjust the time. Time adjustable range is 1 – 15 hours.
e) Delay Timer Button
- Press Delay Timer Button to preset cooking complete time.
- Delay Timer up to 15 hours.
f) Keep Warm / Off Button
- Once cooking finish, it will automatically turn into Keep Warm mode. The keep warm
function lasts up to 15 hours, but we recommended to keep warm within 6 hours to
avoid yellowish rice or bottom crusted.
- Press Keep Warm / Off Button when cancel or made error selection during operation.
Operating Features
3 4
A. Preparation
1. Kindly take out all parts including plastics, Stainless Steel Inner Pot, Plastic Steam Tray,
Detachable Cover Lid, Power Cord, and other accessories wash it before using.
2. Please ensure there are no impurities on bottom of inner pot and around heating element.
Kindly ensure the Stainless Steel Inner Pot fits closely with heating element.
3. Measure and wash the required amount of rice in a separate container with measuring
cup provided.
4. Rinse the rice several times until the water become clear.
5. Put the washed rice into Stainless Steel Inner Pot with corresponding amount of fresh water
level on the indicator line based on your cooking preferences between Rice, Multigrain
or Porridge.
Reminder:
* Please do not cook less than 2 cups of rice under White Rice & Multigrain mode. 0.5 cups
under Porridge mode.
* Please pre-soak brown rice for 30 minutes before cooking & do not cook more than 6 cups
of brown rice.
**You may adjust the amount of water according to own preferences based on type
of rice.
**Table above is for references only.
6. Wipe off the water on the outside of Stainless Steel Inner Pot, place it into Rice Cooker to
align it with heating element correctly, turn inner pot gently from right to left.
7. Kindly ensure the bubble breaker is properly assembled.
8. Close the cover lid and insert power plug and start operate.
Model
Voltage
Power
Gross Capacity
Rice Capacity Only
Quantity
Net Weight
Gross Weight
Product Dimension (LxWxH)
Box Dimension (LxWxH)
Colour
RCM18SS
220-240 ~ 50-60Hz
790W
5L
1.8L
1 Unit
4.1kg
4.4kg
389 x 284 x 229mm
420 x 312 x 274mm
Red Alpha
Specifications
*Specifications are subject to change without prior notice.
Type White Rice Multigrain Porridge
Rice (Cup/s) Indicator Line Indicator Line Indicator Line
0.5 X X 0.5
1 X X 1
1.5 X X 1.5
2 2 2 X
3 3 3 X
4 4 4 X
5 5 5 X
6 6 6 X
7 7 X X
8 8 X X
9 9 X X
10 10 X X
How to Use
Product Specifications
| Brand: | Khind |
| Category: | Rice cooker |
| Model: | RCM18SS |
Do you need help?
If you need help with Khind RCM18SS, ask a question below and other users will answer you
Rice cooker Khind User Manuals

13 October 2024
13 October 2024
13 October 2024
13 October 2024
13 October 2024
13 October 2024
13 October 2024
13 October 2024
13 October 2024
13 October 2024
Rice cooker User Manuals
- Rice cooker Xiaomi
- Rice cooker Braun
- Rice cooker Philips
- Rice cooker Panasonic
- Rice cooker Imarflex
- Rice cooker Gourmetmaxx
- Rice cooker Gemini
- Rice cooker Sencor
- Rice cooker Aroma
- Rice cooker Hitachi
- Rice cooker Salton
- Rice cooker Elba
- Rice cooker HomeCraft
- Rice cooker Black And Decker
- Rice cooker SKG
- Rice cooker Pars
- Rice cooker H.Koenig
- Rice cooker Lauben
- Rice cooker Yamazen
- Rice cooker Metos
Latest Rice cooker User Manuals
26 October 2024
26 October 2024
25 October 2024
23 October 2024
23 October 2024
23 October 2024
23 October 2024
23 October 2024
15 October 2024

14 October 2024