StarTech.com C2-ETHERNET-EXTENDER Manual
StarTech.com
Wifi-repeater
C2-ETHERNET-EXTENDER
Read below 📖 the manual in Italian for StarTech.com C2-ETHERNET-EXTENDER (3 pages) in the Wifi-repeater category. This guide has been helpful for 33 people and has been rated 4.5 stars on average by 2 users
Page 1/3
Quick-Start Guide
To view manuals, FAQs, videos, drivers, downloads, technical drawings, and more, visit www.startech.com/support.
Manual Revision: April 11, 2024
Product ID
C2-ETHERNET-EXTENDER
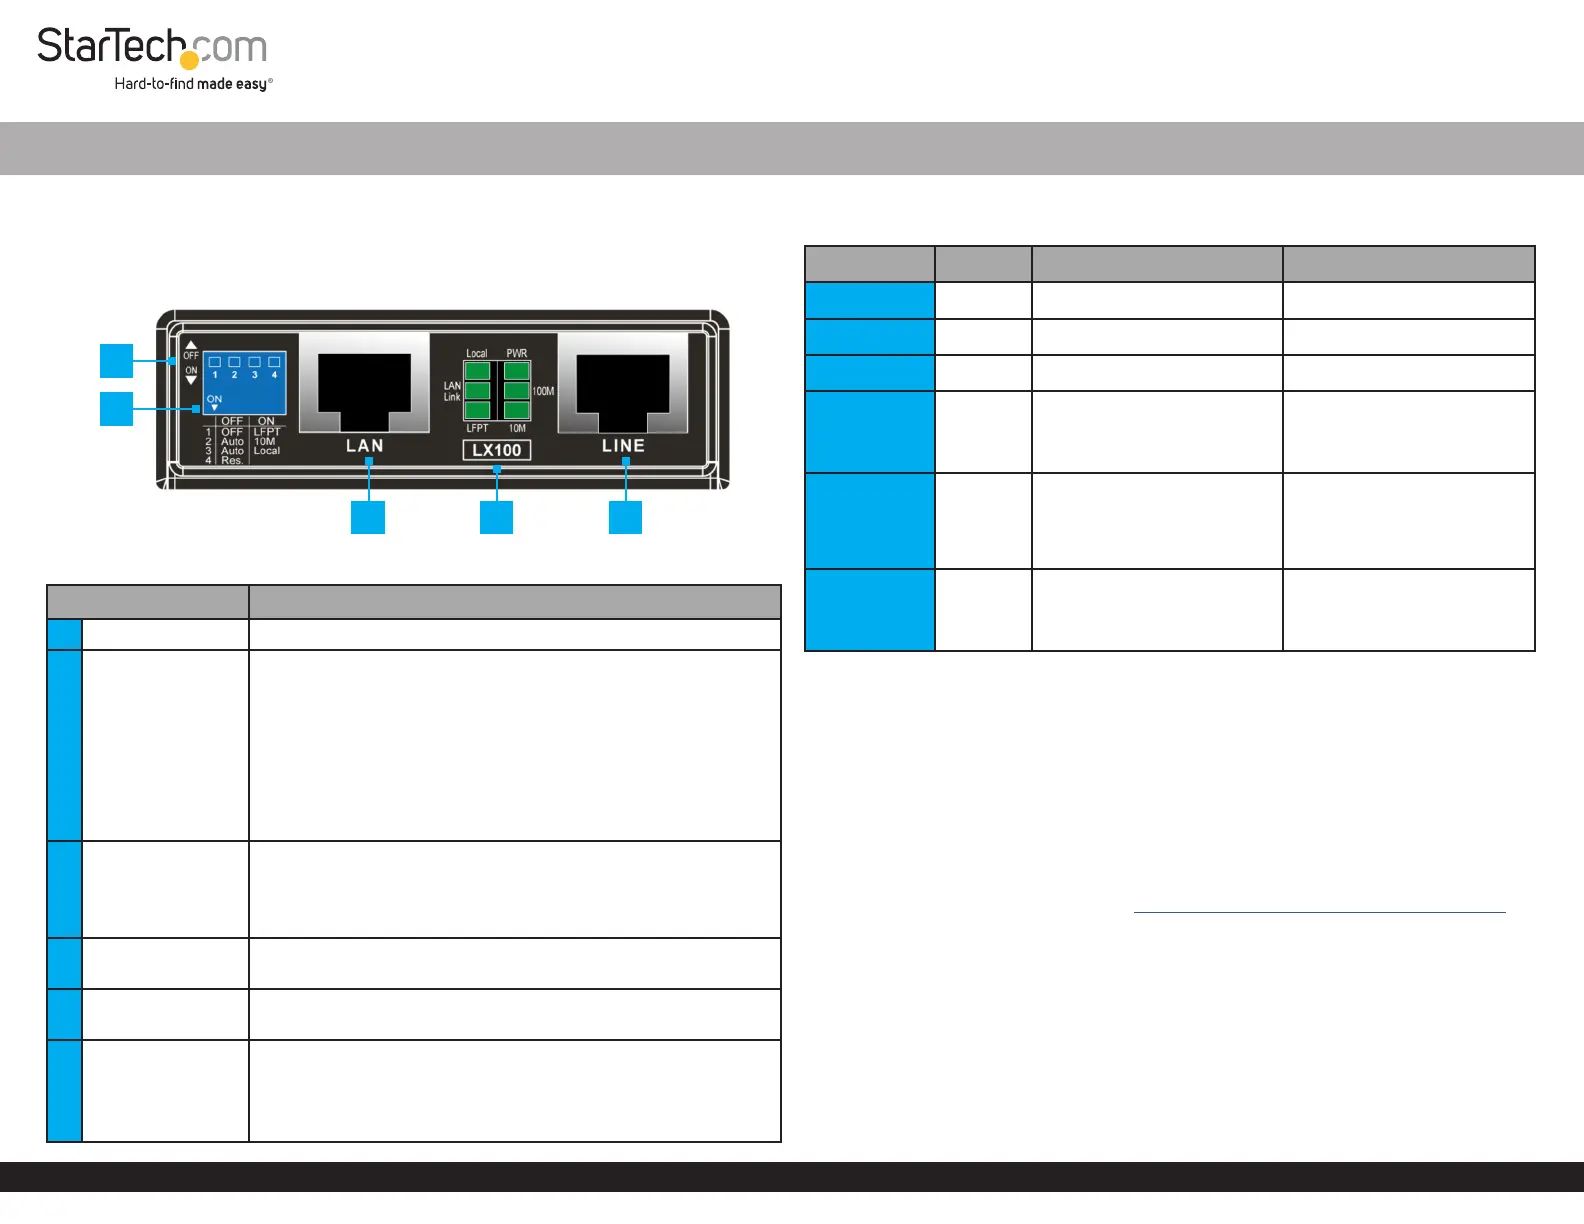
Front View
Component Function
1 ON/OFF Position • Sets a specied DIP Switch ON or OFF
2 DIP Switches
• Select the desired change for (1) Link Fault Pass-Through
(LFPT), (2) Link Speed, or (3) Local/Remote mode
Note: Keep the DIP Switch 4 in the OFF position at all times to
prevent undesired behavior.
LFPT Note: If a link between two units is lost, one unit may
continue to send packets assuming the link is up, potentially
leading to data loss. LFPT minimizes this risk by forcing a link
down state upon link failure.
3 LAN Port
• Connects the Local unit to the Local Network or Host
Device/Computer via RJ45 UTP Cable
• Connects the Remote unit to a Remote Network or
IP-Based Device via RJ45 UTP Cable
4 LED Indicators
• Indicate the status of Local/Remote, Power, Link Status,
Link Speed, and LFPT
5 LINE Port
• Connects the Local and Remote units to each other using
RJ45 or RJ11UTP Cable
6
DC Power Port
(At the Back)
• Connect to a Power Source using the included Power
Adapter
• Recommended 12V and 1A
• Type M barrel plug: Ø 5.5x2.1x9.5mm
10/100 Base-TX Ethernet Extender Kit - Extend up to 2,624ft (800m)
LED Indicators
LED Color ON OFF
Local Green Local Mode is ON Auto Mode
PWR Green Unit is receiving power Unit is not receiving power
LAN Link Green LAN Link Up LAN Link is Down
100M Green
Local to Remote Link is
operating at 100Mbps
Local to Remote unit Link
is operating at 10Mbps or
is Down
LFPT Green
LFPT function is ON,
and a LAN Link Fault has
occurred
LFPT function is OFF or
LFPT function is ON, and
no LAN Link Fault has
occurred
10M Green
Local to Remote Link is
operating at 10Mbps
Local to Remote unit Link
is operating at 100Mbps or
is Down
Package Contents
• Ethernet Extender x 2
• Power Adapter x 2
• Mounting Bracket x 2
• Mounting Screws x 4
• Quick-Start Guide x 1
Requirements
For the latest requirements, please visit www.startech.com/C2-ETHERNET-EXTENDER
• RJ45 terminated UTP/STP Cat5e (or better) Ethernet cable (sold separately)
• Phillips head screwdriver
1
3
2
54
*Product may vary from image

Note: If the DIP Switches need to be adjusted after the initial setup, both units must be
Powered O before changing the DIP Switch settings.
Install the Ethernet Extender Kit
1. Adjust the DIP Switches according to the needs of the setup.
2. Position the units in each of the deployment locations, Local and Remote.
3. Plug in an RJ45 Patch Cable from the LAN Port on the Local Extender unit to an
Ethernet Port on a Local Network or a Host Device/Computer.
4. Plug in an RJ45 Patch Cable from the LAN Port on the Remote Extender unit to an
Ethernet Port on a Remote Network or IP-Based Device.
5. Plug in a terminated RJ45 or RJ11 UTP Cable from the Line Port on the Local
Extender unit to the Line Port on the Remote Extender unit.
6. Connect the included Power Adapter to the DC Power Port on the Local and
Remote units.
Mounting the Local and Remote Units
Warning!
The mounting hardware included with this product may not be adequate for some
wall structures. If lacking the necessary expertise to wall mount this product, contact
a construction professional to install the mounting hardware or to provide specic
mounting instructions for the wall structure.
Note: Use one of the Wall Mount Brackets as a template to mark the Holes to be
drilled on the Wall or Mounting Surface.
1. Align the holes in the Wall Mount Brackets with the holes on the Bottom of the
Local or Remote units.
2. Insert the Mounting Screws (x 2) through the Wall Mount Bracket and into the
Local or Remote unit. (Figure 1)
Figure 1
3. Tighten the Mounting Screws using a Phillips Head Screwdriver.
4. Use the Key Holes (x 2) on the Wall Mount Brackets to attach the Local or Remote
unit to the Screws (x 2) on the Wall or Mounting Surface.
5. Repeat Steps 1 to 4 with the remaining unit.
Installation
Extension Distance and Link Speed
Extension Distance ft (m)
Cat5e or Cat6 UTP Link speed (Mbps)
2 Pairs 1 Pair
328ft (100m) 100Mbps 100Mbps
656.1ft (200m) 100Mbps 100Mbps
984.2ft (300m) 100Mbps 100Mbps
1312.3 (400m) 100Mbps 10Mbps
1640.4 (500m) 100Mbps 10Mbps
2296.5ft (600m) 100Mbps 10Mbps
2296.5ft (700m) 10Mbps 10Mbps
2624.6ft (800m) 10Mbps 10Mbps
Note: Either Unit can be the Local or Remote Unit.
If the Link Speed is set to 10Mbps it will limit the speed regardless of distance and
number of pairs in the UTP Cable used.
DIP Switches
DIP Switch ON OFF
1 - LFPT
When the Remote Unit's
Network Link is Down the
Network Link of the Local unit
will be Forced Down
Disables LFPT
2 - Link Speed
Forces the Link Speed to
10Mbps
Auto-selects the Link Speed
between 10 or 100Mbps
depending on the Extension
Distance and number of Pairs
of UTP Cable used
3 - Local/Remote
Forces either of the units to
Local Mode
Note: Only one unit must be
set to Local mode
Auto-selects the Local and
Remote unit (factory default)
4 - No Function -
Leave Permanently OFF to
connect the DIP Switch to
ground
Quick-Start Guide

exceed the actual price paid for the product. Some States do not allow the exclusion
or limitation of incidental or consequential damages. If such laws apply, the limitations
or exclusions contained in this statement may not apply to you.
Safety Measures
EN: Do not touch the product under power if the product has an exposed printed
circuit board or electrical wire.
Warning: please consult the online manual for detailed safety instructions.
NL: Raak het product niet aan als het onder stroom staat en er een blootliggende
printplaat of elektrische draad zichtbaar is.
Waarschuwing: raadpleeg de online handleiding voor gedetailleerde
veiligheidsinstructies.
FR: Ne touchez pas le produit lorsqu’il est sous tension et qu’il dispose d’un circuit
imprimé ou d’un l électrique apparent.
Attention : veuillez consulter le manuel en ligne pour des instructions de sécurité
détaillées.
DE: Berühren Sie das Produkt nicht unter Spannung, wenn es eine freiliegende
Leiterplatte oder einen freiliegenden elektrischen Draht hat.
Warnung: Ausführliche Sicherheitshinweise nden Sie im Online-Handbuch.
IT: Non toccare il prodotto quando è sotto tensione se il prodotto ha una scheda di
circuito stampato o un lo elettrico esposto.
Attenzione: consulti il manuale online per le istruzioni di sicurezza dettagliate.
ES: No toque el producto cuando se encuentre bajo tensión si este tiene una placa de
circuito impreso o un cable eléctrico expuesto.
Advertencia: Para instrucciones detalladas de seguridad, consulte el manual en línea.
JP: プリント基板や電線が露出している製品は、電源が入っている状態で直接触
れないでください 。
注意:安全性に関わる注意事項の詳細について、オンラインマニュアルを参照
してください。
FCC Compliance Statement
This equipment has been tested and found to comply with the limits for a Class
A digital device, pursuant to Part 15 of the FCC rules. These limits are designed to
provide reasonable protection against harmful interference when the equipment
is operated in a commercial environment. This equipment generates, uses and can
radiate radio frequency energy and, if not installed and used in accordance with
the instruction manual, may cause harmful interference to radio communications.
Operation of this equipment in a residential area is likely to cause harmful interference
in which case the user will be required to correct the interference at his own expense.
Industry Canada (IC) Statement
This Class A digital apparatus complies with Canadian ICES-003.
Cet appareil numérique de la classe [A] est conforme à la norme NMB-003 du Canada.
CAN ICES-3 (A)/NMB-3(A)
This device complies with Industry Canada licence-exempt RSS standard(s). Operation
is subject to the following two conditions:
(1) This device may not cause interference, and (2) This device must accept any
interference, including interference that may cause undesired operation of the device.
Le présent appareil est conforme aux CNR d’Industrie Canada applicables aux appareils
radio exempts de licence. L’exploitation est autorisée aux deux conditions suivantes:
(1) l’appareil ne doit pas produire de brouillage, et (2) l’utilisateur de l’appareil doit
accepter tout brouillage radioélectrique subi, même si le brouillage est susceptible
d’en compromettre le fonctionnement.
Use of Trademarks, Registered Trademarks, and other Protected Names and
Symbols
This manual may make reference to trademarks, registered trademarks, and other
protected names and/or symbols of third-party companies not related in any way
to StarTech.com. Where they occur these references are for illustrative purposes
only and do not represent an endorsement of a product or service by StarTech.
com, or an endorsement of the product(s) to which this manual applies by the third-
party company in question. StarTech.com hereby acknowledges that all trademarks,
registered trademarks, service marks, and other protected names and/or symbols
contained in this manual and related documents are the property of their respective
holders.
Warranty Information
This product is backed by a 2-year warranty.
For further information on product warranty terms and conditions, please refer to
www.StarTech.com/warranty.
Limitation of Liability
In no event shall the liability of StarTech.com Ltd. and StarTech.com USA LLP (or
their ocers, directors, employees or agents) for any damages (whether direct or
indirect, special, punitive, incidental, consequential, or otherwise), loss of prots, loss
of business, or any pecuniary loss, arising out of or related to the use of the product
FR
FR: startech.com/fr
DE: startech.com/de
ES: startech.com/es
NL: startech.com/nl
IT: startech.com/it
StarTech.com Ltd.
45 Artisans Crescent
London, Ontario
N5V 5E9
Canada
StarTech.com Ltd.
Unit B, Pinnacle 15
Gowerton Road
Brackmills,
Northampton
NN4 7BW
United Kingdom
StarTech.com LLP
4490 South Hamilton
Road
Groveport, Ohio
43125
U.S.A.
StarTech.com Ltd.
Siriusdreef 17-27
2132 WT Hoofddorp
The Netherlands
Product Specifications
| Brand: | StarTech.com |
| Category: | Wifi-repeater |
| Model: | C2-ETHERNET-EXTENDER |
Do you need help?
If you need help with StarTech.com C2-ETHERNET-EXTENDER, ask a question below and other users will answer you
Wifi-repeater StarTech.com User Manuals

21 October 2024
16 October 2024
Wifi-repeater User Manuals
- Wifi-repeater Xiaomi
- Wifi-repeater Huawei
- Wifi-repeater Fluke
- Wifi-repeater D-Link
- Wifi-repeater Cudy
- Wifi-repeater Extron
- Wifi-repeater Lindy
- Wifi-repeater Netgear
- Wifi-repeater CSL
Latest Wifi-repeater User Manuals
27 October 2024
15 October 2024
15 October 2024
15 October 2024
13 October 2024
13 October 2024
13 October 2024
13 October 2024
13 October 2024
13 October 2024