Yamaha ELBU-F02 Manual
Read below 📖 the manual in Italian for Yamaha ELBU-F02 (1 pages) in the Keyboard category. This guide has been helpful for 22 people and has been rated 4.5 stars on average by 2 users
Page 1/1
Please keep this manual in a safe and handy place for future
reference.
CAUTION
Read these precautions carefully before you install the
key cover.
These precautions are to promote safe use of the key cover and to
prevent injury and damage from occurring to you and others.
Following them carefully ensures that you will get long and safe
usage from your key cover.
• Be careful not to confuse any of the parts, and be sure to install
all parts in the correct direction and according to the sequence
given below.
• Assembly should be carried out by at least two persons.
• Use only the screws specified when installing the key cover. Use
of any other screws may result in an inadequate installation that
may cause damage to both the keyboard and the key cover.
• Do not apply excessive force to the key cover as it may damage
the cover.
• Make sure the key cover is sturdy and safe, and all screws have
been tight and firm before use. If not, the key cover may drop, or
may result in injury to the user.
• To disassemble, reverse the assembly sequence given below.
• Take care that the key cover does not pinch your fingers, and do
not insert your finger or hand in any gaps on the key cover or
instrument.
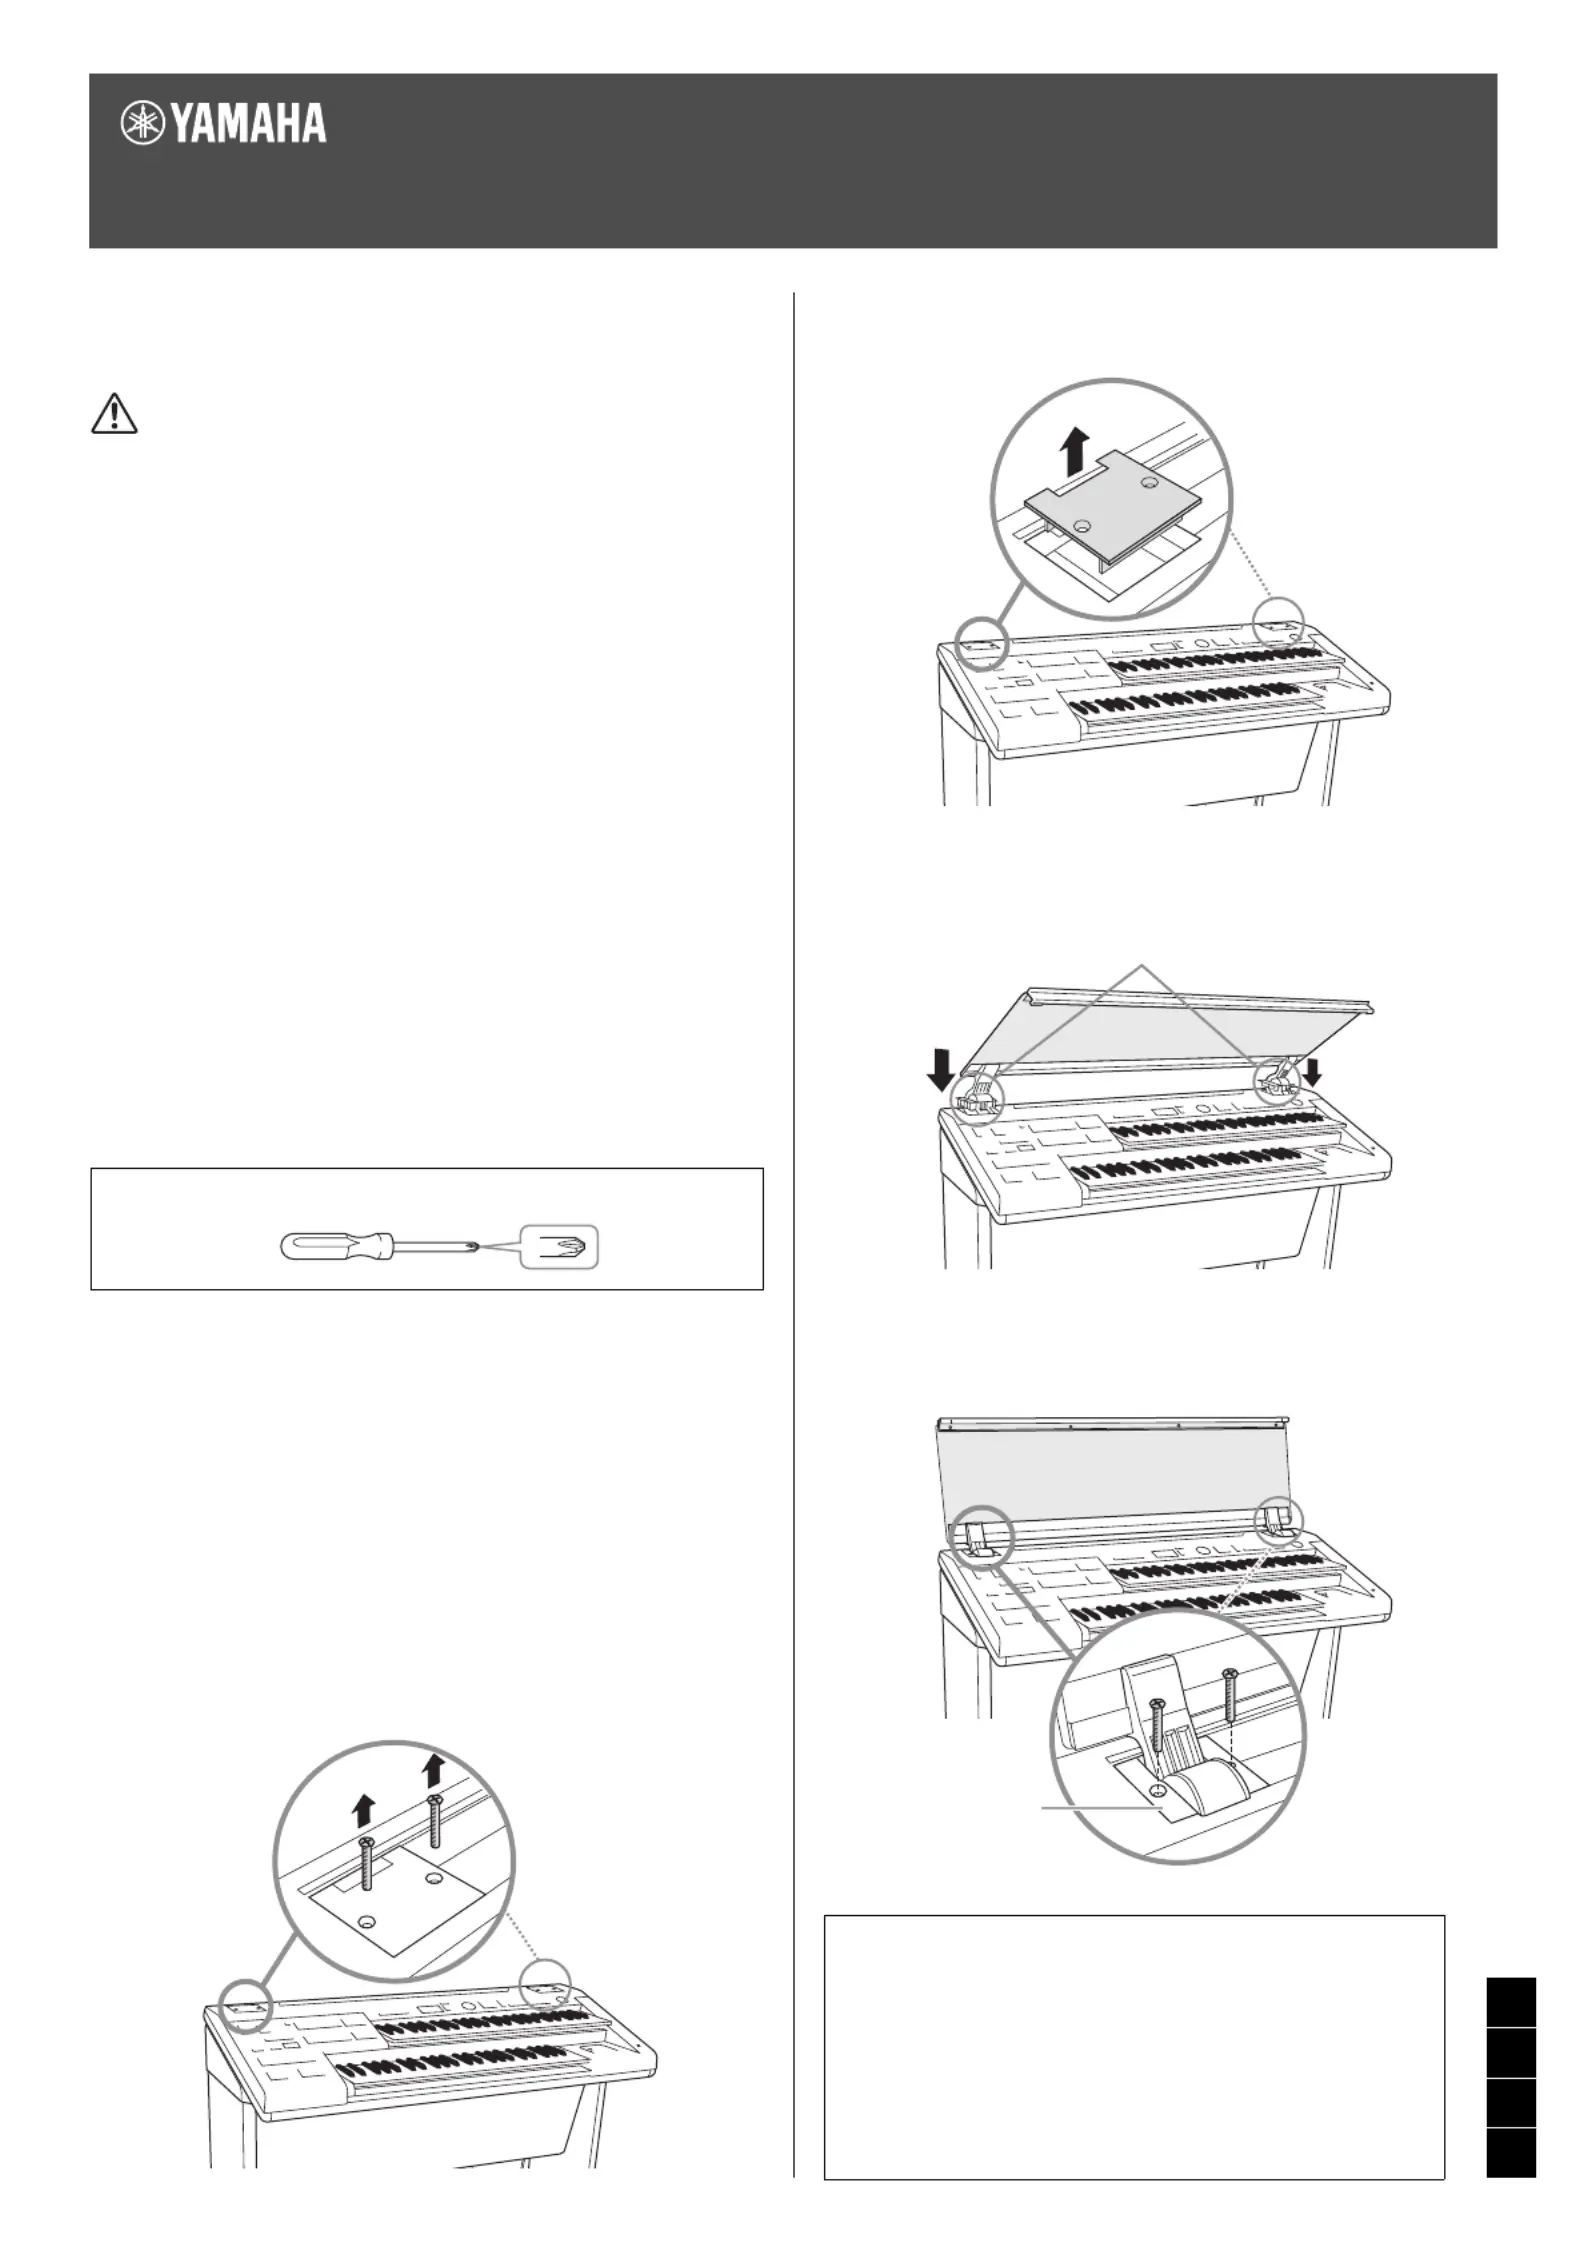
Assembly Instructions
1Confirm that the key cover is included in the
package.
If a music rest is inserted in the instrument, remove it. The
key cover also functions as a music rest.
2Remove the cover mounts from the upper left and
right of the panel.
2-1 Using a screwdriver, remove the four screws using
a screwdriver from the cover mounts.
Do not discard the screws; you’ll need them later in step 4.
2-2 Remove the cover mounts.
Keep the cover mounts in a safe place for future use.
3Put the key cover in place.
Place the anchors of the key cover into the holes from which
you removed cover mounts.
4Install the key cover.
Fix the key cover anchors to the instrument by securely
fastening the four screws you removed in step 2-1.
Have a Phillips-head (+) screwdriver of the appropriate size ready.
Post-assembly checklist
Once you’ve assembled the stand, check the following points:
• Are there any parts left over?
If so, read the assembly instructions again and correct
any mistakes you might have made.
• If the key cover makes a creaking noise or seems
unsteady when you play it, refer carefully to the assembly
instructions and diagrams and retighten all screws.
Cover anchors
Cover anchor
ELBU-F02
Assembly Instructions
Option Unit
EN
ZH
KO
JA
1
Product Specifications
| Brand: | Yamaha |
| Category: | Keyboard |
| Model: | ELBU-F02 |
Do you need help?
If you need help with Yamaha ELBU-F02, ask a question below and other users will answer you
Keyboard Yamaha User Manuals

15 October 2024
15 October 2024
15 October 2024
15 October 2024
15 October 2024
15 October 2024
Keyboard User Manuals
- Keyboard Xiaomi
- Keyboard Casio
- Keyboard HP
- Keyboard Panasonic
- Keyboard Vorago
- Keyboard Krom
- Keyboard Kogan
- Keyboard GoGEN
- Keyboard Urban Factory
- Keyboard Trust
- Keyboard Goldtouch
- Keyboard Asus
- Keyboard Gembird
- Keyboard Woxter
- Keyboard Lenovo
- Keyboard Sharkoon
- Keyboard RGV
- Keyboard Gamdias
- Keyboard CSL
- Keyboard Elgato
- Keyboard Genesis
- Keyboard Logilink
- Keyboard V7
- Keyboard Goodis
- Keyboard Speed-Link
- Keyboard Sven
- Keyboard EVOLVEO
- Keyboard Xtrfy
- Keyboard Ducky
- Keyboard Xtech
- Keyboard Mad Dog
- Keyboard Korg
- Keyboard Voxicon
- Keyboard UNYKAch
- Keyboard Carlsbro
- Keyboard Accuratus
- Keyboard Gamesir
- Keyboard NGS
- Keyboard Havis
- Keyboard Kurzweil
- Keyboard HyperX
- Keyboard Keychron
- Keyboard Rapoo
- Keyboard Savio
- Keyboard Erica Synths
- Keyboard Xcellon
- Keyboard IQUNIX
- Keyboard On-Stage
- Keyboard Kawai
- Keyboard Redragon
- Keyboard Hammond
- Keyboard Polyend
- Keyboard Tiptop Audio
- Keyboard Man & Machine
- Keyboard Acme Made
- Keyboard Deltaco
Latest Keyboard User Manuals
27 October 2024
27 October 2024

26 October 2024
26 October 2024
26 October 2024
26 October 2024
26 October 2024
26 October 2024
26 October 2024
26 October 2024