Yamaha UD-USB01 Manual
Read below 📖 the manual in Italian for Yamaha UD-USB01 (2 pages) in the Keyboard category. This guide has been helpful for 18 people and has been rated 4.5 stars on average by 2 users
Page 1/2

取扱説明書
Owner’s Manual
EN
ZH
JA
UD-USB01
WQ69340
[持込修理用]ヤマハUSBオプションユニット保証書
この度はヤマハ USB オプションユニットをお買上げ頂きましてありがとうございました。本書は、下の保証規定により無料修理を行なうことをお約束
するものです。お買上げの日から下記期間中に、万一故障が発生した場合は、製品に本保証書を添えて、お買上げの販売店にご持参の上、修理を
ご依頼ください。
型番
お買上げ日
保証期間
UD-USB01
年 月 日
本体 お買上げの日から6ヶ月間
販売店名
修理申出先
(名称)
(住所)
(電話)
〒
-
ご住所
お名前
様
(TEL)
〒108
-
8568
東京都港区高輪
2
-
17
-
11
お客様へ
保証書に所定事項が記入されていない場合
は無効となりますので必ずお買上げ店にて
記入して頂いてください。
販売店様へお願い
保証書下にも貴店住所・店名をご記入頂き、
お客様にお渡しください。
保証期間中、万一品質及び製造上の不備による故障が発生した場合
には、無料修理いたします。
保証書のご使用法
○
保証期間内に万一本製品が故障した場合には、お買上げの販売店
(修理申出先)にご依頼の上、修理に際して本書をご提出ください。
保証期間中でも次の場合は有料修理となります
○取り扱い不適当による故障あるいは損傷の場合。
○故障の原因が本製品以外の機器あるいは他の要因(アンテナ、
電波、設置場所)により正常な動作をしない場合。
○弊社関係のサービスマン以外の方が修理・改造された部分で、
その修理改造が不適当であった場合。
○部品の消耗、取扱いミスによる損傷の場合。
○火災・地震・水害・落雷、その他の天災及び公害や電圧異常による
故障、損傷の場合。
○鼠害、塩害等で修理不能部が生じた場合。
○一般家庭用以外に使用された場合の故障、損傷、消耗部品を交換
する場合。
○塗装面及び金属面が経年変化により退色、変色した場合。
○本書にお買上げ日、お客様名、販売店名の記入のない場合。
○本書のない場合。また、ご提示のない場合。
転居の場合等
○転居、ご贈答品等で本書に記載してあるお買い上げ販売店(修理
申出先)に修理をご依頼できない場合には、ヤマハ修理ご相談セン
ターにお問い合わせください。
○本書は日本国内においてのみ有効です。
ThiswarrantyisvalidonlywithinJapan.
○保証期間の6ヶ月を過ぎても、サービスは有料にて責任を持って
実施させていただきます。
○本書は再発行いたしませんので大切に保管してください。
* この保証書は本書に明示した期間、条件のもとにおいて無料修理をお約束
するものです。従って本書によってお客様の法律上の権利を制限するもの
ではありませんので、保証期間経過後の修理等についてご不明の場合は、
お買上げの販売店もしくはヤマハ修理ご相談センターにご相談ください。
* 保証期間経過後の修理、補修用性能部品の保有期間については、エレク
トーンの取扱説明書をご覧ください。
◆修理に関するお問い合わせ
ヤマハ修理ご相談センター
上記番号でつながらない場合はTEL053-460-4830
受付時間 月曜日〜金曜日9:00〜18:00
土曜日9:00〜17:00
(祝日およびセンター指定休日を除く)
FAX東日本(北海道/東北/関東/甲信越/東海)
03-5762-2125
西日本(沖縄/九州/中国/四国/近畿/北陸)
06-6465-0367
◆修理品お持込み窓口
受付時間 月曜日〜金曜日9:00〜17:45
(祝日および弊社休業日を除く)
*お電話は、ヤマハ修理ご相談センターでお受けします。
東日本サービスセンター
〒143-0006東京都大田区平和島2丁目1-1
京浜トラックターミナル内14号棟A-5F
FAX03-5762-2125
西日本サービスセンター
〒554-0024大阪市此花区島屋 6 丁目 2-82
ユニバーサル・シティ和幸ビル 9F
FAX06-6465-0374
*名称、住所、電話番号などは変更になる場合があります。
ヤマハ株式会社
〒430-8650静岡県浜松市中区中沢町10-1
*都合により、住所、電話番号、名称、営業時間などが変更になる場合がござい
ますので、あらかじめご了承ください。
付属品
●取扱説明書(本書) ●取り付けネジ* 4本 ●コードクランプ*
*取り付けネジ、コードクランプは、UD-USB01をエレクトーンに取り付ける場合に使用します。
取り付け方法については、本書裏面をご参照ください。
仕様
寸法 212(W)x132(D)x30(H)mm(USBケーブルを含まず)
質量 0.3kg
接続端子 USBTODEVICE端子
C.S.G., DMI Development Division
© 2008-2014 Yamaha Corporation
Published 01/2014
改版
MWTO-B0
安全上のご注意
UD-USB01のご使用の前に、必ずエレクトーンの取扱説明書の「安全上のご注意」と「USBTODEVICE 端子ご使用上の注意」をお読み
ください。
エレクトーン ELS-01/01C/01X への取り付けについて
本ユニットは、取り付けネジを使用してエレクトーンの鍵盤の下側に取り付けます。取り付けには、+( プラス ) のドライバーが必要です。
ご用意ください。
注意
ドライバーは、ネジ頭のサイズと合うものをお使いください。サイズの合わないドライバーで無理な力を加えると、ネジ頭の十字溝がつぶ
れてしまうことがあります。
本ユニット単独でエレクトーンに取り付ける場合と、本ユニットとフロッピーディスクドライブ UD-FD01 を一緒に取り付ける場合とで、取り
付け方法が異なります。詳しくは裏面の手順をご覧ください。
USB Option Unit
USBオプションユニット
USB
ܯՌঐѝ
࣐҄ރЯ
Included items
Owner’s Manual
Screws (4 mm x 10 mm) x 4
Cord clamp
The screws are used for installing the UD-USB01 to the Electone.
The cord clamp is only for Japanese users.
For installation instructions, see the back of this document.
Installing this unit to the ELS-01/01C/01X
The UD-USB01 can be installed to the bottom of the ELS series Electone by using four screws. You’ll also need a Phillips
head (+) screwdriver.
CAUTION
Make sure that the screwdriver head snugly fits the slots of the screw head. In particular, avoid applying excessive force
with an ill-fitting screw driver; doing so may strip the slots and damage the screws.
This Owner’s Manual describes two methods of installation to the Electone: installing only this unit, and installing both this
unit and the UD-FD01 floppy disk drive. For installation instructions, see the back of this document.
Precautions
Before using the UD-USB01, be sure to read the “Precautions” and “Precautions when using the USB TO DEVICE terminal”
sections in the Owner’s Manual of your Electone.
Specifications
Dimensions: 212 (W) x 132 (D) x 30 (H) mm (Excluding the USB cable)
Weight: 0.3 kg
Connector: USB TO DEVICE terminal
ԔӃࣩࢢռ
ֵ⭞䈪᱄Ҝ
㷰ѓ (4 mm x 10 mm) x 4
⭫Ⓠ㓵രᇐಞ
䘏ӑ㷰ѓ⭞ᶛሼUD-USB01ᆿ㻻ࡦElectoneрȾ
⭫Ⓠ㓵രᇐಞӻבᰛᵢ⭞ᡭֵ⭞Ⱦ
ᆿ㻻䈪᱄䈭৸㿷ᵢᮽԬ㜂䶘Ⱦ
ذޯ،ӰELS-01/01C
UD-USB01 ֵ⭞仍㷰ѓᆿ㻻ࡦELS ㌱ࡍ Electone Ⲻᓋ䜞Ⱦཌθ䘎䴶㾷жᣀᆍδηε㷰ѓ࠶Ⱦ
سڵ
⺤䇚㷰ѓ࠶࠶ཪᚦླ༺ӄ㷰ѓཪ″ѣȾ⢯ࡡ㾷⌞ᝅθֵ⭞ᆿ㻻уᖉⲺ㷰ѓ࠶ᰬу㾷⭞࣑䗽ཝχࡏθ″㜳Ր㻡ࡤඅᒬ
ъ㜳Րᦕඅ㷰ѓȾ
ᵢֵ⭞䈪᱄Ҝԁ㔃Ҽњ〃ᆿ㻻ElectoneⲺᯯ⌋φӻᆿ㻻ᵢᵰθԛᰬᆿ㻻ᵢᵰૂUD-FD01䖥ⴎ傧ࣞಞȾ ᆿ㻻䈪᱄䈭৸㿷ᵢ
ᮽԬ㜂䶘Ⱦ
ࡉڿж
ֵ⭞ UD-USB01 ҁࢃθ䈭ࣗᗻ䰻䈱 Electone ֵ⭞䈪᱄ҜѣⲺ “ ⌞ᝅӁ亯 ” ૂ “ ֵ⭞ USB TO DEVICE ㄥᰬⲺ⌞ᝅӁ亯 ”
䜞࠼Ⱦ
ߡ
ተሮφ 212 δᇳε x 132 δε x 30 δ儎ε mm δуᤢ USB ⭫㔼ε
䠃䠅φ 0.3 kg
φ USB TO DEVICEㄥ
※
全国どこからでも市内通話料金でおかけいただけます。
0570
-
012
-
808
ナビダイヤル
(全国共通番号)
※
全国どこからでも市内通話料金でおかけいただけます。
0570
-
005
-
808
ナビ
ダイヤル
お客様コミュニケーションセンター
エレクトーン・D-DECK ご相談窓口
上記番号でつながらない場合はTEL053-460-4836
営業時間: 月曜日〜金曜日 10:00〜18:00
土曜日 10:00〜17:00
(祝日およびセンター指定休日を除く)
http://jp.yamaha.com/support/
For details of products, please contact your nearest Yamaha representative or the authorized distributor listed below.
ީӄӝⲺ䈜㓼ؗᚥθ䈭ቧ䘇ⲺYamahaԙ⨼ᡌсࡍ㔅䬶䈘䰤Ⱦ
A
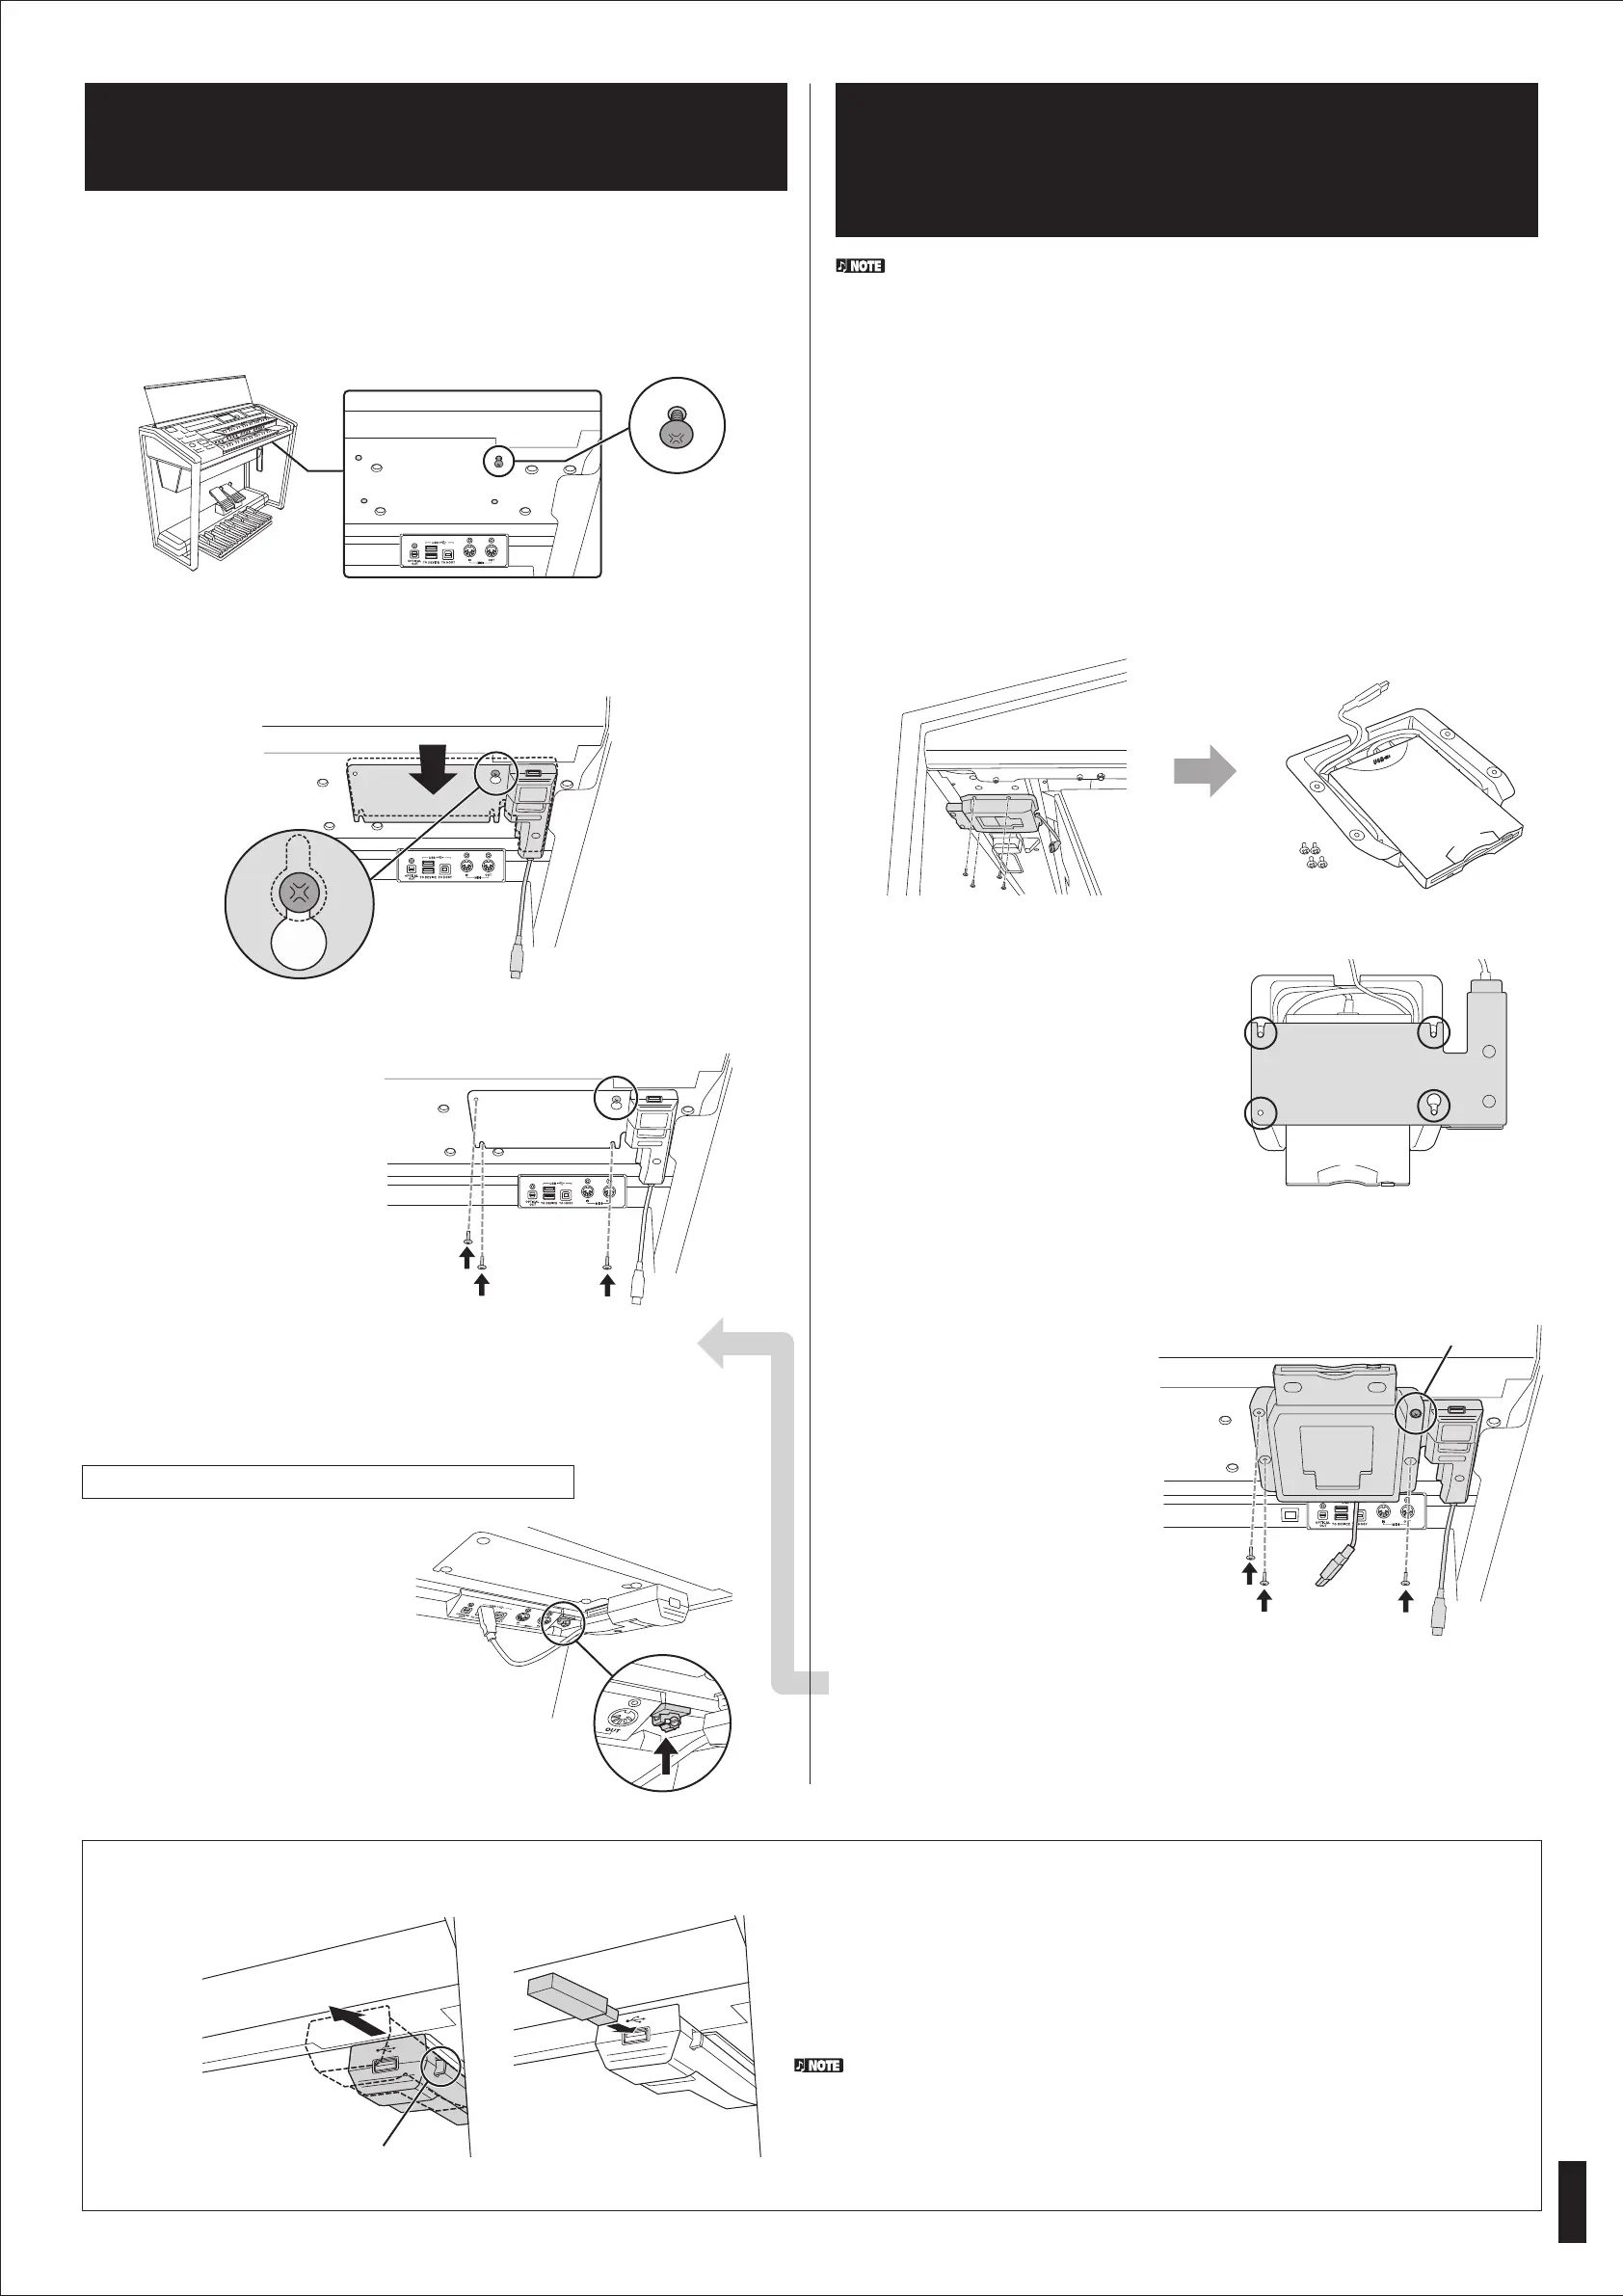
取り付け方法1
:本ユニットを単体で取り付ける
Method 1: Installing only this unit to the Electone
ݱࡄ
1
͵эذޯ،Ӱ
Electone
エレクトーンの鍵盤右下にあるネジ穴に、取り付けネジを1本軽く締めます。
1
Insert but do not fully tighten one of the screws to the right front
screw hole under the Electone.
ذ▁梂夊БܷҴӰ
Electone
ЇࣩӸݱ夊БѷЈ؎ҵ㝠澞
本ユニットの穴Aを、手順1で締めたネジに引っ掛けます。
Hook this unit (with hole A, shown below) onto the installed screw.
2
ذޯױЇےࣩ
A
ܖӰ،ࣩ夊БІ澞
3
ܷҴٶӢ֠ؓӽѾࣩЅ梂
夊Б澞
դࢡ֠㝠ےޥ֙梂夊
Б澞
ほかの3つのネジも軽く締めます。
締め終わったら、4本すべてのネジをしっかり固定します。
Insert and partially fix
the remaining three
screws. Then, firmly
tighten all four screws.
USBケーブルをエレクトーン本体のUSBTODEVICE端子に挿します。
Connect the USB cable to the USB TO DEVICE terminal.
4
ذ
USB
ࣔধܯ২
USB TO DEVICE
Ռ澞
For Japanese users only
э҇ݺޯ࣐ې
5
コードクランプをMIDI端子の右側
に取り付けます。
コードクランプは、エレクトーンの分
解の際に使用します。
分解の際は本ユニットのUSBケーブル
を抜き、コードクランプにはさみます。
キーボードユニットを外したときに
ケーブルが破損するのを防ぐため、確実
にコードクランプにはさんでください。
USB機器の接続/ Connecting USB storage devices
ܯ
USB
Ҥה
ボタンを押しながら、手前にスライドさせる
While holding this button, pull the unit toward you.
按住该按钮,朝外将本装置拉出。
ሼUSBᆎ۞䇴༽䘔ࡦUSB TO DEVICEᰬθ⺤䇚䇴༽рѰ䘸⭞Ⲻཪᒬъ➝↙⺤ᯯ䘔Ⱦ
USBTODEVICE端子の形状に合うプラグを上下の向きに注意して差し込んでください。
When connecting a USB storage device to the USB TO DEVICE, make sure that the connector
on the device is appropriate and that it is connected in the proper direction.
൞╊྅䗽ぁѣθ䈭ࣗᗻ┇ࣞ䭤ⴎсⲺ
USB
ঋݹȾྸሼެؓᤷ൞ࢃⲺփ㖤θࡏ㜳Ր⻦ࡦᛞⲺᢁᒬᦕඅ
USB
䇴༽Ⱦ
演奏中は、USB機器を奥へスライドさせておいてください。手前に引き出したままだと、手などがぶつかってけが
をしたり、USB機器が破損するおそれがあります。
During your performance, make sure to slide the USB unit under the keyboard. If you leave it in the
forward position, there is a danger of hitting it with your hand and breaking the USB device.
4
Follow step 4 in Method 1.
ଇݱࡄ
1
ࣩࠖற
4
澞
このあとの手順は取り付け方法1と同じです。取り付け方法1の手順4へ進んで
ください。
Temporarily install these
two units together with
screw A.
Insert and partially fix the
remaining three screws.
Then, firmly tighten all four
screws.
3
ほかの3つのネジも軽く締めます。締め終わったら、4本すべてのネジをしっかり固定します。
࣐夊Б
A
ޗݿذГী،Ӱ▁ફ澞
ᨈޛᒬ䜞࠼രᇐ࢟֏Ⲻп仍㷰ѓȾ❬
θ⢘രᤝ㍝ᡶᴿ仍㷰ѓȾ
フロッピーディスクと本ユニットを重ねた状態で、手前右側のネジAを軽く締め、
エレクトーンに固定します。
2
フロッピーディスクドライブの上に、本ユニットを重ねます。
4か所の穴が重なるようにします。
ױ֢ےذޯݚ֧ࣶԇࣩ֗
Іݱ澞
❬θሼњ㘻ⲺѠᆊሯ喆Ⱦ
Then, align the four holes of
these two units.
Put this unit on top of the
floppy disk drive as shown.
1
ё
Electone
ԲЇࣶԇ֗ױ߈ٜ،ࣶԇ֗澞ܘ
Electone
࣐҄ރЯЗ
،ރࣩࣼՅஎٽԮՔذࣶԇ֗۽Բ澞
Remove the floppy disk drive from the Electone (if the floppy disk drive
has already been installed.) The floppy disk drive can be removed by
reversing the order of the installation instructions described in the
Owner’s Manual of the Electone.
すでにフロッピーディスクドライブがエレクトーンに取り付けられている場合は、
エレクトーンの取扱説明書の手順を参照して(取り付けと逆の手順で)、フロッピー
ディスクドライブを外します。
取り付け方法2
:フロッピーディスクドライブUD-FD01と一緒に
本ユニットを取り付ける
Method 2: Installing both this unit and the UD-FD01 floppy
disk drive to the Electone
ݱࡄ
2
͵բݿذޯո
UD-FD01
ࣶԇ֗،Ӱ
Electone
䘏〃ᯯ⌋у䴶㾷ֵ⭞Ա䱺ᑜⲺ㷰ѓȾ
ᵢᵰૂ䖥ⴎ傧ࣞಞൽֵ⭞䖥ⴎ傧ࣞಞⲺ㷰ѓᆿ㻻Ⱦ
None of the included screws are necessary in this method.
Both this unit and the floppy disk drive are installed by using the screws for the floppy disk drive.
本ユニットに付属のネジは使用しません。
フロッピーディスクドライブの取り付けネジを使用して、本ユニットとフロッピーディスクを一緒に取り付けます。
A
EN
ZH
JA
Product Specifications
| Brand: | Yamaha |
| Category: | Keyboard |
| Model: | UD-USB01 |
Do you need help?
If you need help with Yamaha UD-USB01, ask a question below and other users will answer you
Keyboard Yamaha User Manuals

15 October 2024
15 October 2024
15 October 2024
15 October 2024
15 October 2024
15 October 2024
Keyboard User Manuals
- Keyboard Xiaomi
- Keyboard Casio
- Keyboard HP
- Keyboard Panasonic
- Keyboard Vorago
- Keyboard Krom
- Keyboard Kogan
- Keyboard GoGEN
- Keyboard Urban Factory
- Keyboard Trust
- Keyboard Goldtouch
- Keyboard Asus
- Keyboard Gembird
- Keyboard Woxter
- Keyboard Lenovo
- Keyboard Sharkoon
- Keyboard RGV
- Keyboard Gamdias
- Keyboard CSL
- Keyboard Elgato
- Keyboard Genesis
- Keyboard Logilink
- Keyboard V7
- Keyboard Goodis
- Keyboard Speed-Link
- Keyboard Sven
- Keyboard EVOLVEO
- Keyboard Xtrfy
- Keyboard Ducky
- Keyboard Xtech
- Keyboard Mad Dog
- Keyboard Korg
- Keyboard Voxicon
- Keyboard UNYKAch
- Keyboard Carlsbro
- Keyboard Accuratus
- Keyboard Gamesir
- Keyboard NGS
- Keyboard Havis
- Keyboard Kurzweil
- Keyboard HyperX
- Keyboard Keychron
- Keyboard Rapoo
- Keyboard Savio
- Keyboard Erica Synths
- Keyboard Xcellon
- Keyboard IQUNIX
- Keyboard On-Stage
- Keyboard Kawai
- Keyboard Redragon
- Keyboard Hammond
- Keyboard Polyend
- Keyboard Tiptop Audio
- Keyboard Man & Machine
- Keyboard Acme Made
- Keyboard Deltaco
Latest Keyboard User Manuals
27 October 2024
27 October 2024

26 October 2024
26 October 2024
26 October 2024
26 October 2024
26 October 2024
26 October 2024
26 October 2024
26 October 2024