Extron OCS 100W Manual
Extron
Motion detector
OCS 100W
Read below 📖 the manual in Italian for Extron OCS 100W (6 pages) in the Motion detector category. This guide has been helpful for 19 people and has been rated 4.5 stars on average by 2 users
Page 1/6
1
IMPORTANT:
IMPORTANT:
Go to www.extron.com for the
complete user guide, installation
instructions, and specifications.
Occupancy Sensor OCS 100W • Setup Guide
The OCS 100W is a dual technology occupancy sensor that can be used to automate meeting and presentation spaces when
used with Extron control products. The OCS is equipped with ultrasonic (US), infrared (PIR), and photocell sensors that can be
used together to report ambient light conditions and room occupancy. Sensors can be wired directly to Extron controller products
equipped with Digital I/Os ports or via eBUS, when using optional eBUS interface accessories.
The OCS requires 24 VDC for operation. If local 24 V power is not available, use the included 12 V to 24 V, USB 5 V to 24 V power
converter.
NOTE: The OCS 100W is designed to detect occupancy using both the PIR and US sensors with their default settings to
avoid false detections.
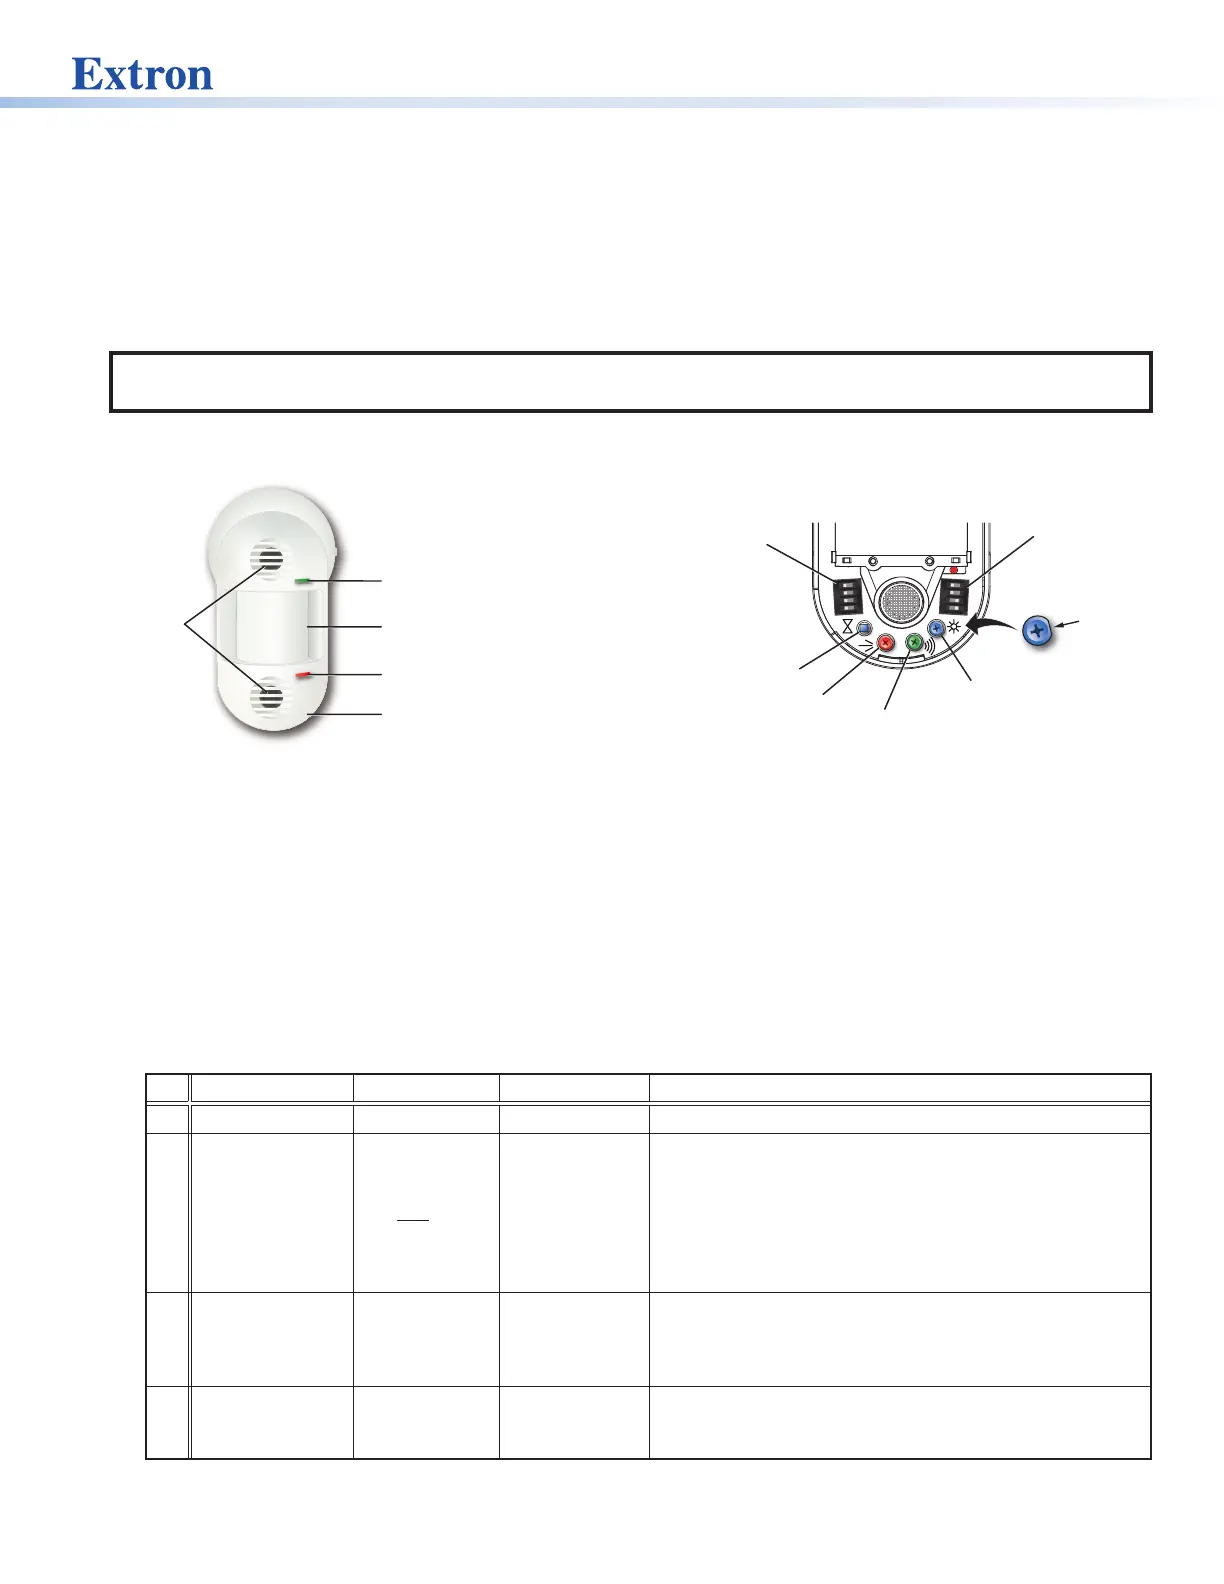
Front Panel Features and Control
AB
1
2
3
4
1
2
3
4
Blue Timer Test Button
Ultrasonic
Sensors
Infrared/Photocell
Sensor and Lens
Removable Front Cover
DIP Switches (B)
DIP Switches (A)
Ultrasonic (US) Green LED
(status indicator)
Infrared (PIR) Red LED
(status indicator)
Blue Photocell
Sensitivity Dial
Green Ultrasonic
Sensitivity Dial
Red Infrared
Sensitivity Dial
Notch
Figure 1. OCS 100W Front Panel Features Figure 2. OCS 100W Controls
• Ultrasonic Sensors (2) — Detect movement in the room, based on ultrasonic sound waves. The US sensor emits ultrasonic
sound waves into an area and measures the speed of their return to detect the presence of people. Frequency changes are
caused by the movement of people, which is detected by the US waves.
• Ultrasonic (US) Green LED status indicator — Flashes when the ultrasonic sensors detect occupancy.
• Infrared/Photocell Sensor and Fresnel Lens —
• The Fresnel lens diffracts the incoming light and directs the light to the infrared sensor behind it.
• The Infrared (PIR) sensor detects the presence of people based on the difference between the heat generated by moving
people versus the ambient room temperature.
• Infrared (PIR) Red LED status indicator — Flashes when the infrared sensor detects occupancy.
• Removable Front Cover — Conceals all controls and DIP switches.
• DIP Switches (A) —
A Switch Function OFF ON Note
1 Not used *Not used Not used Switch is not used.
2 Occupancy
detection
behavior - Dual
Technology Mode
*Mutually
exclusive
(requires both
PIR and US
detection)
Independent
(either PIR or
US detection)
If A2 is set to OFF, both the PIR and US sensors must
be triggered (simultaneously) before the OCS reports
an occupancy signal. If A2 is set to ON, the OCS reports
occupancy based on only one of the sensors being
triggered. When only one sensor is desired, set A2 to ON
and adjust the dials accordingly. If A2 is ON, false detection
when the room is not occupied increases.
3 Sensor status
indicators
*LEDs enabled LEDs disabled
Setting A3 to OFF provides a visual notication whenever
the PIR or US sensors are triggered. When the visual LED
indicators are a distraction or you want to disable the
ashing LEDs, A3 should be set to ON.
4 Automatic adjust
reset
*Retain
learned sensor
adjustments
Erase all learned
settings (toggle
ON, then OFF)
Only applicable when Timer (B3) or Sensitivity adjust (B4) or
both are set to Automatic mode (OFF). Toggling A4 ON then
OFF will reset any stored learned adjustments.
*Default and recommended settings
1
2

2
Occupancy Sensor OCS 100W • Setup Guide (Continued)
• DIP Switches (B) — (see figure2 on the previous page)
B Switch Function Settings Note
1 Timer Setting
(B1 and B2
switches must be
set together)
*8 minutes:
OFF
4 minutes:
OFF
15 minutes:
ON
30 minutes:
ON
In manual mode only (B3 set to ON), set
the amount of time before the sensor
triggers OFF when there is no occupancy
detected. In automatic mode (B3 set to
OFF) the timer settings are ignored.
2 *OFF ON OFF ON
B Switch Function OFF ON
3 Timer adjust Automatic *Manual Applies to the Timer (blue), Infrared
sensitivity (red), and Ultrasonic sensitivity
(green) adjustment dials.
• Setting to Manual mode allows for
more predicted behavior and is better
suited for automating AV applications.
• Setting to Automatic mode allows the
sensor to learn over time the ideal
timer and sensitivity adjustments for
the space and usage trends. This is
better suited for automating lighting
applications.
• All adjustment dials are disabled
when set to Automatic (OFF).
4 Sensitivity adjust Automatic *Manual
*Default and recommended
NOTE: B3 must be set to ON for Manual mode, in order to adjust the timer switches manually. B4 must be set to ON for
Manual mode, in order to adjust the infrared sensitivity and US sensitivity dials manually.
• Timer Setting (B1 and B2) — The occupancy sensor has a built-in timer feature. In Manual mode (B3 set to ON), set the
B1 and B2 DIP Switches together, as shown in the table above, to set the amount of time before the sensor triggers OFF.
When the sensor detects motion, it instantly triggers ON.
Once occupancy is no longer detected, the timer begins. If no motion is detected and the timer expires, then the sensor
triggers OFF.
NOTE: If it takes too long for the OCS to turn off when the room is unoccupied, adjust the timer to 8 or 4 minutes
and extend the timer via the configuration of the connected control processor. This setup reduces false detection.
• Blue Timer Test Button —
• To enable an 8 second timer test mode, push the blue button once. The test mode lasts for 1 hour, and then
automatically resets to the dip switch settings.
• To cancel the 8 second test mode, push and hold the blue button until the red LED ashes, returning the OCS to the
settings dened by the dip switches.
• Red Infrared Sensitivity Dial — Adjust this dial to increase or decrease infrared sensitivity.
• Turn counter-clockwise (CCW) to decrease sensitivity. Major movements are needed to detect occupancy.
• Turn clockwise (CW) to increase sensitivity. Minor movements are detected as occupancy.
• The factory default setting is at 75%.
• Green Ultrasonic Sensitivity Dial — Adjust this dial to increase or decrease ultrasonic sensitivity.
• Turn counterclockwise (CCW) to decrease sensitivity. Major movements are needed to detect occupancy.
• Turn clockwise (CW) to increase sensitivity. Minor movements are detected as occupancy.
• The factory default setting is at 100%.
• Blue Photocell Sensitivity Dial — Photocell prevents the sensor from triggering on when the area is adequately lit with
natural light and when motion is detected. The sensor must be mounted directly over an area that is representative of the
average, natural room lighting. Before setting the photocell control, wait until the natural light is brightest (optional). Adjust
this dial to increase or decrease photocell sensitivity.
• Turn counterclockwise to decrease photocell sensitivity, causing it to activate with less light.
• Turn clockwise to increase photocell sensitivity, requiring brighter light to activate the sensor.
• Factory default is 100% (full clockwise) — Photocell sensor is disabled.
• Range — 10 to 1000 lux

3
Recommended Setup
Ultrasonic (US) Green LED
(status indicator)
Infrared (PIR) Red LED
(status indicator)
AB
1
2
3
4
1
2
3
4
Blue Timer Test Button
DIP Switches (B)
DIP Switches (A)
Blue Photocell
Sensitivity Dial
Green Ultrasonic
Sensitivity Dial
Red Infrared
Sensitivity Dial
Notch
Figure 3. OCS 100W Front Panel Features and Controls
With the OCS in the default or recommended settings (A2 OFF), the OCS requires both the IR sensor AND the US sensor to
detect occupancy to turn ON. Only one sensor (PIR or US) needs to trigger to reset the timer for the OCS to remain ON while the
room is still occupied. When the OCS is in the OFF state, no occupancy is detected.
Follow these steps to set up the OCS to detect occupancy with minimal false detection:
NOTE: We recommend using the OCS 100W in the default settings when beginning the setup or the test mode. If needed,
adjust slightly from the default sensitivity settings.
1. Keep all the DIP switches and rotary dials in the default positions.
2. Set the OCS in Test Mode.
3. Enter the room several times to verify if the IR detector is detecting movement (red LED ashes).
• If the red LED ashes when entering the room, the default red infrared sensitivity dial is set correctly.
• Verify the red LED ashes with movement throughout the room.
• Turn the red infrared sensitivity dial to decrease or increase IR sensitivity, until the red LED only ashes when entering the
room or making movements throughout the room.
• To avoid false detections when the room is unoccupied, do not make the sensor too sensitive.
4. Enter the room and verify if the US detector is detecting movement (green LED ashes).
• If the green LED ashes when entering the room, the default green ultrasonic range dial is set correctly. This sensor is
very sensitive.
• Verify the green LED ashes with movement throughout the room.
• Turn the green ultrasonic range dial to decrease or increase US sensitivity, until the green LED only ashes when entering
the room or making movements throughout the room.
• To avoid false detections when the room is unoccupied, do not make the sensor too sensitive.
5. Leave the room and close the door. Wait until the Digital output state, relay or red and green LEDs stay OFF. Wait several
minutes to ensure there are no false detections.
• If the door remains open, the US sensor may detect changes.
• If possible, wait longer, to conrm no IR or US change is registered.
6. Enter the room again to conrm the Digital output state, relay, red, or green LEDs turn ON.
NOTE: After going through these steps and verifying the OCS is set up to accommodate the room, do not adjust the DIP
switches or dials.
Automatic Mode
Out of the box, the OCS 100W can be set up in Automatic Mode, where no manual sensitivity adjustments are needed and
sensitivity learning and adjustments are made automatically. For simple setup, we recommend keeping the OCS in the default
settings and ipping the B4 Dip switch to the OFF (Auto) position. The OCS is ready to mount (see Installation on page5).
3
Product Specifications
| Brand: | Extron |
| Category: | Motion detector |
| Model: | OCS 100W |
Do you need help?
If you need help with Extron OCS 100W, ask a question below and other users will answer you
Motion detector Extron User Manuals

13 October 2024
Motion detector User Manuals
- Motion detector Schwaiger
- Motion detector Kogan
- Motion detector Busch-Jaeger
- Motion detector Maxsa
- Motion detector ORNO
- Motion detector V-Tac
- Motion detector Jung
- Motion detector ESYLUX
- Motion detector Satel
- Motion detector Inovonics
- Motion detector Theben
Latest Motion detector User Manuals
26 October 2024
26 October 2024
26 October 2024
22 October 2024
19 October 2024
15 October 2024
15 October 2024
15 October 2024
15 October 2024
14 October 2024