Stamos S-LK-3 Manual
Stamos
Soldering machine
S-LK-3
Read below 📖 the manual in Italian for Stamos S-LK-3 (16 pages) in the Soldering machine category. This guide has been helpful for 24 people and has been rated 4.5 stars on average by 2 users
Page 1/16
S-LK-1 | S-LK-2 | S-LK-3
w w w . S T A M O S - W E L D I N G . c o m
User manual | Manuel d´utilisation | Istruzioni per l‘uso | Manual de instrucciones
BEDIENUNGSANLEITUNG
emaks spółka z ograniczoną odpowiedzialnością sp.k. | Ul. Dekoracyjna 3 | 65-155 Zielona Góra | Nr. kom.: +48 506 06 05 74 | E-mail: info@emaks.pl
SICHERHEITSHINWEISE
Allgemeine Sicherheitshinweise bei der Benutzung von Elektrogeräten:
Um das Verletzungsrisiko durch Feuer oder Stromschlag zu minimieren, bitten wir Sie stets einige grundlegende
Sicherheitsvorkehrungen zu treffen, wenn Sie dieses Gerät verwenden. Bitte lesen Sie diese Bedienungsanleitung sorgfältig
und vergewissern Sie sich, dass keine Fragen offen bleiben. Bewahren Sie diese Betriebsanleitung bitte sorgfältig in der
Nähe des Produktes auf, um bei Fragen auch später noch einmal nachschlagen zu können. Verwenden Sie immer einen
geerdeten Stromanschluss mit der richtigen Netzspannung (siehe Anleitung oder Typenschild)! Falls Sie Zweifel haben, ob
der Anschluss geerdet ist, lassen Sie ihn durch einen qualizierten Fachmann überprüfen. Benutzen Sie niemals ein defektes
Stromkabel! Öffnen Sie dieses Gerät nicht in feuchter oder nasser Umgebung, genauso wenig mit nassen oder feuchten
Händen, außerdem sollten Sie das Gerät vor direkter Sonneneinstrahlung schützen. Betreiben Sie das Gerät immer an einem
geschützten Ort, sodass niemand auf Kabel treten, über sie fallen und/oder sie beschädigen kann. Sorgen Sie darüber hinaus
für ausreichende Luftzirkulation, wodurch Sie die Kühlung des Gerätes verbessern und gleichzeitig Wärmestaus vermeiden.
Ziehen Sie vor der Reinigung dieses Gerätes den Netzstecker und benutzen Sie zur Reinigung nur ein feuchtes Tuch.
Vermeiden Sie den Einsatz von Putzmitteln und achten Sie darauf, dass keine Flüssigkeit in das Gerät eindringt, bzw. darin
verbleibt.
Es ist dem Benutzer untersagt, das Gerät selbstständig zu öffnen und Teile im Inneren selbst zu warten. Überlassen Sie
Wartungs- und Reparaturarbeiten, sowie den Abgleich qualiziertem Fachpersonal. Im Falle eines Fremdeingriffs erlischt
die Gewährleistung!
VOR DER ERSTEN BENUTZUNG
Bei Erhalt der Ware, prüfen Sie zunächst die Verpackung auf Unversehrtheit. Wenn die Verpackung Beschädigungen
aufweist, so setzen Sie sich innerhalb von 3 Tagen mit der Transportgesellschaft und Ihrem Vertriebspartner in Verbindung.
Dokumentieren Sie dazu so gut wie möglich die Beschädigungen. Stellen Sie das volle Paket nicht verkehrt herum auf! Sollten
Sie das Paket weiter transportieren, achten Sie bitte darauf, dass es horizontal und stabil gehalten wird.
Entsorgung der Verpackung
Es wird darum gebeten, das Verpackungsmaterial (Pappe, Plastikbänder und Styropor) zu behalten, um das Gerät in
Servicefällen möglichst geschützt zurücksenden zu können!
TECHNISCHES DATENBLATT
Modell
S-LK-1 S-LK-2 S-LK-3
Ausgangsleistung (W) 75 60 75
Spannung (V) 26 AC 24 AC 26 AC
SICHERHEITSHINWEISE
1. Die Endstücke erst auswechseln, wenn der Kolben vollkommen erkaltet ist.
2. Es ist untersagt, das Gerät in der Nähe leicht entzündbarer Gase, Bestandteile oder vergleichbarer Substanzen
einzusetzen. Das Endstück des Kolbens hat eine sehr hohe Temperatur. Berühren ist untersagt, da Verbrennungen
eintreten können.
3. Eine zu hohe Arbeitstemperatur des Lötkolbens kann die Funktionsfähigkeit der Endstücke beeinträchtigen.
4. Die Lötspitze muss regelmäßig mithilfe eines Schwammes oder mit Flussmitteln gereinigt werden, um das Oxidieren
der Spitze zu vermeiden.
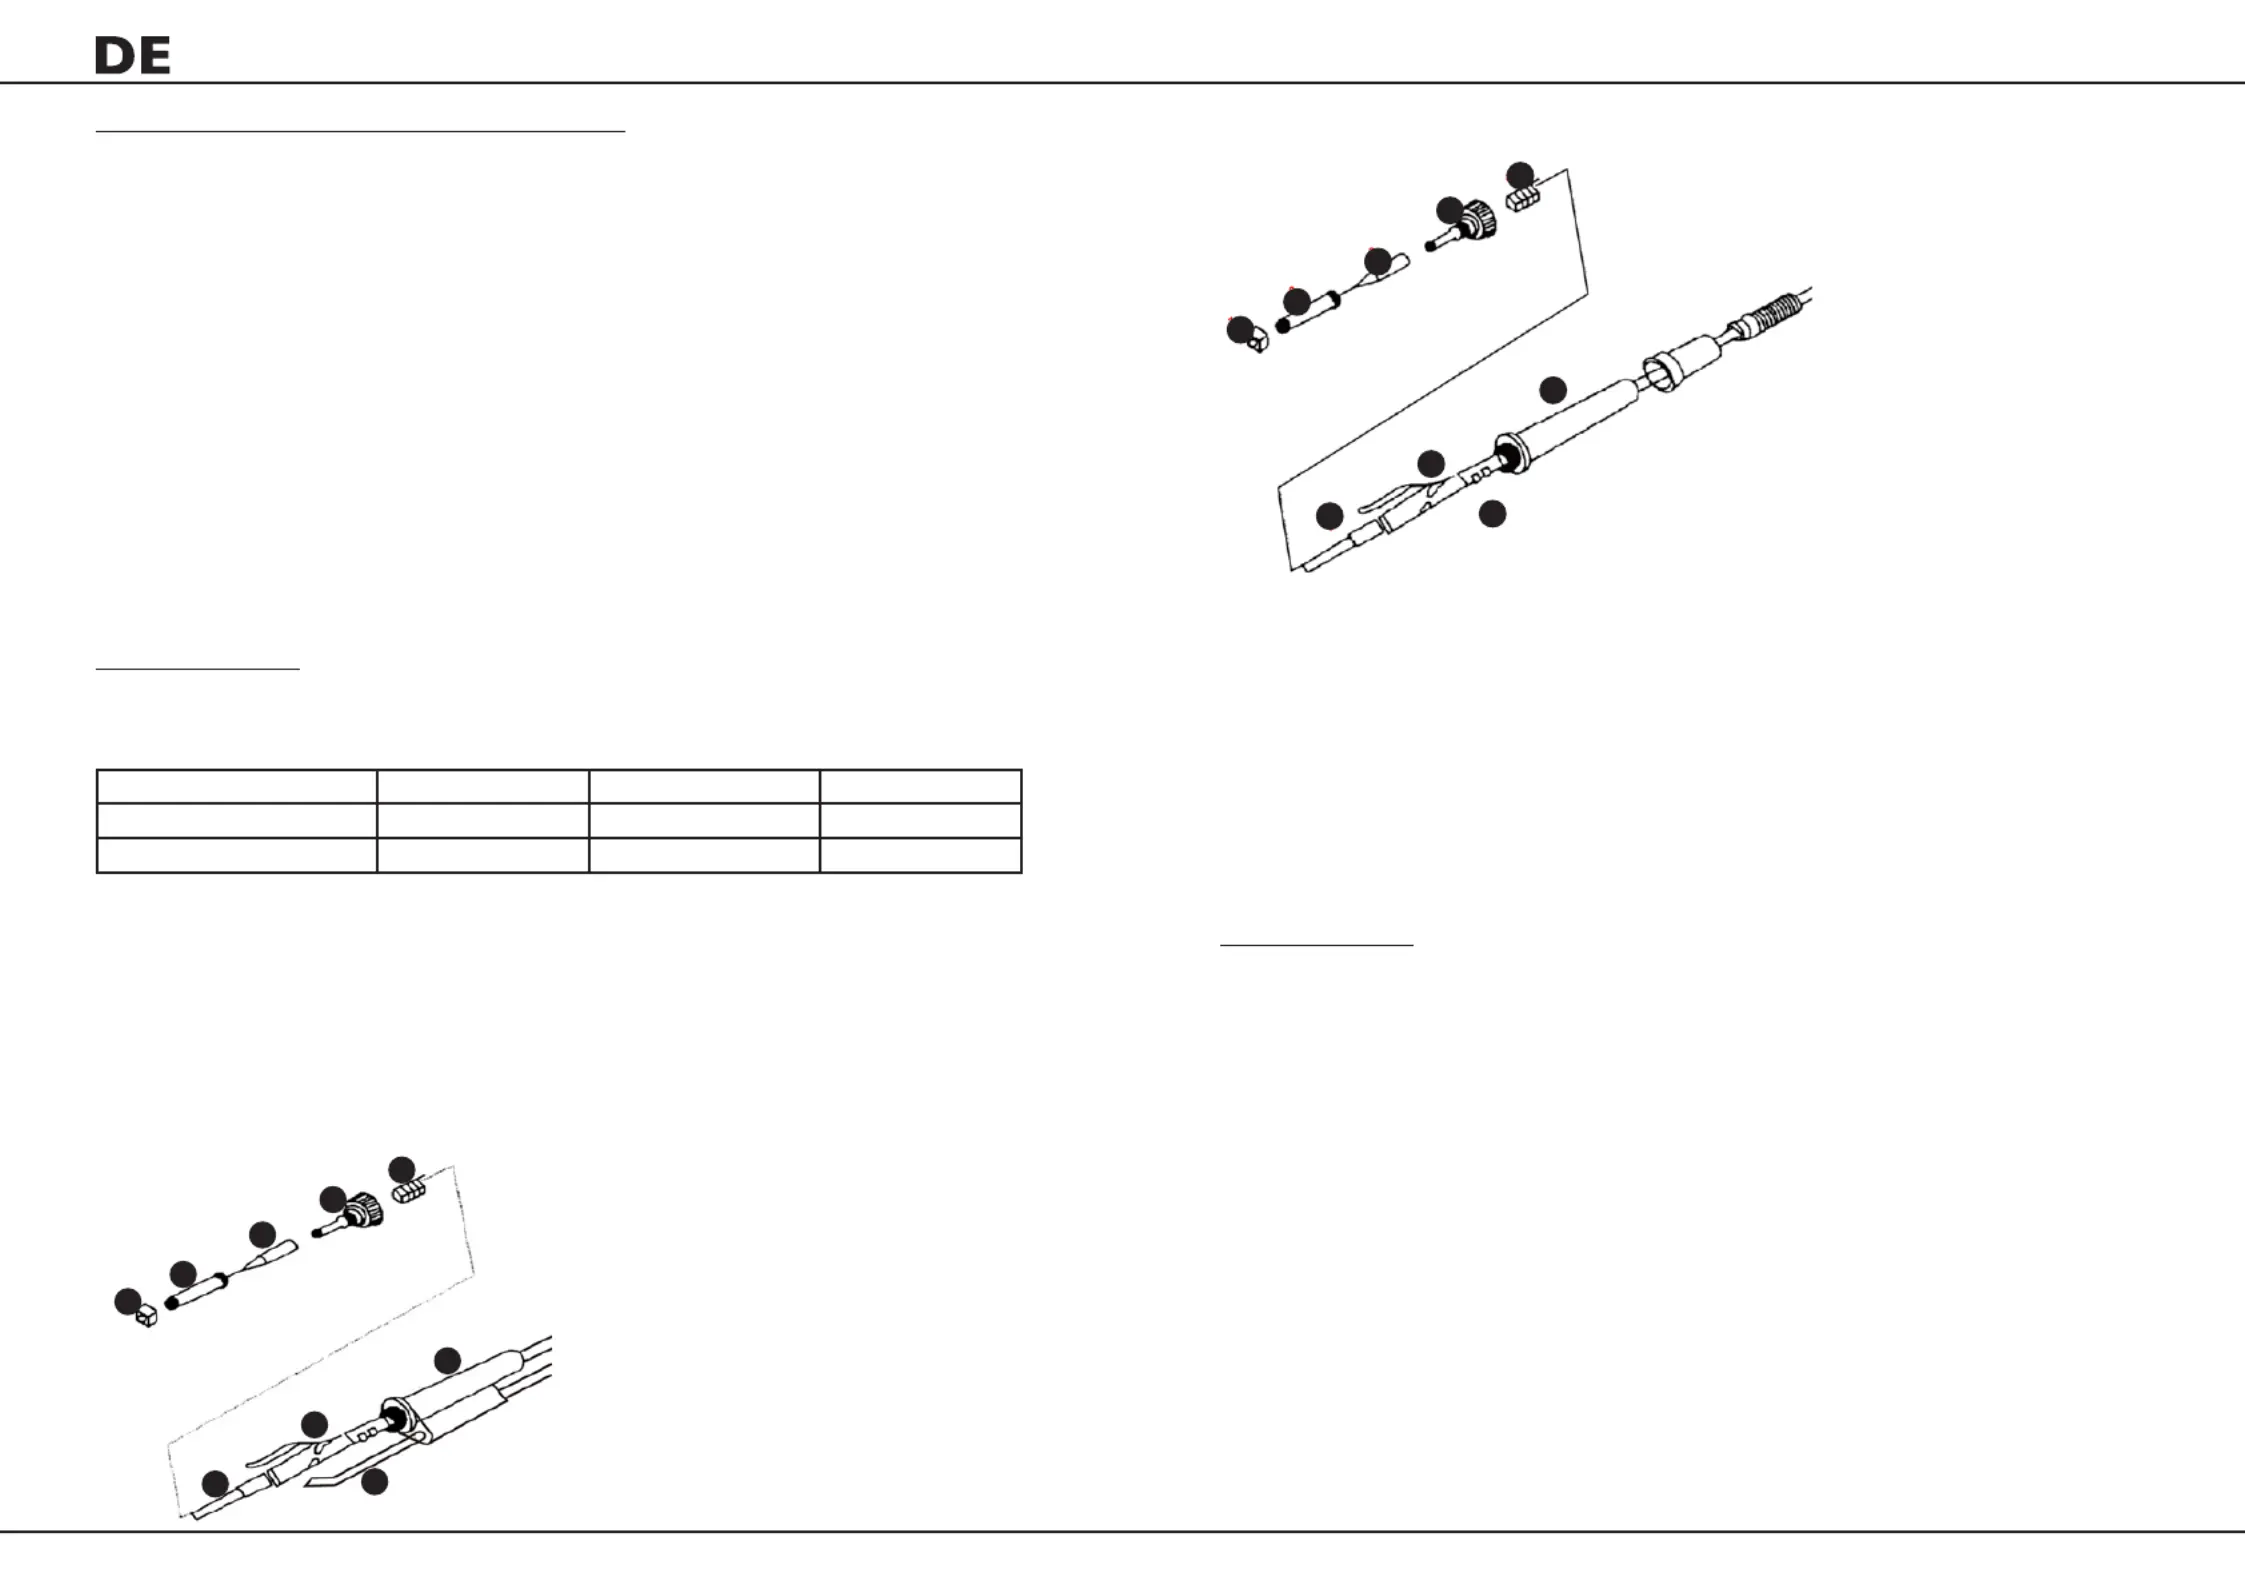
AUSTAUSCH DES HEIZELEMENTS UND DER LÖTKOLBENSPITZE – MODELL S-LK-1
3
2
1
4
5
6
7
8
9
1. Mutter zur Festigung der Lötspitze
2. Gehäuse der Lötspitze
3. Lötspitze
4. Mutter mit Heizplattenkabel
5. Feder
6. Heizelement
7. Platte mit Drähten
8. Handgriff
9. Conduite d‘aspiration des fumées
AUSTAUSCH DER LÖTSPITZE UND DES HEIZELEMENTES
STELLEN SIE SICHER, DASS DER LÖTKOLBEN VÖLLIG ERKALTET IST.
1. Austausch der Lötspitze: Entfernen Sie die Mutter, welche die Abdeckung der Lötspitze sichert. Entfernen Sie nun
die Abdeckung und ersetzen diese durch eine neue, dazu setzen Sie die neue Abdeckung auf und drehen die Mutter
wieder fest.
2. Austausch des Heizelementes: Schrauben Sie zunächst die Mutter ab, welche die Fassung der Lötspitze sichert, und
nehmen Sie anschließend die Fassung der Lötspitze heraus. Schrauben Sie die sichernde Fassung des Heizelements (4)
ab und nehmen Sie das Heizelement (6), sowie die Platte mit den Drähten vorsichtig heraus. Nun können Sie das neue
Heizelement einsetzten. Achten Sie dabei auf die Verbindung der Drähte.
3
2
1
4
5
6
7
8
9
1. Mutter zur Festigung der Lötspitze
2. Gehäuse der Lötspitze
3. Lötspitze
4. Mutter mit Heizplattenkabel
5. Feder
6. Heizelement
7. Platte mit Drähten
8. Handgriff
AUSTAUSCH DES HEIZELEMENTS UND DER LÖTKOLBENSPITZE - MODELLE S-LK-2, S-LK-3
STANDARDREINIGUNG
Allgemeine Anmerkungen
• Spritzen Sie niemals das Gerät ab. Es dürfen bei der Reinigung keinerlei Bürsten oder Utensilien benutzt werden,
welche die Geräteoberäche beschädigen können.
Bevor Sie anfangen zu reinigen, trennen Sie das Gerät von der Stromversorgung.
REGELMÄSSIGE PRÜFUNG DES GERÄTES
Prüfen Sie regelmäßig, ob Elemente des Gerätes Beschädigungen aufweisen. Sollte dies der Fall sein, darf das Gerät nicht
mehr benutzt werden. Wenden Sie sich umgehend an Ihren Verkäufer um Nachbesserungen vorzunehmen.
Was tun im Problemfall?
Kontaktieren Sie Ihren Verkäufer und bereiten Sie folgende Angaben vor:
• Rechnungs- und Seriennummer (letztere nden Sie auf dem Typenschild)
• Ggf. ein Foto des defekten Teils
• Ihr Servicemitarbeiter kann besser eingrenzen, worin das Problem besteht, wenn Sie es so präzise wie möglich
beschreiben. Formulierungen wie z.B. „das Gerät heizt nicht“ können missverständlich sein, und bedeuten, dass das
Gerät zu wenig oder eben gar nicht heizt. Dies sind aber zwei verschiedene Fehlerursachen!
• Geben Sie stets den Zustand der Leuchten an, da dies die Diagnose erleichtert. Je detaillierter Ihre Angaben sind,
umso schneller kann Ihnen geholfen werden!

3
2
1
4
5
6
7
8
9
1. nut for mounting the soldering iron tip housing
2. soldering iron tip housing
3. soldering iron tip
4. plastic nut for mounting the heater and the board
wires
5. spring
6. heater
7. wires board
8. handle
9. smoke absorber pipe
3
2
1
4
5
6
7
8
9
1. nut for mounting the soldering iron tip
housing
2. soldering iron tip housing
3. soldering iron tip
4. plastic nut for mounting the heater and
the board wires
5. spring
6. heater
7. wires board
8. handle
REPLACEMENT OF THE SOLDERING IRON TIP AND SOLDERING IRON HEATING CORE ELEMENT–
MODELS S-LK-2, S-LK-3:
CAUTIONS
General safety information for the use of electrical devices:
To avoid injury from re or electric shock, please ensure compliance with safety instructions when using this device. Please
read the instruction carefully and make sure that you have understood it well. Keep the manual near the equipment to
be able to read it at any time. Always use current sources connected to the ground and providing the necessary voltage
(indicated on the label on the device). If you have any doubt, let an electrician check that your outlet is properly grounded.
Never use a damaged power cable. Do not open the unit in damp or wet environment, or if your hands or clothes are
damp. Protect the unit from solar radiation. Use the device in a protected location to avoid damaging the equipment or
endangering others. Make sure the device is able to cool and avoid placing it too close to other devices that produce
heat. Before cleaning, disconnect it. Use a soft damp cloth for cleaning. Avoid using detergent and make sure that no liquid
enters the unit. No internal element of this device needs to be maintained by the user. An opening of the device without
our approval leads to a loss of warranty.
BEFORE FIRST USE
Upon receipt of the goods, check the packaging for integrity and open it. If the packaging is damaged, please contact your
transport company and distributor within 3 days, and document the damages as detailed as possible. Do not turn the
package upside down! When transporting the package, please ensure that it is kept horizontal and stable. Please keep
all packaging materials (cardboard, plastic tapes and styrofoam), so the device can be sent back to the service centre in
accurate condition in case of any problems.
Disposing of packaging
The various items used for packaging (cardboard, plastic straps, polyurethane foam) should be kept, so that the device can
be sent back to the service centre in the best condition in case of a problem!
TECHNICAL DETAILS
Model
S-LK-1 S-LK-2 S-LK-3
Output power (W) 75 60 75
Voltage (V) 26 AC 24 AC 26 AC
SAFETY ISSUES REMARKS
1. Tips may only be changed when the soldering iron is completely cold.
2. It is forbidden to use the device near ammable or combustible material and objects or in environments containing
such dangers. The tips reach very high temperatures, it is forbidden to touch these elements. This can cause serious
burns.
3. Soldering tip temperatures that are too high may cause functionality reduction of the soldering iron.
4. Soldering iron tip must be cleaned regularly using sponge and plate on a layer of tin to prevent tips oxidation.
REPLACEMENT OF THE SOLDERING IRON TIP AND SOLDERING IRON HEATING CORE
ELEMENT – MODEL S-LK-1:
BEFORE HEATER REPLACEMENT, MAKE SURE THAT THE SOLDERING IRON IS COMPLETELY
COLD!
1. SOLDERING IRON TIP REPLACEMENT: remove the nut for mounting the soldering iron tip housing and take off the
housing. Replace the tip with the new one, place the housing and x all with the plastic nut.
2. HEATER REPLACEMENT: remove the nut for mounting the soldering iron tip housing and take off the housing along
with the tip. Remove the nut for xing the heater (4) and gently remove the heater (6) along with the board with wires
(7). Replace the whole remembering the wires’ connection order.
REGULAR CLEANING
Generalities
• Never clean the device with a pressurized water-jet, industrial cleaners, and brushes or any other type of cleaning
utensil that could damage the surface of the appliance.
• Before cleaning you must remove the electricity supply plug isolating the appliance from the main power circuit.
REGULAR CONTROL OF THE DEVICE
Control regularly that the device doesn´t present any damage. If there is any damage, please stop using the device. Please
contact your customer service to solve the problem.
What to do in case of problem?
Please contact your customer service and prepare following information:
• Invoice number and serial number (the latest is to be found on the technical plate on the device).
• If relevant, a picture of the damaged, broken or defective part.
• It will be easier for your customer service clerk to determine the source of the problem if you give a detailed and
precise description of the matter. Avoid formulations like “the device doesn´t heat”, which may mean that it doesn´t
heat enough or even not at all. Though, those two possibilities have a different causation!
• The more detailed your information, the better the customer service will be able to answer your problem rapidly
and efciently!
Product Specifications
| Brand: | Stamos |
| Category: | Soldering machine |
| Model: | S-LK-3 |
Do you need help?
If you need help with Stamos S-LK-3, ask a question below and other users will answer you
Soldering machine Stamos User Manuals

15 October 2024
15 October 2024
15 October 2024
15 October 2024
15 October 2024
15 October 2024
15 October 2024
15 October 2024
15 October 2024
15 October 2024
Soldering machine User Manuals
- Soldering machine Toolcraft
- Soldering machine Ryobi
- Soldering machine RIDGID
- Soldering machine Silverline
- Soldering machine CFH
- Soldering machine Portasol
- Soldering machine Sievert
Latest Soldering machine User Manuals
26 October 2024
19 October 2024
17 October 2024
15 October 2024
14 October 2024
13 October 2024
13 October 2024
13 October 2024
13 October 2024
13 October 2024