Intellinet 561945 Manual
Intellinet
Switch
561945
Read below 📖 the manual in Italian for Intellinet 561945 (4 pages) in the Switch category. This guide has been helpful for 23 people and has been rated 4.5 stars on average by 2 users
Page 1/4
For additional benets:
or go to: register.intellinet-network.com/r/561945
Scan to
register your
product warranty
North & South America
IC Intracom Americas
550 Commerce Blvd.
Oldsmar, FL 34677, USA
Asia & Africa
IC Intracom Asia
4-F, No. 77, Sec. 1, Xintai 5th Rd.
Xizhi Dist., New Taipei City 221, Taiwan
Europe
IC Intracom Europe
Löhbacher Str. 7
D-58553 Halver, Germany
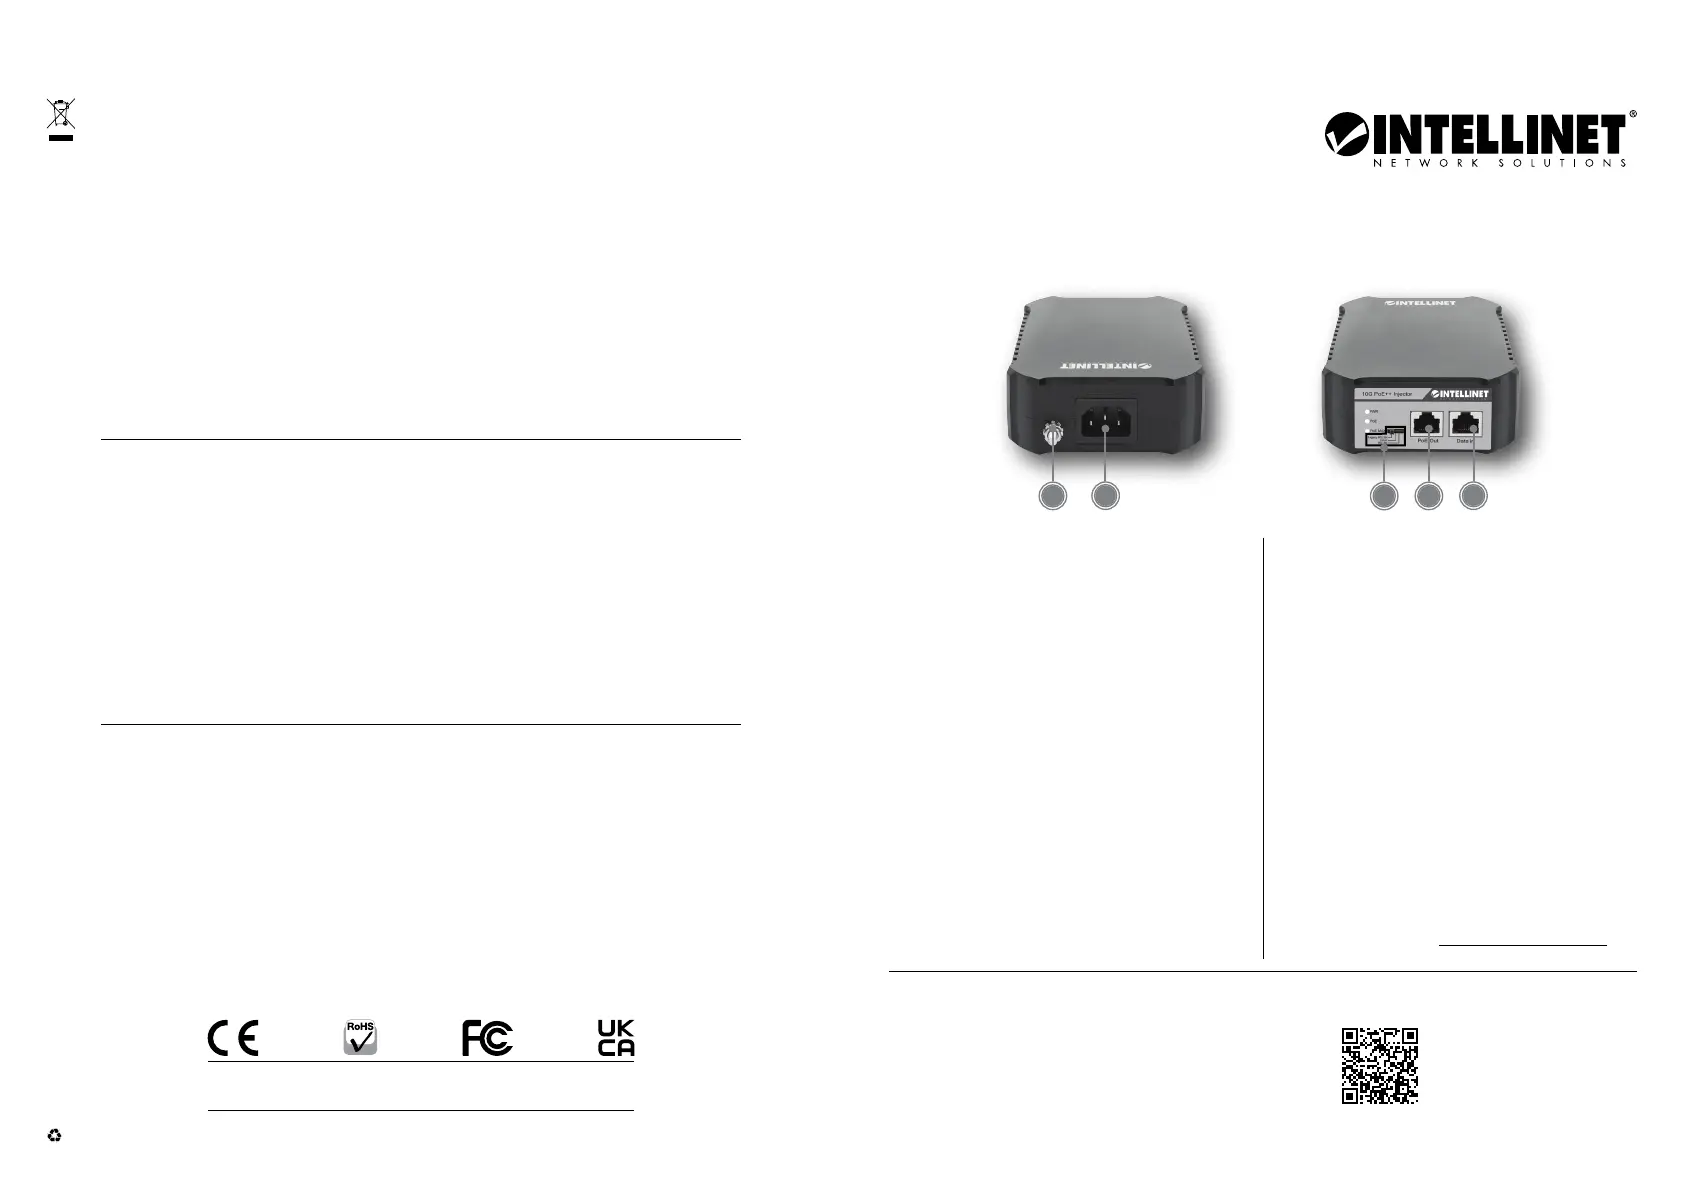
1
4 2
3
5
Placement
Place this injector on a clean, stable surface, or
mount it to a wall. For wall mounting, install
two screws into the wall at the distance of the
spaces on the back of the injector. Place the
injector over them and adjust until secure.
Setup
1 Wire the grounding terminal to an earth
grounding object to protect equipment
from external electrical surges.
2 Using Ethernet cable (Cat5e min.; Cat6
cables are required for 10G speeds),
connect a LAN port on your non-PoE
switch to the Data In port on the injector.
3 Using Ethernet cable (Cat5e min.; Cat6
cables are required for 10G speeds),
connect your Powered Device (PD;
IEEE 802.3bt/at/af compliant) to the
PoE Out port on the injector.
4 Use the included power cable to
connect the injector to an AC outlet.
5 Select the PoE standard of the connected
PD: 802.3bt (for fully compliant
802.3bt/at/af PDs); UPoE (for PDs that
support the maximum power from PSE
over four pairs, regardless of the PD class,
including Cisco Universal Power over
Ethernet); Legacy 802.3bt (for PDs not
in full compliance with 802.3bt/at/af).
NOTE: if unsure as to the standard you
require, it is safe to try each setting.
LEDs: A lit PWR LED means power is
being supplied to the injector. A lit PoE
LED means the connected PD is getting
power. A lit PoE Max LED means PoE
usage is at 80% of the maximum.
For specifications, visit intellinetnetwork.com.
INT_561945_QIG_0822_REV_5.11
All trademarks and trade names are the property of their respective owners. © IC Intracom. All rights reserved.
Intellinet Network Solutions is a trademark of IC Intracom, registered in the U.S. and other countries.
Printed on recycled paper.
Important: Read before use. • Importante: Leer antes de usar.
WASTE ELECTRICAL & ELECTRONIC EQUIPMENT
Disposal of Electric and Electronic Equipment (applicable in the E.U. and other countries with separate collection systems)
ENGLISH: This symbol on the product or its packaging means that this product
must not be treated as unsorted household waste. In accordance with EU
Directive 2012/19/EU on Waste Electrical and Electronic Equipment (WEEE),
this electrical product must be disposed of in accordance with the user’s
local regulations for electrical or electronic waste. Please dispose of this product
by returning it to your local point of sale or recycling pickup point in your
municipality.
DEUTSCH: Dieses auf dem Produkt oder der Verpackung angebrachte Symbol
zeigt an, dass dieses Produkt nicht mit dem Hausmüll entsorgtwerden darf. In
Übereinstimmung mit der Richtlinie 2012/19/EU des Europäischen Parlaments
und des Rates über Elektro- und Elektronik-Altgeräte (WEEE) darf dieses
Elektrogerät nicht im normalen Hausmüll oder dem Gelben Sack entsorgt
werden. Wenn Sie dieses Produkt entsorgen möchten, bringen Sie es bitte zur
Verkaufsstelle zurück oder zum Recycling-Sammelpunkt Ihrer Gemeinde.
ESPAÑOL: Este símbolo en el producto o su embalaje indica que el producto
no debe tratarse como residuo doméstico. De conformidad con la Directiva
2012/19/EU de la UE sobre residuos de aparatos eléctricos y electrónicos
(RAEE), este producto eléctrico no puede desecharse se con el resto de
residuos no clasificados. Deshágase de este producto devolviéndolo a su
punto de venta o a un punto de recolección municipal para su reciclaje.
FRANÇAIS: Ce symbole sur Ie produit ou son emballage signifie que ce
produit ne doit pas être traité comme un déchet ménager. Conformément
à la Directive 2012/19/EU sur les déchets d’équipements électriques et
électroniques (DEEE), ce produit électrique ne doit en aucun cas être
mis au rebut sous forme de déchet municipal non trié. Veuillez vous
débarrasser de ce produit en Ie renvoyant à son point de vente ou au point
de ramassage local dans votre municipalité, à des fins de recyclage.
POLSKI: Jeśli na produkcie lub jego opakowaniu umieszczono ten symbol,
wówczas w czasie utylizacji nie wolno wyrzucać tego produktu wraz z
odpadami komunalnymi. Zgodnie z Dyrektywą Nr 2012/19/EU w sprawie
zużytego sprzętu elektrycznego i elektronicznego (WEEE), niniejszego
produktu elektrycznego nie wolno usuwać jako nie posortowanego
odpadu komunalnego. Prosimy o usuniecie niniejszego produktu
poprzez jego zwrot do punktu zakupu lub oddanie do miejscowego
komunalnego punktu zbiórki odpadów przeznaczonych do recyklingu.
ITALIANO: Questo simbolo sui prodotto o sulla relativa confezione indica
che il prodotto non va trattato come un rifiuto domestico. In ottemperanza
alla Direttiva UE 2012/19/EU sui rifiuti di apparecchiature elettriche ed
elettroniche (RAEE), questa prodotto elettrico non deve essere smaltito come
rifiuto municipale misto. Si prega di smaltire il prodotto riportandolo al punto
vendita o al punto di raccolta municipale locale per un opportuno riciclaggio.
WARRANTY AT: | GARANTIE AUF: | GARANTÍA EN: | GARANTIE À : | GWARANCJA NA: | GARANZIA A:
intellinet-network.com
EN MÉXICO: Póliza de Garantía Intellinet Network Solutions — Datos del importador y responsable ante el consumidor IC Intracom México, S.A.P.I. de
C.V. • Av. Interceptor Poniente # 73, Col. Parque Industrial La Joya, Cuautitlán Izcalli, Estado de México, C.P. 54730, México. • Tel. (55)1500-4500 • La presente
garantía cubre los siguientes productos contra cualquier defecto de fabricación en sus materiales y mano de obra. A. Garantizamos los productos de limpieza,
aire comprimido y consumibles, por 60 dias a partir de la fecha de entrega, o por el tiempo en que se agote totalmente su contenido por su propia función
de uso, lo que suceda primero. B. Garantizamos los productos con partes móviles por 3 años. C. Garantizamos los demás productos por 5 años (productos
sin partes móviles), bajo las siguientes condiciones: 1) Todos los productos a que se refiere esta garantía, ampara su cambio físico, sin ningún cargo para el
consumidor. 2) El comercializador no tiene talleres de servicio, debido a que los productos que se garantizan no cuentan con reparaciones, ni refacciones, p1-ya
que su garantía es de cambio físico. 3) La garantía cubre exclusivamente aquellas partes, equipos o sub-ensambles que hayan sido instaladas de fábrica y
no incluye en ningún caso el equipo adicional o cualesquiera que hayan sido adicionados al mismo por el usuario o distribuidor. • Para hacer efectiva esta
garantía bastará con presentar el producto al distribuidor en el domicilio donde fue adquirido o en el domicilio de IC Intracom México, S.A.P.I. de C.V., junto con
los accesorios contenidos en su empaque, acompañado de su póliza debidamente llenada y sellada por la casa vendedora (indispensable el sello y fecha de
compra) donde lo adquirió, o bien, la factura o ticket de compra original donde se mencione claramente el modelo, número de serie (cuando aplique) y fecha
de adquisición. Esta garantía no es válida en los siguientes casos: Si el producto se hubiese utilizado en condiciones distintas a las normales; si el producto
no p1-ha sido operado conforme a los instructivos de uso; o si el producto p1-ha sido alterado o tratado de ser reparado por el consumidor o terceras personas.
REGULATORY STATEMENTS
FCC Class A
This equipment has been tested and found to comply with the limits for a Class A digital device, pursuant to Part 15 of the Federal Communications Commission
(FCC) Rules. These limits are designed to provide reasonable protection against harmful interference when the equipment is operated in a commercial
environment. This equipment generates, uses and can radiate radio frequency energy, and if not installed and used in accordance with the instruction manual
may cause harmful interference to radio communications. Operation of this equipment in a residential area is likely to cause harmful interference, in which
case the user will be required to correct the interference at his own expense. Any changes or modifications made to this equipment without the approval of the
manuafacturer could result in the product not meeting the Class A limits, in which case the FCC could void the user’s authority to operate the equipment.
CE
ENGLISH : This device complies with the requirements of CE 2014/30/EU (UKCA Electromagnetic Compatibility Regulations 2016) and / or
2014/35/EU (UKCA Electrical Equipment [Safety] Regulations 2016). The Declaration of Conformity for is available at:
DEUTSCH : Dieses Gerät enspricht der CE 2014/30/EU und / oder 2014/35/EU. Die Konformitätserklärung für dieses Produkt finden Sie unter:
ESPAÑOL : Este dispositivo cumple con los requerimientos de CE 2014/30/EU y / o 2014/35/EU. La declaración de conformidad esta disponible en:
FRANÇAIS : Cet appareil satisfait aux exigences de CE 2014/30/EU et/ou 2014/35/EU. La Déclaration de Conformité est disponible à :
POLSKI : Urządzenie spełnia wymagania CE 2014/30/EU I / lub 2014/35/EU. Deklaracja zgodności dostępna jest na stronie internetowej producenta:
ITALIANO : Questo dispositivo è conforme alla CE 2014/30/EU e / o 2014/35/EU. La dichiarazione di conformità è disponibile al:
support.intellinet-network.com/barcode/561945
10G PoE++
Injector
Instructions
Model 561945
(
IP I - 9 5 -10 G
)

1
4 2
3
5
PSE sur quatre paires, quelle que soit la classe PD,
y compris Cisco Universal Power over Ethernet) ;
Legacy 802.3bt (pour les PD qui ne sont pas en
pleine conformité avec 802.3bt/at/af). REMARQUE :
si vous n’êtes pas sûr de la norme qui convient dans
votre cas, il est prudent d’essayer chaque réglage.
DEL : Un voyant LED PWR allumé signifie que
l’injecteur est alimenté. Un voyant LED PoE signifie que
le DP connecté est alimenté. Une LED PoE Max allumée
signifie que l’utilisation du PoE est à 80 % du maximum.
Vous trouvez les spécifications sur
intellinetnetwork.com. Enregistrez votre produit
sur register.intellinet-network.com/r/561945 ou
scannez le code QR figurant sur la couverture.
POLSKI
Umiejscowienie
Adapter injector należy umieścić na czystej, stabilnej
powierzchni lub zamontować na ścianie. W
przypadku montażu ściennego należy zamontować
dwie śruby w ścianie w odległości od powierzchni
z tyłu adaptera. Adapter należy umieścić nad nimi i
wyregulować aż do momentu jego zamocowania.
Konfiguracja
1 Podłączyć gniazdo uziemienia do instalacji
uziemiającej, aby zabezpieczyć sprzęt
przed zewnętrznymi skokami napięcia.
2 Przy użyciu dostępnego kabla Ethernet (Cat5e
min.; prędkość 10G wymaga zastosowania kabli
Cat6), podłącz port LAN na swoim switchu non-
PoE do portu Data In w adapterze Injector.
3 Przy użyciu dostępnego kabla Ethernet (Cat5e
min.; prędkość 10G wymaga zastosowania
kabli Cat6), podłącz zasilane urządzenie
(PD; zgodne ze standardem IEEE 802.3bt/at/
af) do portu PoE Out adaptera Injector.
4 Użyj dołączonego kabla, aby podłączyć
zasilanie do adaptera.
5 Wybierz standard PoE podłączonego urządzenia PD:
802.3bt (pełna kompatybilność z urządzeniami PD
802.3bt/at/af); UPoE (dla urządzeń PD obsługujących
maksymalną moc z urządzenia PSE przesyłaną po
czterech patach skrętki, niezależnie od klasy PD, w
tym Cisco Universal Power over Ethernet); Legacy
802.3bt (dla urządzeń PD nie posiadających pełnej
zgodności z 802.3bt/at/af). UWAGA: w przypadku
braku pewności co do wymaganego standardu
można podjąć próbę każdego ustawienia.
Diody LED: Świecąca dioda LED PWR oznacza, że
adapter Injector jest podłączony do zasilania. Kiedy
świeci się dioda LED PoE, oznacza to, że podłączone
urządzenie jest zasilane. Świecąca dioda PoE Max
oznacza, że zużycie PoE wynosi 80% maksymalnego.
Specyfikacja techniczna dostępna jest na stronie
intellinetnetwork.com. Zarejestruj produkt na
register.intellinet-network.com/r/561945 lub
zeskanuj znajdujący się na pokrywie kod QR.
ITALIANO
Posizionamento
Posizionare l’iniettore su una superficie pulita e stabile
o fissarlo a una parete. Per il montaggio a parete,
installare due viti nella parete rispettando la distanza
degli spazi presenti sul retro dell’iniettore. Posizionarvi
l’iniettore sopra regolandolo fino a renderlo stabile.
Configurazione
1 Collegare il terminale di messa a terra a un oggetto
di messa a terra per proteggere l’apparecchiatura
da sovratensioni elettriche esterne.
2 Utilizzando il cavo Ethernet (Cat5e min.; per
le velocità 10G sono necessari cavi Cat6),
collegare una porta LAN sull’interruttore
non PoE alla porta Data In dell’iniettore.
3 Utilizzando il cavo Ethernet (Cat5e min.; per le
velocità 10G sono necessari cavi Cat6), collegare
il dispositivo alimentato (PD; IEEE 802.3bt/at/af)
alla porta di uscita PoE (PoE Out) sull’iniettore.
4 Usare i cavi di alimentazione inclusi per
connettere l’inietttore alla presa di rete AC.
5 Selezionare lo standard PoE del PD collegato:
802.3bt (per PD 802.3bt/at/af completamente
conformi); UPoE (per PD che supportano la
massima potenza da PSE su quattro coppie,
indipendentemente dalla classe PD, incluso Cisco
Universal Power over Ethernet); Legacy 802.3bt
(per PD non pienamente conformi a 802.3bt/at/af).
NOTA: se non si è sicuri dello standard richiesto,
è possibile provare ogni impostazione.
LED: Un LED PWR acceso significa che l’alimentazione
è fornita all’iniettore. Un LED PoE acceso significa che
il PD collegato riceve energia. Un LED PoE Max acceso
indica che l’utilizzo di PoE è all’80% del massimo.
Per ulteriori specifiche, visita il sito
intellinetnetwork.com. Registra il tuo prodotto
su register.intellinet-network.com/r/561945 o
scansiona il codice QR presente sulla copertina.
DEUTSCH
Platzierung
Platzieren Sie diesen Injektor auf einer sauberen,
stabilen Oberfläche oder befestigen Sie ihn
an einer Wand. Bei der Wandmontage bringen
Sie zwei Schrauben in der Wand im Abstand
der Zwischenräume auf der Rückseite des
Injektors an. Platzieren Sie den Injektor darauf
und justieren Sie ihn so, dass er sicher hält.
Einrichtung
1 Verdrahten Sie die Erdungsklemme mit
einem Erdungsobjekt, um das Gerät vor
externen Überspannungen zu schützen.
2 Verwenden Sie ein Ethernet-Kabel (mindestens
Cat5e; Für 10G-Geschwindigkeiten sind Cat6-
Kabel erforderlich.), um einen LAN-Anschluss
an Ihrem Nicht-PoE-Switch mit dem „Data
In“-Anschluss des Injektors zu verbinden.
3 Verbinden Sie Ihr Powered Device (IEEE 802.3af/at/
bt-Standard) über ein Ethernet-Kabel (mindestens
Cat5e; Für 10G-Geschwindigkeiten sind Cat6-Kabel
erforderlich.) mit dem PoE Out-Port des Injektors.
4 Schließen Sie den Injektor über das beiliegende
Stromkabel an eine Steckdose an.
5 Wählen Sie den PoE-Standard des angeschlossenen
PD: 802.3bt (für vollständig konforme 802.3bt/at/
af-PDs); UPoE (für PDs, die die maximale Leistung
eines PSE über vier Adernpaare unterstützen,
unabhängig von der PD-Klasse, inklusive Cisco
Universal Power over Ethernet); Legacy 802.3bt
(für PDs, die nicht vollständig konform mit
802.3bt sind). HINWEIS: Wenn Sie sich nicht sicher
sind, welchen Standard Sie benötigen, ist es zur
Sicherheit besser, jede Einstellung ausprobieren.
LED: Eine leuchtende PWR-LED zeigt an, dass der
Injektor mit Strom versorgt wird. Eine leuchtende
PoE-LED zeigt an, dass das angeschlossene
PD-Gerät mit Strom versorgt wird. Eine
leuchtende PoE Max-LED bedeutet, dass die
PoE-Nutzung bei 80 % des Maximums liegt.
Die Spezifikationen finden Sie auf
intellinetnetwork.com. Sie Ihr Produkt auf
register.intellinet-network.com/r/561945 oder
scannen Sie den QR-Code auf dem Deckblatt.
ESPAÑOL
Colocación
Coloque este inyector sobre una superficie
limpia y estable o móntelo en la pared. Para el
montaje en la pared, coloque en esta dos tornillos
a la misma distancia que los huecos de la parte
posterior del inyector. Coloque el inyector sobre
los tornillos y apriételos hasta que quede fijado.
Configuración
1 Conecte un cable desde la conexión de
tierra a un objeto con toma de tierra, así
el equipo estará protegido frente a
sobrecargas eléctricas de origen externo.
2 Utilizando el cable Ethernet (Cat5e min.; los cables
Cat6 se requieren para las velocidades 10G), conecte
un puerto LAN en el conmutador sin PoE al puerto
de entrada de datos (Data In) del inyector.
3 Utilizando el cable Ethernet (Cat5e min.; los
cables Cat6 se requieren para las velocidades
10G), conecte su dispositivo alimentado (PD;
Compatible con IEEE 802.3bt/at/af) al puerto
de salida PoE (PoE Out) del inyector.
4 Utilice el cable de corriente incluido para
conectar el inyector a una toma de corriente.
5 Seleccione el estándar PoE del PD conectado:
802.3bt (para PDs totalmente compatibles con
802.3bt/at/af); UPoE (para PDs que soportan
la máxima potencia de PSE sobre cuatro
pares, independientemente de la clase de PD,
incluyendo la Alimentación Universal sobre
Ethernet de Cisco); Legacy 802.3bt (para PDs
que no cumplen totalmente con 802.3bt/at/af).
NOTA: si no está seguro del estándar que necesita,
es seguro probar cada configuración.
LED: Un LED PWR iluminado significa que se
suministra energía al inyector. Un LED PoE iluminado
significa que la PD conectada está recibiendo
energía. Un LED PoE Max encendido significa
que el uso de PoE es del 80 % del máximo.
Para más especificaciones, visite
intellinetnetwork.com. Registre el producto
en register.intellinet-network.com/r/561945
o escanee el código QR en la cubierta.
FRANÇAIS
Placement
Placez cet injecteur sur une surface propre et stable,
ou montez-le sur un mur. Pour le montage mural,
installez deux vis dans le mur à la distance des espaces
situés à l’arrière de l’injecteur. Placez l’injecteur
par-dessus et réglez-le jusqu’à ce qu’il soit bien fixé.
Configuration
1 Câblez la borne de mise à la terre à un objet
de mise à la terre pour protéger l’équipement
contre les surtensions électriques externes.
2 En utilisant le câble Ethernet (Cat5e min. ; des
câbles Cat6 sont nécessaires pour les vitesses 10G.),
connectez un port LAN sur votre commutateur
non PoE au port d’entrée ‘Data In’ de l’injecteur.
3 En utilisant le câble Ethernet (Cat5e min. ; des
câbles Cat6 sont nécessaires pour les vitesses
10G.), connectez votre périphérique alimenté
(DP ; conforme à la norme IEEE 802.3bt/at/af)
au port de sortie ‘PoE Out’ sur l’injecteur.
4 Connectez l’injecteur via le cordon
d’alimentation inclus à une prise de courant.
5 Sélectionnez la norme PoE du périphérique
connecté : 802.3bt (pour les PD entièrement
conformes 802,3 bt/at/af) ; UPoE (pour les PD qui
prennent en charge la puissance maximale de
Product Specifications
| Brand: | Intellinet |
| Category: | Switch |
| Model: | 561945 |
Do you need help?
If you need help with Intellinet 561945, ask a question below and other users will answer you
Switch Intellinet User Manuals

15 October 2024
15 October 2024
15 October 2024
15 October 2024
15 October 2024
15 October 2024
15 October 2024
15 October 2024
15 October 2024
14 October 2024
Switch User Manuals
- Switch Bosch
- Switch IKEA
- Switch Huawei
- Switch HP
- Switch EBERLE
- Switch Lancom
- Switch TP Link
- Switch Totolink
- Switch D-Link
- Switch StarTech.com
- Switch Cudy
- Switch Extron
- Switch Lindy
- Switch Ecler
- Switch Digitus
- Switch LevelOne
- Switch Engenius
- Switch CyberPower
- Switch CSL
- Switch Smart-AVI
- Switch Generac
- Switch Dahua Technology
- Switch Cambium Networks
- Switch ORNO
- Switch Planet
- Switch PCE
- Switch Equip
- Switch Mikrotik
- Switch Speaka
- Switch Alcatel
- Switch Elation
- Switch Logilink
- Switch Advantech
- Switch Atlona
- Switch Robbe
- Switch Crestron
- Switch IPGARD
- Switch PureLink
- Switch Blustream
- Switch WHALE
- Switch Tenda
- Switch Suevia
- Switch ZyXEL
- Switch Homematic IP
- Switch Setti+
- Switch Trendnet
- Switch Kaiser
- Switch QNAP
- Switch Rex
- Switch Juniper
Latest Switch User Manuals
27 October 2024
27 October 2024
27 October 2024
27 October 2024
26 October 2024
26 October 2024
26 October 2024
26 October 2024
26 October 2024
26 October 2024